# 1 of 1s
Source: https://kingdomly.mintlify.app/market/creator-mint/art-projects/1-of-1s
## Creating a 1 of 1s art project
To create a 1 of 1s art project, you can follow these steps or watch the video tutorial below:
Go to the Art Gallery.
Click on the "Create" button.
Select the "1 of 1s" option.
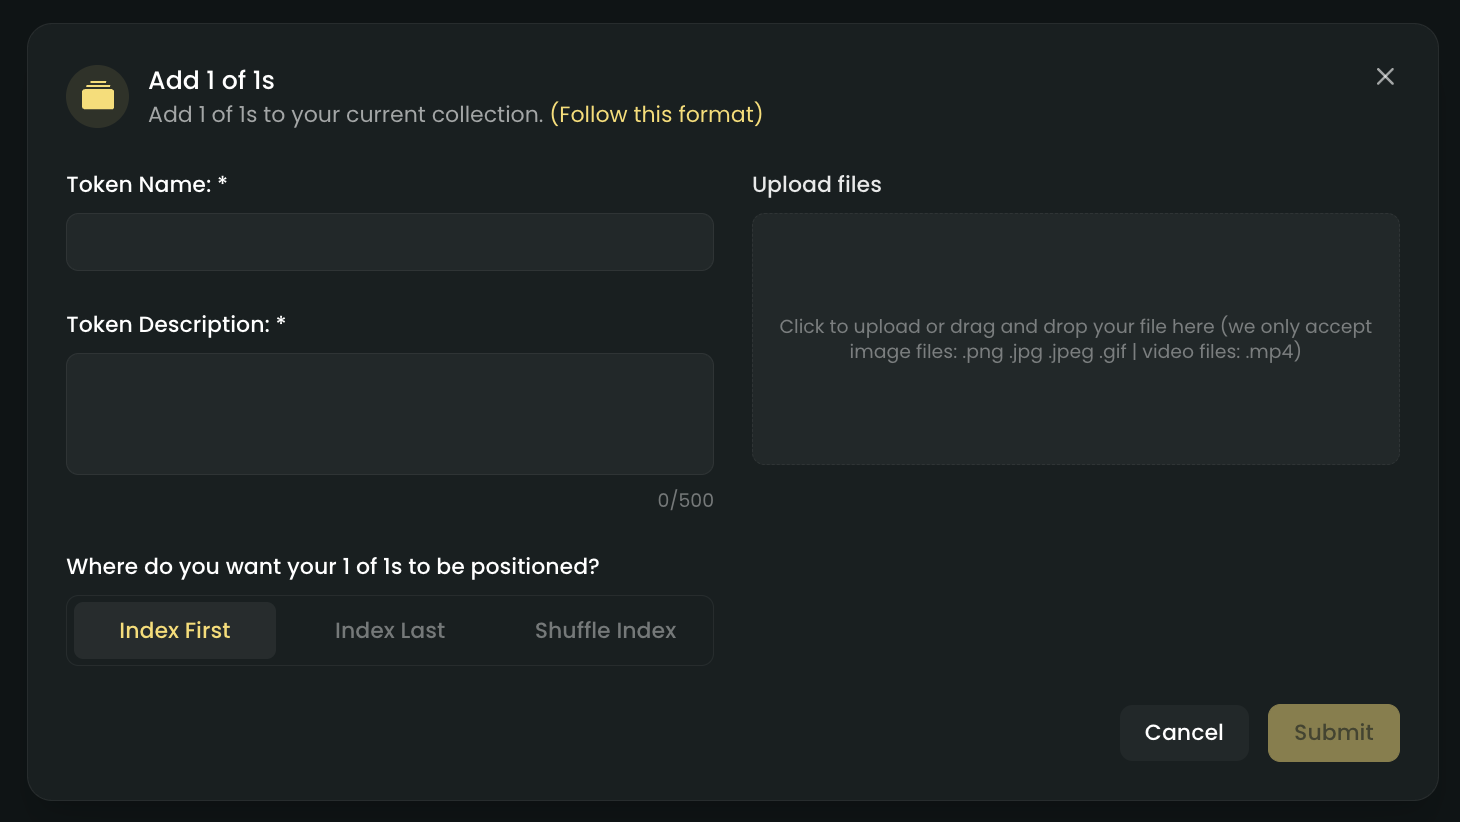
Select "Add 1 of 1s"
Set the name, description, and positioning you want to give to your 1 of 1s assets.
**Note:** Assets uploaded in one go will all have the same name, description, and positioning.
Upload assets and check the preview.
Publish your art project.
You will need to have atleast one asset uploaded to publish your art project
### Video tutorial
### Supported files
At the moment, these are the file types you can use for your 1 of 1s art project.
* Images (PNG, JPEG, GIF)
* Videos (MP4)
File sizes should be less than 10MB.
You may use this 1 of 1s sample zip as a template to get started.
We are working on adding more options soon, so you will have even more flexibility in the future!
### NFT positioning
When adding your 1 of 1s assets, you can choose to position them in the grid.
* **Index first:** This will position your 1 of 1s assets that you are going to upload to be the first in the list.
* **Index last:** This will position your 1 of 1s assets that you are going to upload to be the last in the list.
* **Shuffle index:** This will position your 1 of 1s assets that you are going to upload in a random order.
### Traits handling
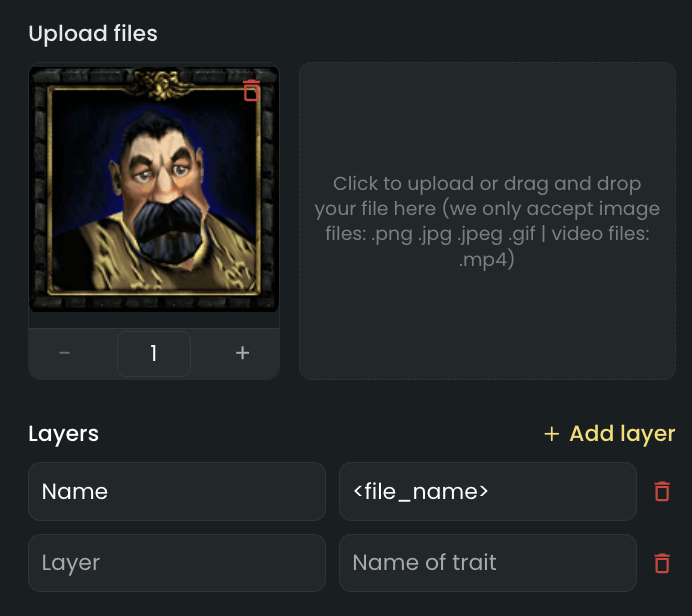
To add traits to your 1 of 1s assets, you must set it up while uploading your assets.
You can add as many traits as you want, but you will need to a key and a value for each trait.
If you set the value of a trait to ``, the value will be the name of the file you uploaded.
# Art Project FAQs
Source: https://kingdomly.mintlify.app/market/creator-mint/art-projects/art-project-faqs
Frequently asked questions about art projects
You can shuffle your collection by selecting the "Shuffle" button in the top right corner of the collection grid.
Once you randomize, you can't revert back to the previous order.
Once your 1 of 1s art project has been published, you cannot make changes to the assets or metadata that have already been uploaded. If you need to make updates, you will need to create a new project and upload the revised assets.
Yes, you can leave the page while your upload is in progress. You can check the status of your project upload by going to the same page you were on.
To check the contents of your base URI, simply paste the URI into your browser or use an IPFS gateway.
Example URI: `https://gateway.pinata.io/ipfs//`
Upload times can vary based on the number and size of assets you are uploading. Large collections or files close to the 10MB limit may take longer to process. If your upload seems unusually slow, you may open a ticket on our Discord and send the link to your art project.
Yes, you can use your own base URI. You can create a dummy art collection and pair it with your mint page project. After deploying your contract, you can set a custom URI for your mint project.
Yes, you can swap the mint page project with another art gallery project that has the same supply count.
## Bugs and Feedback
If you find any bugs with the art project, please open a ticket on our Discord and send the link to your art project.
# Art Project Overview
Source: https://kingdomly.mintlify.app/market/creator-mint/art-projects/art-project-overview
The content that makes up your NFT collection
## Overview
The Art Gallery is where creators generate and manage NFT assets before connecting them to a Mint Page. It provides tools for organizing, customizing, and uploading assets without coding.
### What is an Art project for?
* **Create NFT collections from scratch:** Start new projects and build your NFT assets directly in the Art Gallery.
* **Support for all project types:** Manage 1/1s, generative collections, metadata-driven projects, or single asset drops.
* **Organize and upload assets:** Structure your files and upload them in the correct format for smooth minting.
* **Customize before minting:** Set up hierarchy, rarity, and custom rules for your collection.
* **Finalize and connect to a mint page:** Finish your art project and connect it to a mint pag project.
## Know your art project
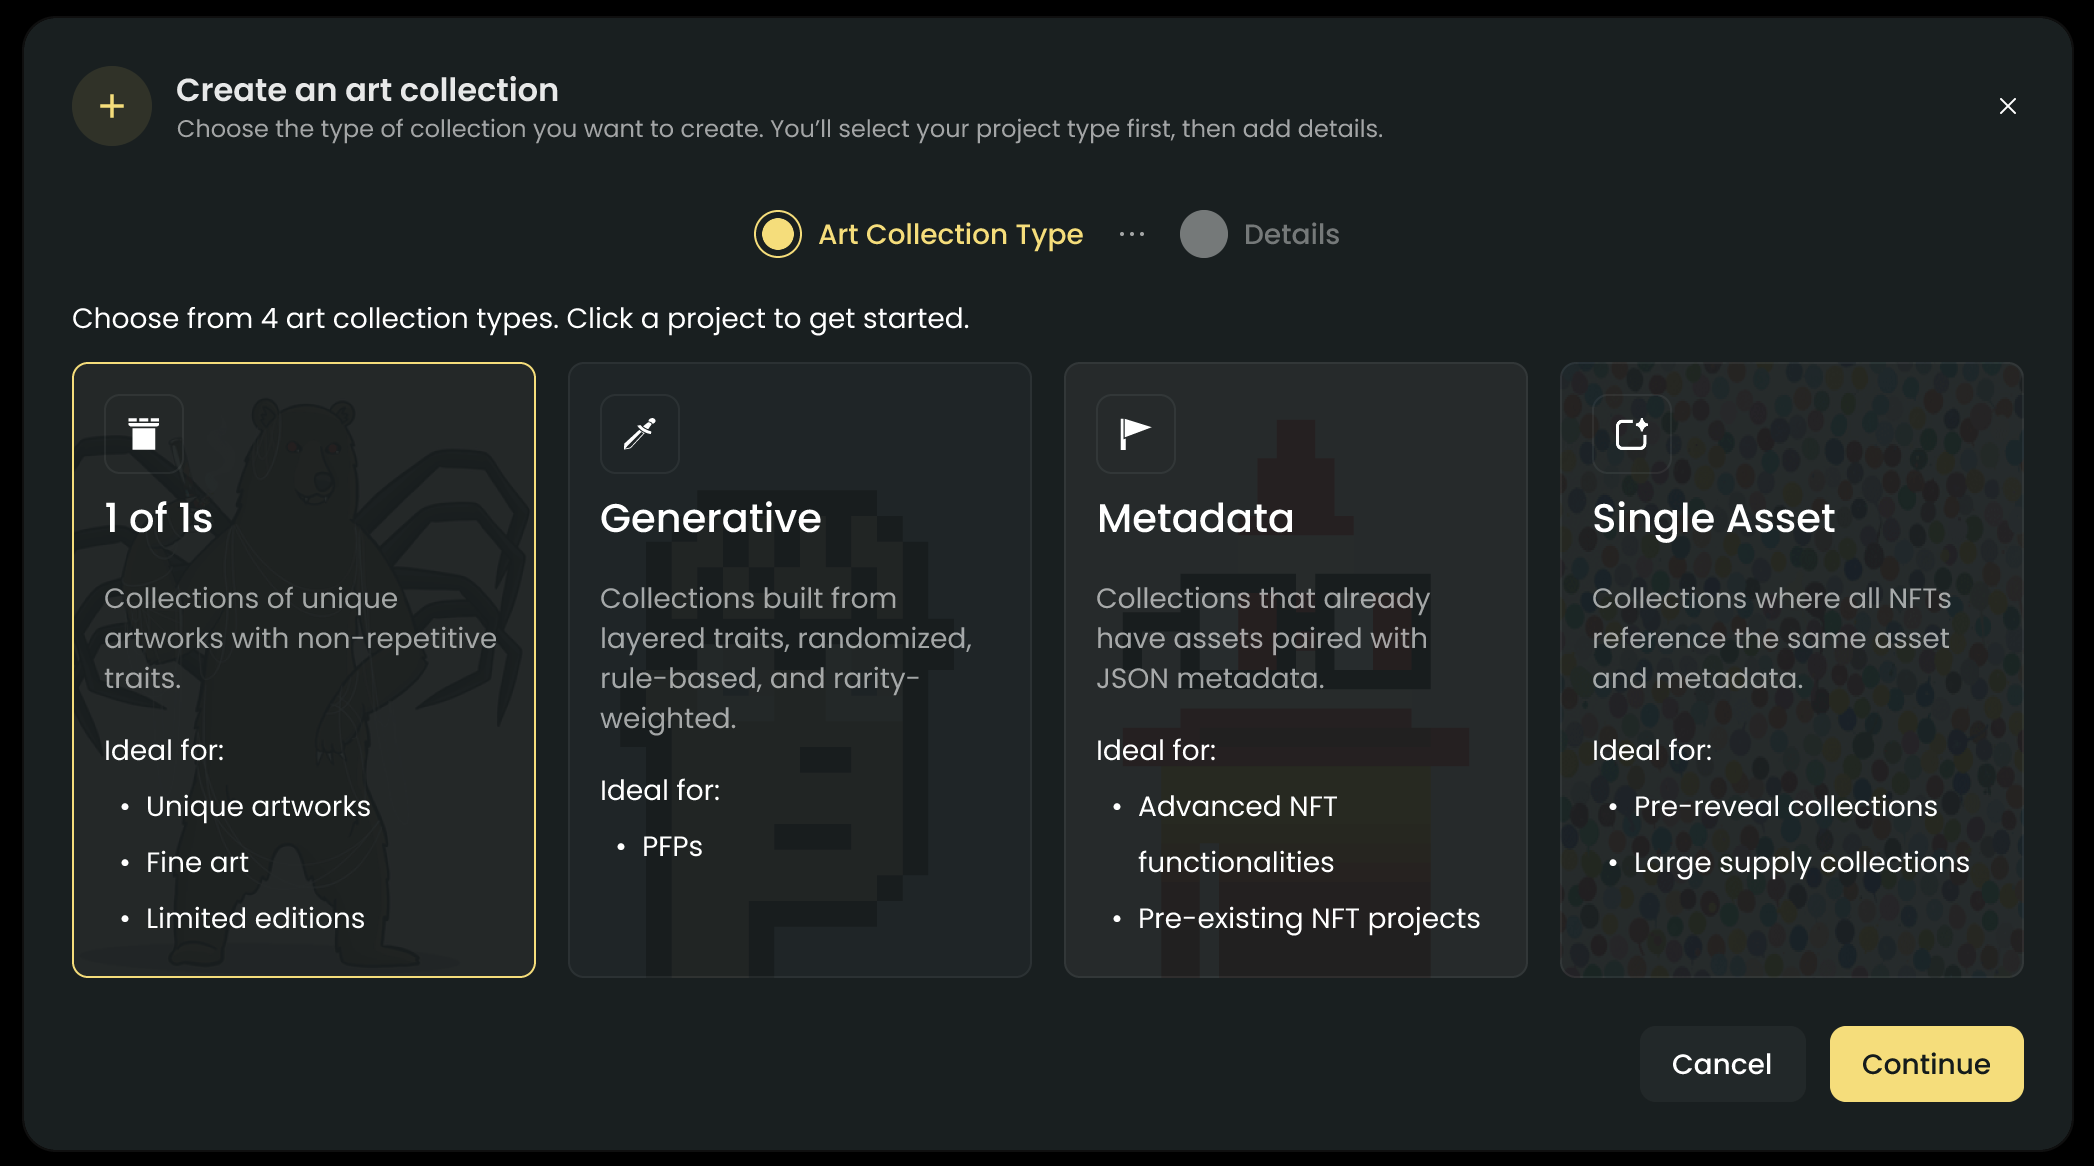
Kingdomly supports multiple types of art projects, each tailored to different creative needs and collection styles:
### 1 of 1s
Collections of unique artworks, where each NFT is distinct and has non-repetitive traits. These are usually a collection that are hand drawn or created by an artist without any algorithmic variations.
**Ideal for:**
* Unique artworks
* Fine art pieces
* Limited edition drops
* Collectible illustrations
**Example 1 of 1 projects:**
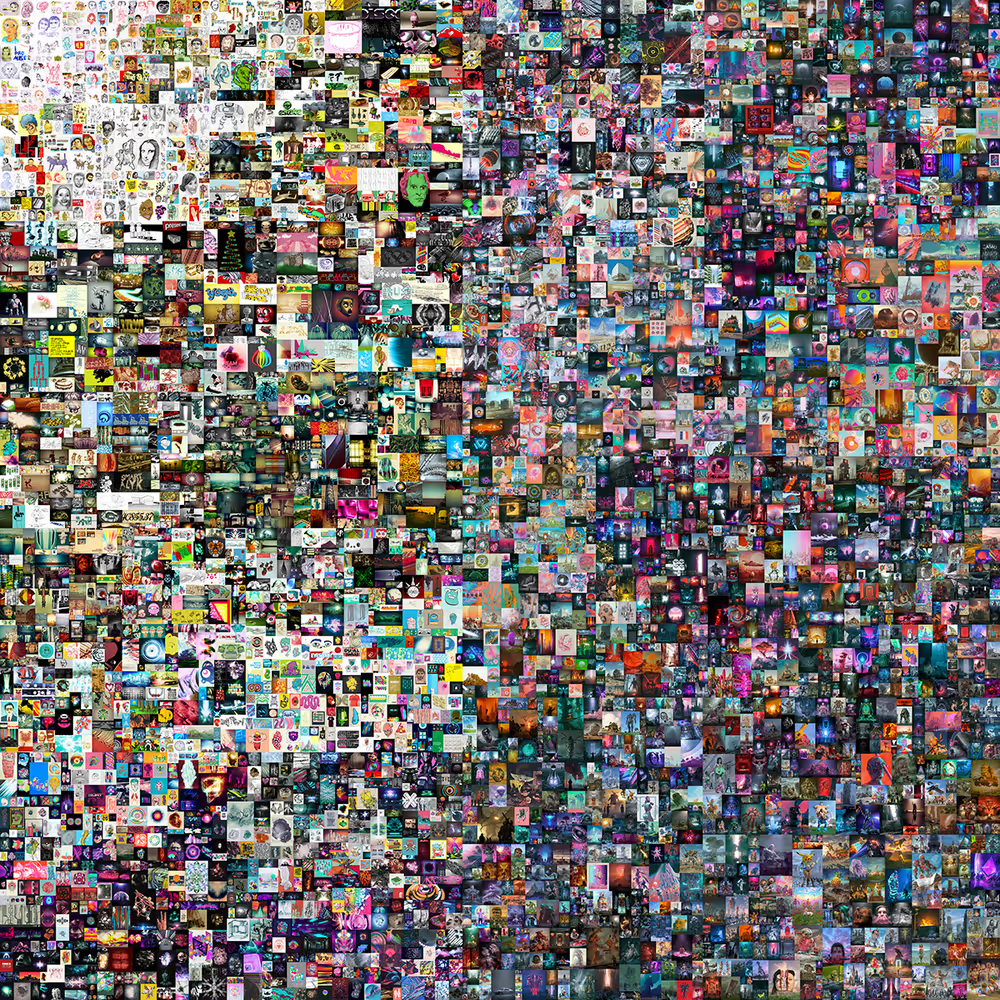
* Everydays the First 5000 Days
* Bong bears from berachain
### Generative
Collections built from layered traits, where assets are programmatically combined and randomized. You can set rules and rarity weights for each trait.
**Ideal for:**
* PFP (Profile Picture) collections
* Generative avatars
* Art with algorithmic variations
**Example generative projects:**
* Bored Ape Yacht Club
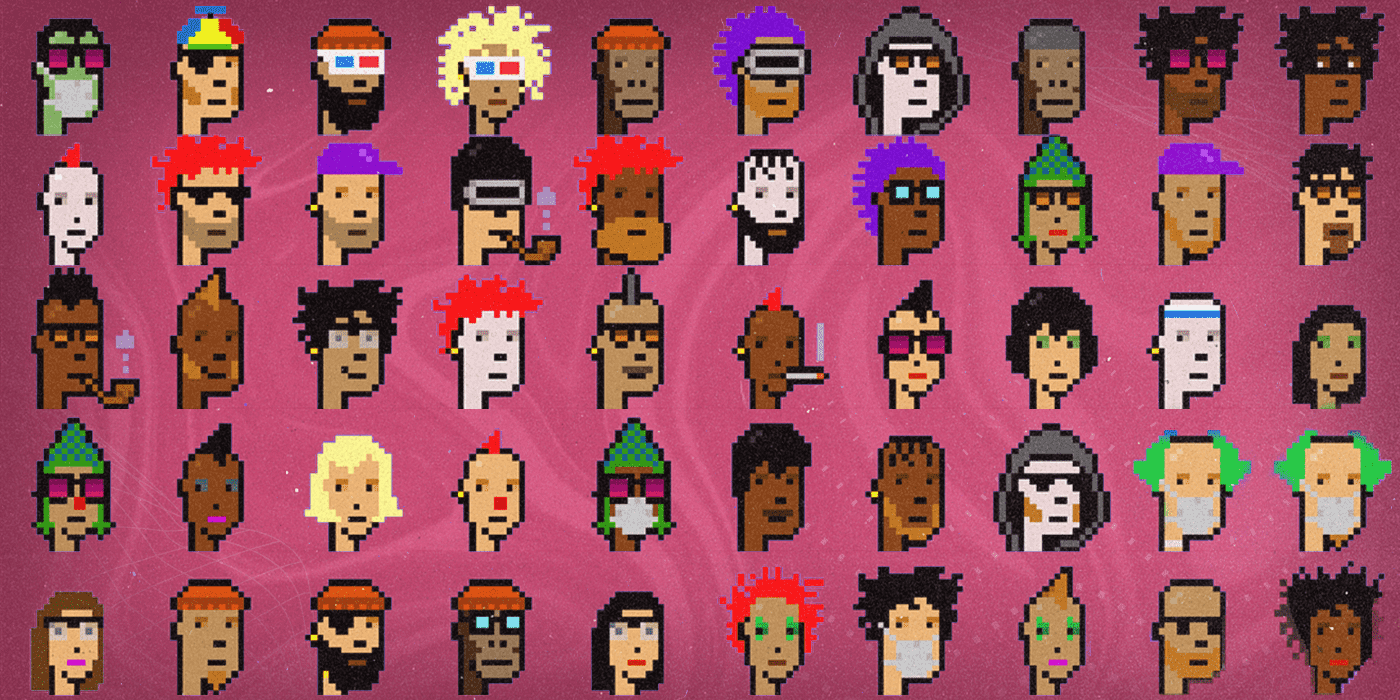
* CryptoPunks
* Pudgy Penguins
### Metadata
Collections where each asset is already paired with its own JSON metadata file. You can import your assets and metadata directly.
**Ideal for:**
* Advanced NFT functionalities (e.g., dynamic traits, on-chain data)
* Pre-existing NFT projects migrating to another chain
* Projects with custom metadata requirements
**Example metadata projects:**
* The Sandbox
* Axie Infinity
* Beramonium
### Single Assets
Collections where all NFTs reference the same asset and metadata. This is a simple way to create a large supply of identical NFTs.
**Ideal for:**
* Pre-reveal collections (where the real art is revealed later)
* Large supply collections (e.g., event tickets, membership passes)
* Simple badge or access token drops
**Example single asset projects:**
* Event Tickets
* Membership Passes
* Simple Badges
### Art project painpoints and solutions
**Usually, when creating an art project, you will encounter the following painpoints and questions:**
* Creating a new art project from scratch
* Uploading assets
* Setting up hierarchy, rarity, and rules (for generative art projects)
* What is the difference of layers, traits, tokens, and collections
**Solutions:**
* Use the art project type that best fits your creative vision and the use-case that you want to cover!
* Uploading assets vary depending on the art project type.
* Plan ahead. Create a collection plan before you start uploading assets and setting up your generative art project.
* Traits are the subset of a layer. Tokens are a subset of a collection. Collections are a subset of a project.
Choose the art project type that best fits your creative vision and the use-case that you want to cover!
# Generative
Source: https://kingdomly.mintlify.app/market/creator-mint/art-projects/generative
## Creating a generative art project
Generative art projects can be simple and complex, depending on the complexity of the layers you want to add. Creativity is the key to a successful generative art project.
To create a generative art project, you can follow these steps or watch the video tutorial below:
Go to the Art Gallery.
Click on the "**Create**" button.
Select the "**Generative**" option.
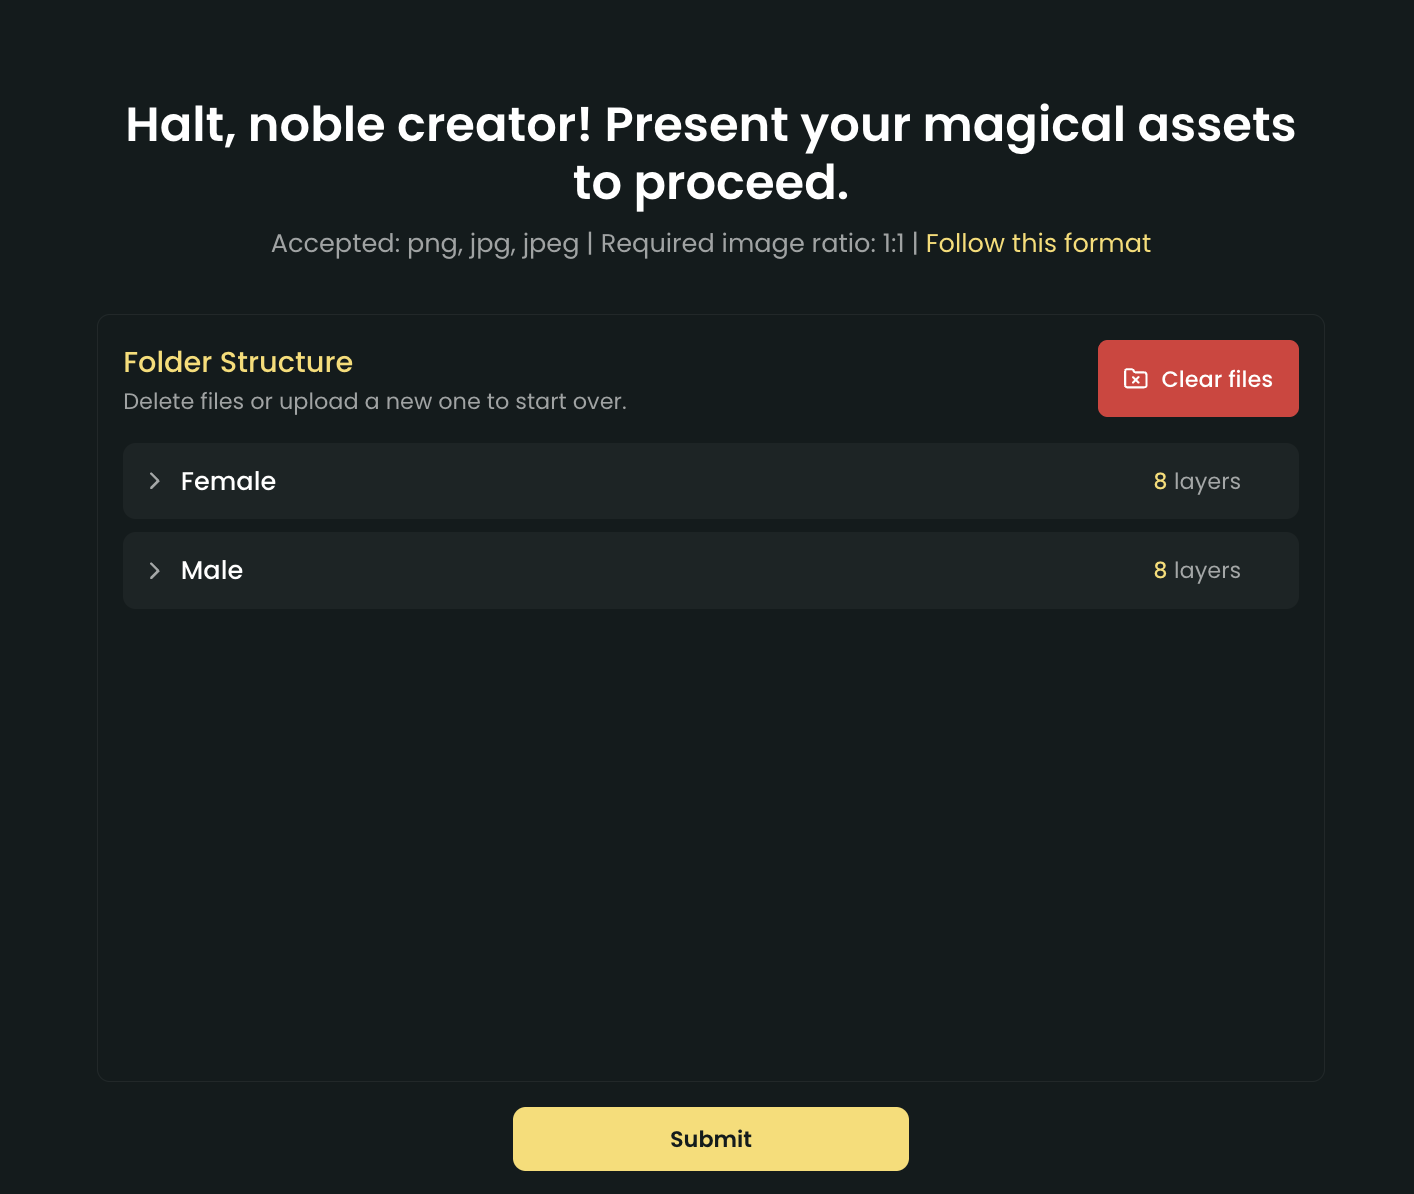
Upload your generative asset folder. You may refer here for the folder structure
Setup your layer hierarchy to make sure that your image are on top of the correct layers
Setup your trait rarity if you want to make certain traits more rare than others
Setup your rules to make sure that your traits will only appear if the certain rules are met
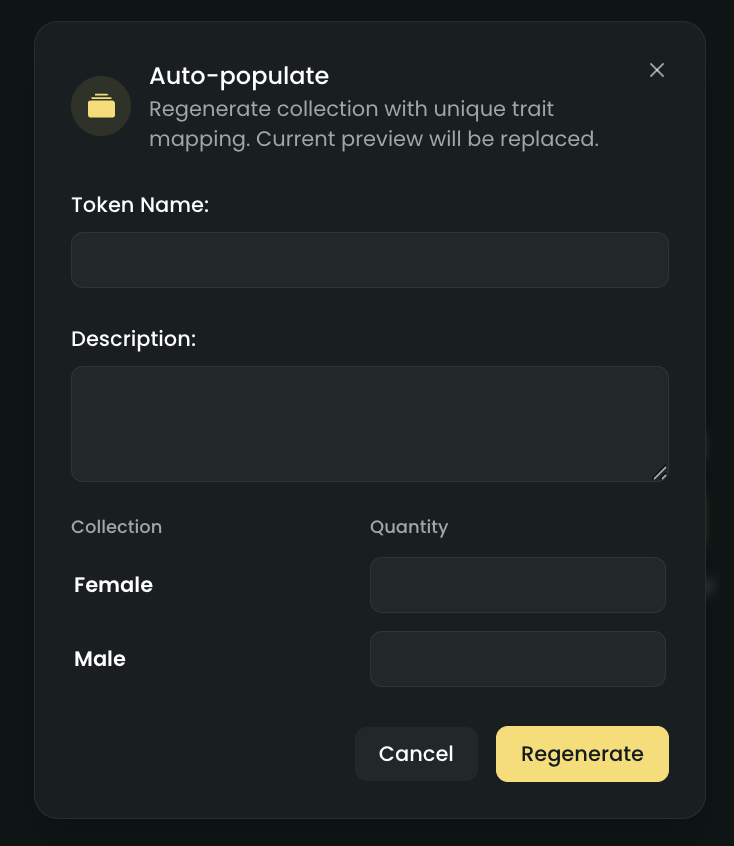
Set the **token name, description, and quantity** for each collection and generate your NFTs
The maximum quantity is determined by multiplying the number of traits in each layer together.
E.g, if you have 3 layers with 4, 5, and 6 traits respectively:\
Maximum Quantity = 4 × 5 × 6 = 120
Optional: Add 1 of 1s
Finalize your preview
Publish your art project.
You will need to have atleast one asset generated to publish your art project
### Video tutorial
***
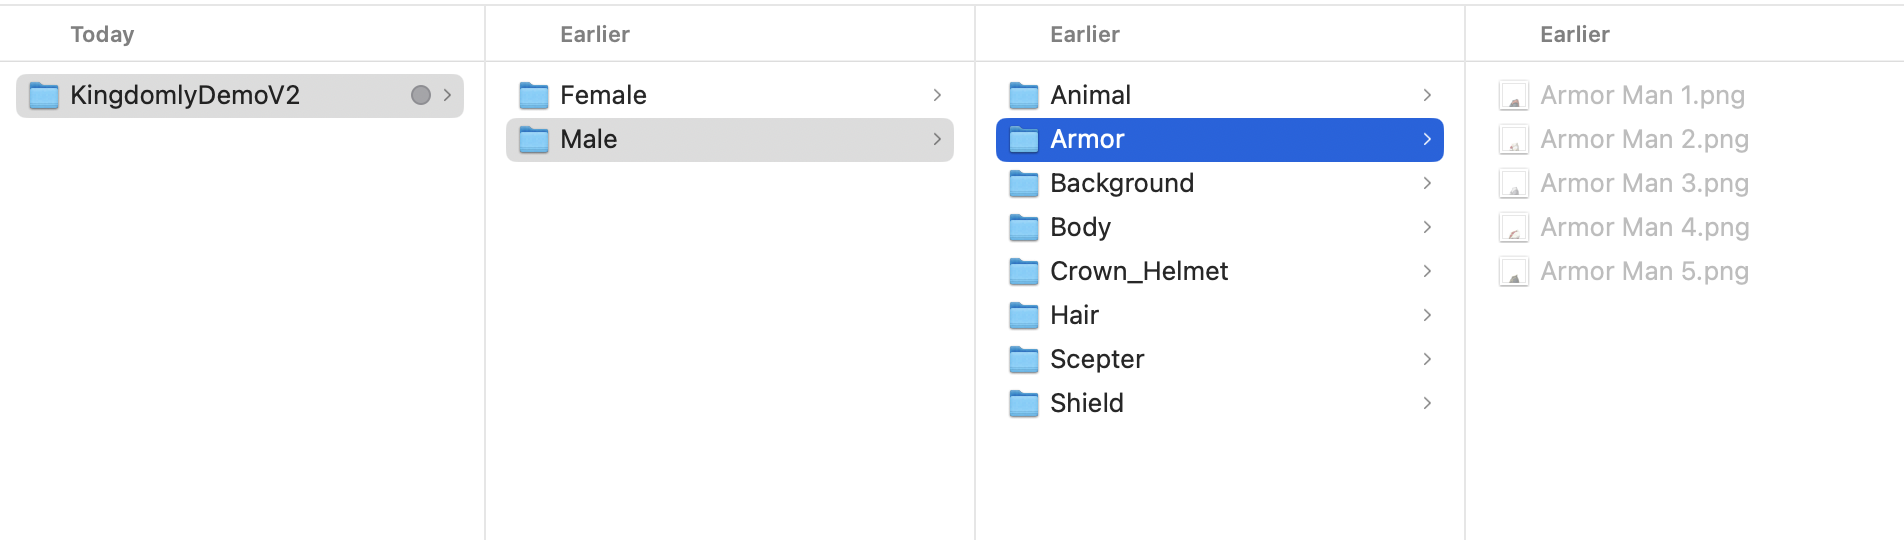
## Generative folder structure
The folder structure for a generative art project is as follows:
```
- collection_1
- layer_1
- trait_1.png
- trait_2.png
- layer_2
- trait_3.png
- trait_4.png
- collection_2 (optional)
- layer_1
- trait_1.png
- trait_2.png
- layer_2
- trait_3.png
- trait_4.png
```
**Warning:** Make sure that the **resolution of the traits are the same**. E.g. all ratio are set to 1:1
## Hierarchy setup
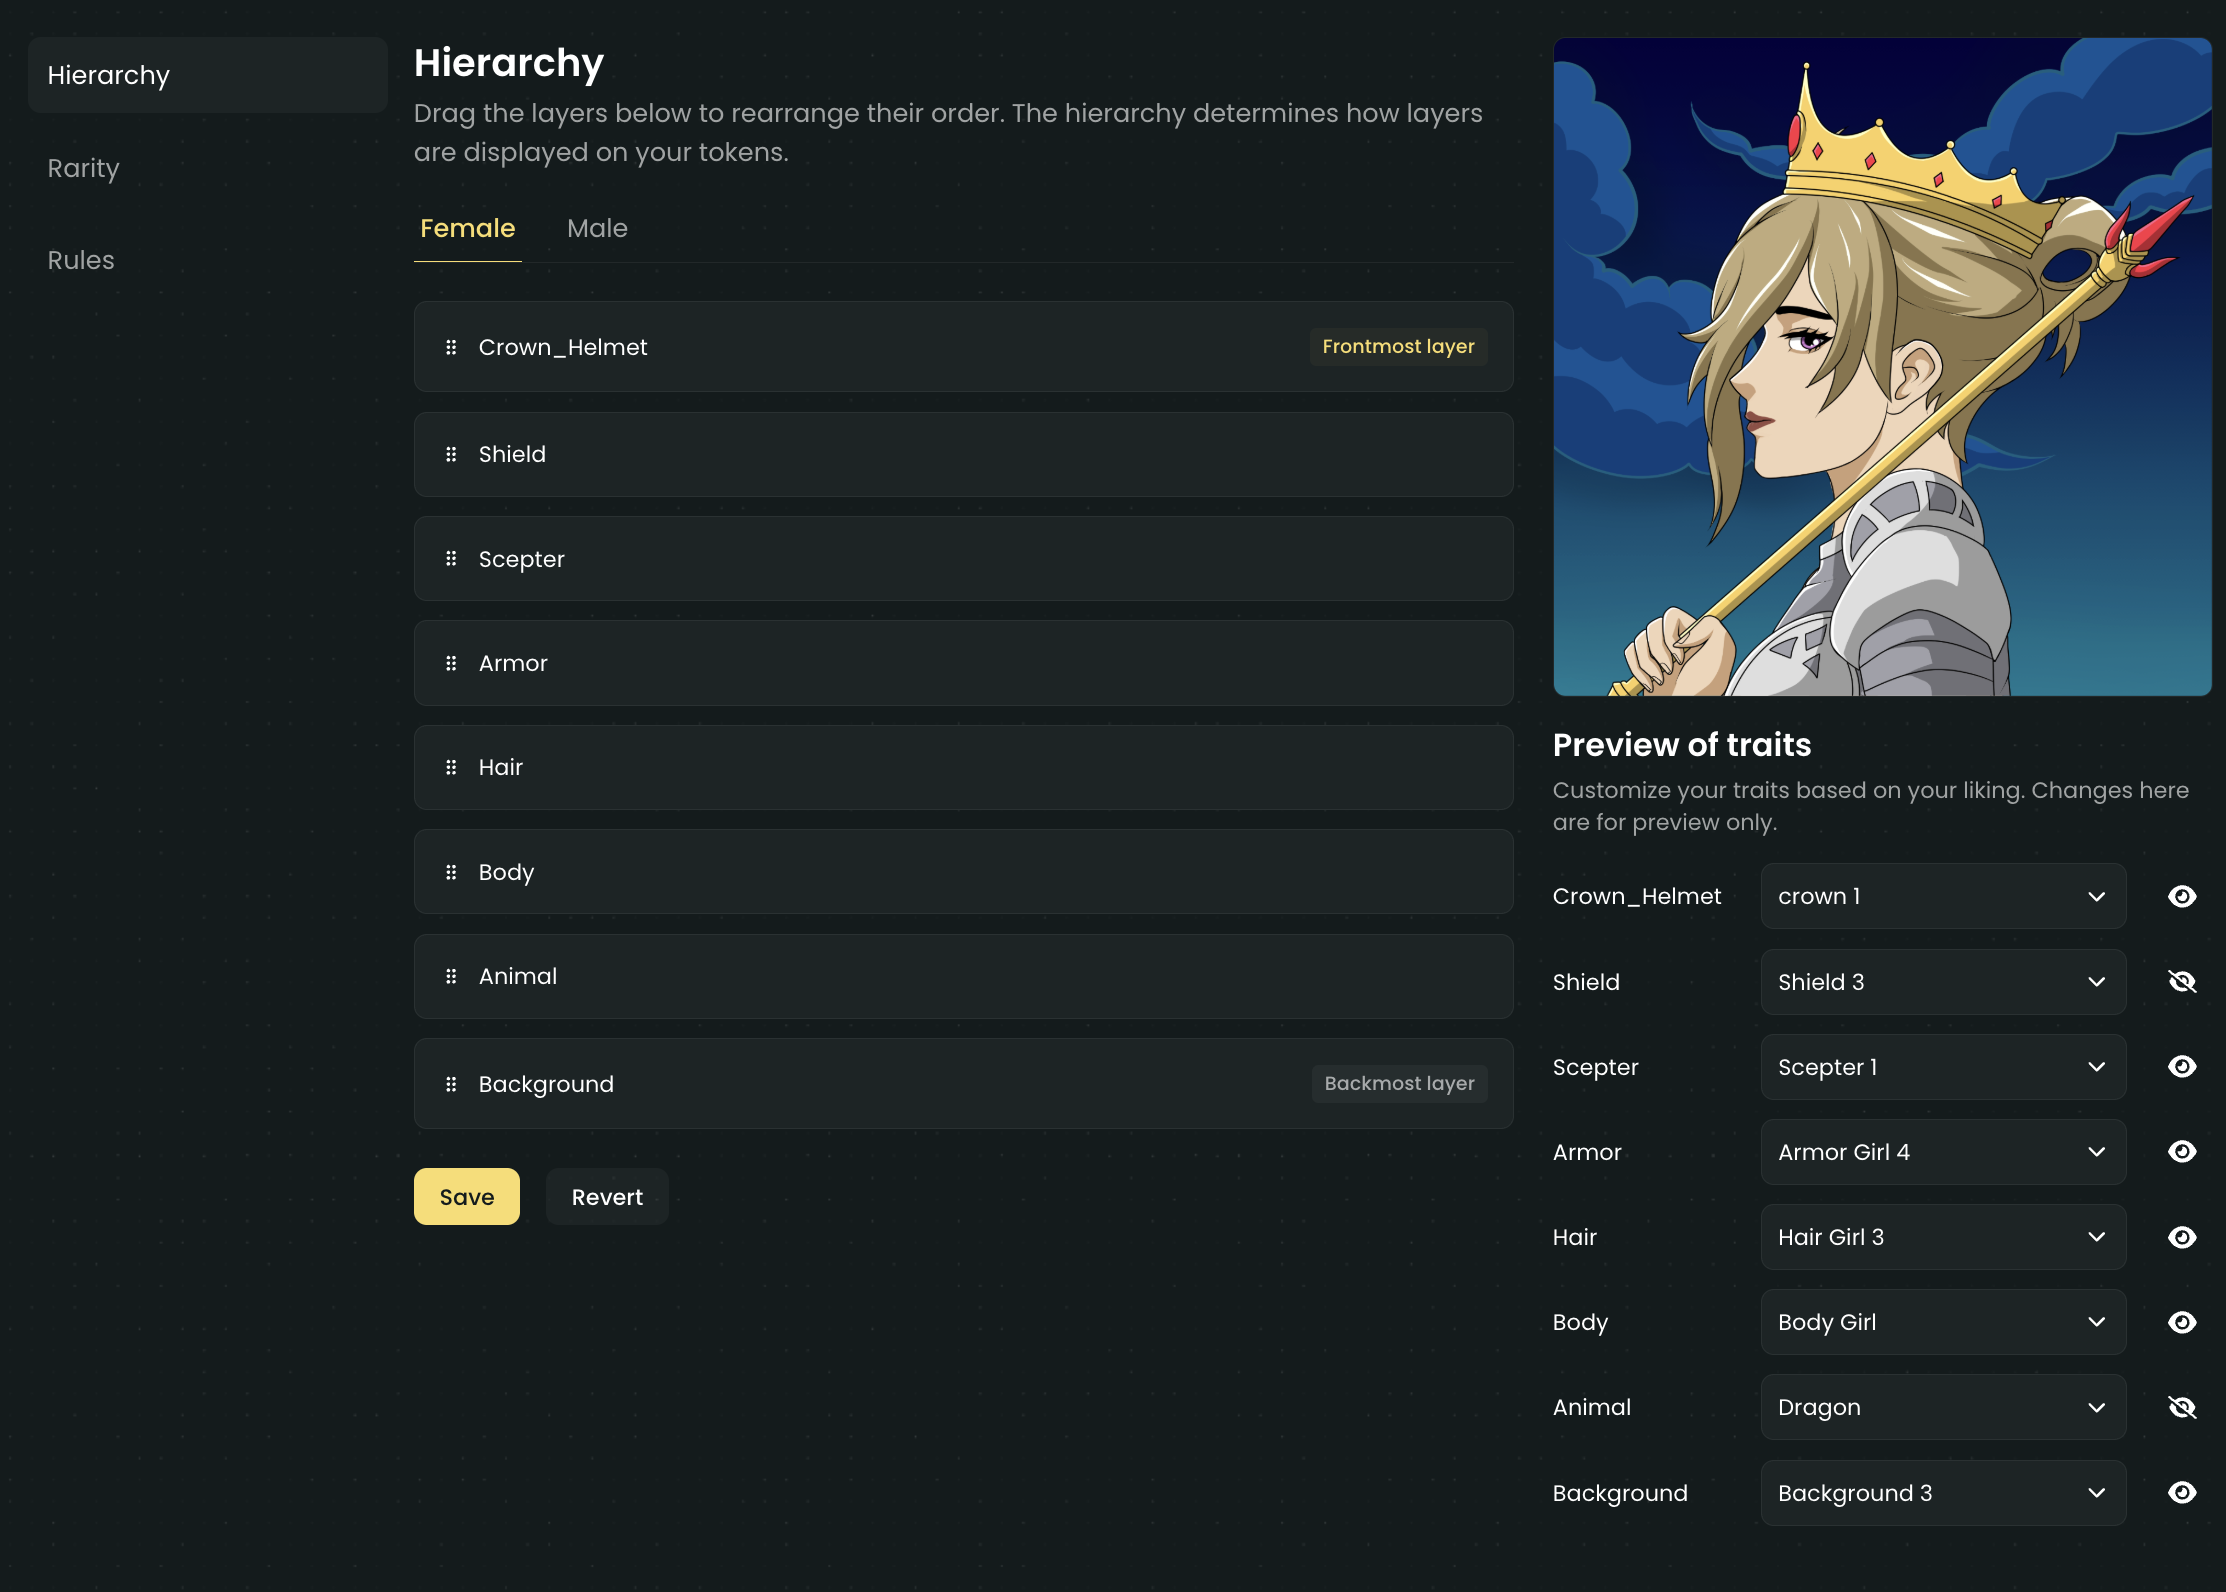
Hierarchy is important to make sure that your image are on top of the correct layers. You can setup your hierarchy by dragging and dropping the layers in the order you want.
To rename layers, you will need to go to the **rarity tab** and click on the **layer settings icon**. ""
**Hierarchy setup playbook:**
* **Folder structure** is important. Make sure that the **folder** and **file names** are final so that you will not need to bother with renaming them.
* The **first layer** is the **frontmost layer**. This layer will be the one that appears on top of the other layers.
* The **last layer** is the **backmost layer**. This layer will be the one that appears on the bottom of the other layers.
* Play around with the **trait preview** to ensure that all of your **traits** match the **layer hierarchies**. You can **select** or **hide** any trait and see how it looks on the preview.
* **Hierarchy** for each **collection** will be independent of each other. Double check the **collection tabs** and see if the hierarchy is set for each collection.
* Do not forget to **save your hierarchy** after you have set it up.
## Rarity setup
Rarity is important to make sure that your traits are distributed correctly across the collection. To edit the rarities of your traits in a generative art project, follow these steps:
Go to the **Rarity** tab in your project dashboard.
Find the layer you want to edit. Open the layer menu by clicking on the three dots or settings icon next to the layer name.
Click on **Edit Layer** to open the layer settings.
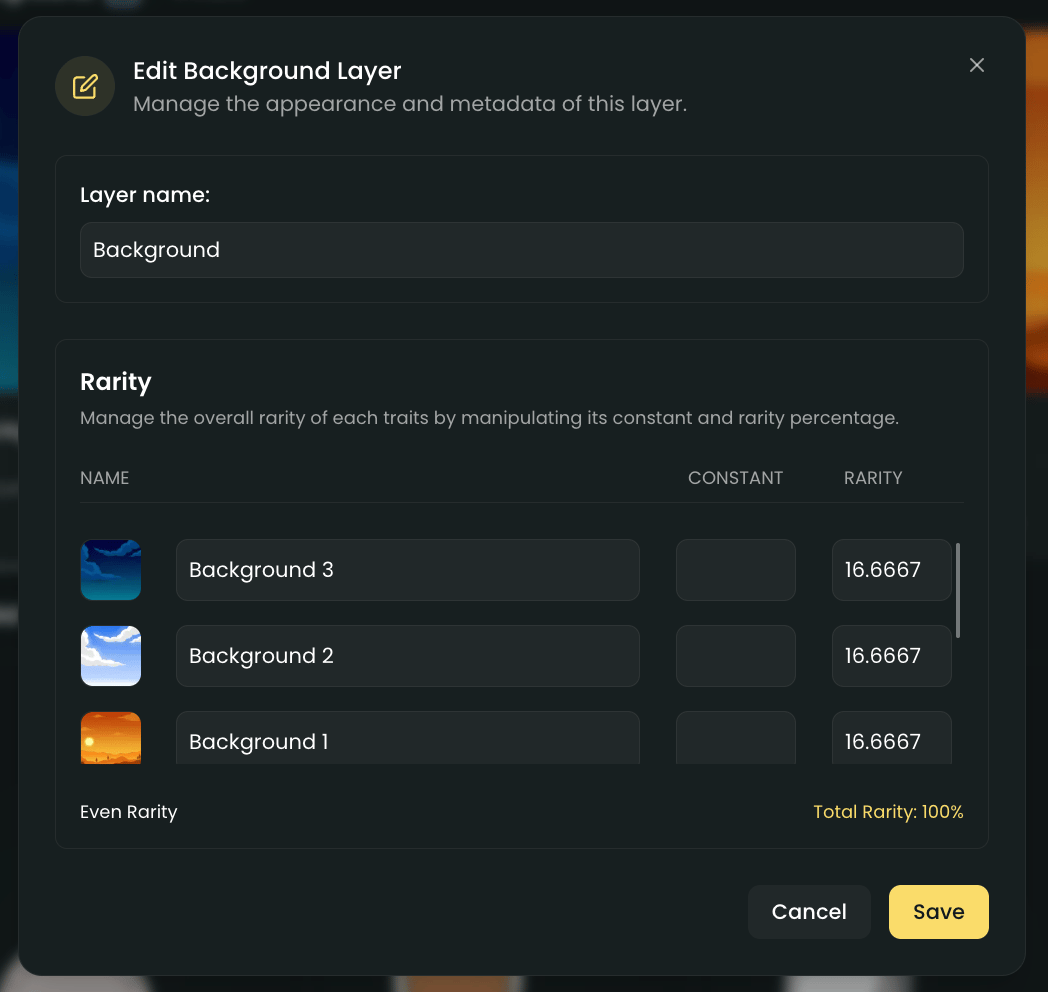
In the layer settings, you will see a list of traits. For each trait, set the desired rarity percentage or weight. This determines how often each trait will appear in your generated NFTs.
Make sure the total rarity for all traits in a layer adds up to 100 percent or the correct total weight, depending on the collection plan.
Optional: Utilize the **Constant** option to set a rarity cap for that specific trait.
The constant setting is not a sure fire way to guarantee a trait to appear in your collection. It is a way to limit the number of times a trait can appear randomly.
Save your changes to apply the new rarities.
Your updated rarities will now be used when re/generating your collection.To rename traits, you will need to go to the **rarity tab** and click on the **trait settings icon**.Adding layers/traits will set the rarity settings back to default. You will need to set them again.
**Rarity setup playbook:**
* Make sure the **total rarity** for all traits in a layer adds up to **100 percent** or the correct **total weight**, based on your collection plan.
* The **constant** setting does not guarantee that a trait will appear in your collection. It only limits how many times a trait can appear randomly.
* Create and follow a clear **rarity plan**. Keep it simple, as overly complex rarity settings can cause some traits to not appear in your collection.
* If the **rarity** and **rules** are not set correctly, a trait may not show up in your collection.
* Keep in mind that **art generation** is random. The **rarity setting** is a guide and does not guarantee an exact percentage.
* Make sure to **finalize your layers and traits before you setup your rarity settings**. Adding layers/traits will set the rarity settings back to default and you will need to set rarity settings again.
* **Rarity** for each **collection** will be independent of each other. Double check the **collection tabs** and see if the rarity is set for each collection.
* Always **save your changes** to ensure your new rarities are applied upon re/generating your collection.
## Rules setup
Rules is the final piece of the puzzle for your generative art project. Setting up your rules correctly will ensure that some traits are going to appear according to the rules you have set.
To edit the rules of your generative art project, follow these steps:
Go to the **Rules** tab in your project dashboard.
Select the collection you want to edit. (If you have multiple collections)
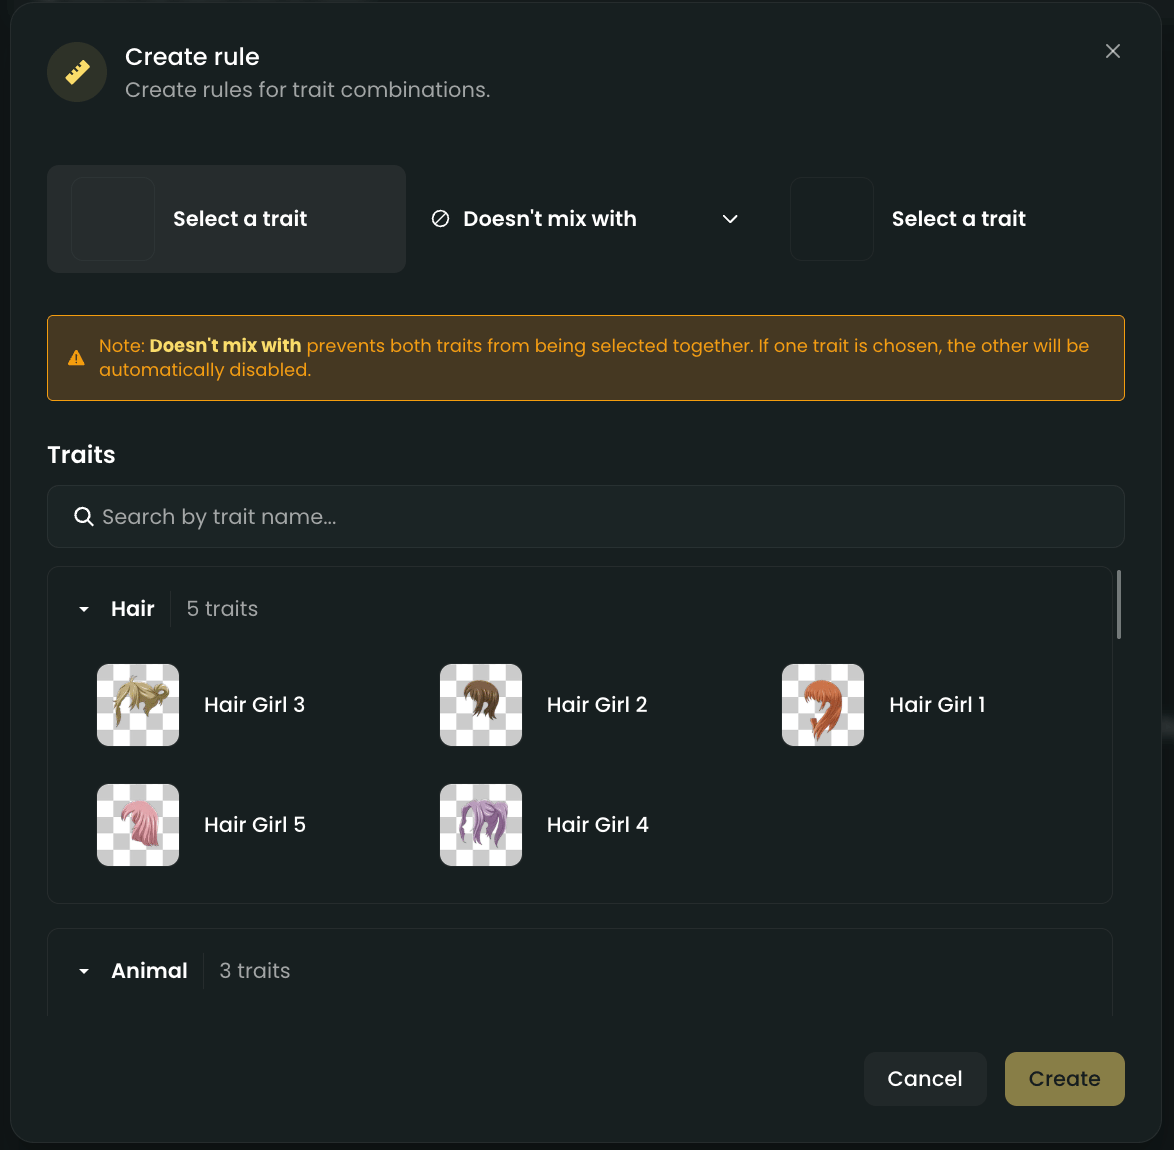
Click on **Add Rules** to open the rules settings.
Select first the rule you want to add.
Rule options are: **Doesnt mix with, Must pair with, and Always pairs with**
Select the trait you want to add the rule to, and select the other traits you want to apply the rule to.
Doesnt pair with will allow you to select multiple traits, but Always and Must pair with will only allow you to select one trait.
Hit create to add the rule.
Your updated rarities will now be used when re/generating your collection.
### Rule types:
* **Doesn't mix with:** This rule will **prevent** the trait you add the rule to from **appearing together** with the selected traits.\
Example: If you set "Red Hat" to not mix with "Blue Shirt", then no generated artwork will have both "Red Hat" and "Blue Shirt" at the same time.
* **Must pair with:** This rule will **ensure** that the trait you add the rule to will **always appear together** with the selected trait.\
Example: If you set "Sunglasses" to must pair with "Yellow Scarf", then every time "Sunglasses" appears, "Yellow Scarf" will also appear in that artwork.
* **Always pairs with:** This rule will **strictly require** that the trait you add the rule to will **only appear together** with the selected trait, and never separately.\
Example: If you set "Robot Arm" to always pair with "Metal Body", then "Robot Arm" will only ever show up when "Metal Body" is present, and never with any other body type
### **Rules Setup Playbook:**
* Make sure to **finalize** your **layers** and **traits** before you set up your **rules**.
* **Rules** for each **collection** are **independent** of each other. Double-check the **collection tabs** to ensure the **rules** are set for each **collection**.
* Try not to overuse **Must Pair With** and **Always Pairs With**. It is better to use **Doesn't Mix With**, since **Must Pair With** and **Always Pairs With** are strict rules and will limit the number of **traits** that can appear in your **collection**.
* You can add a **"None" trait** (a blank image) and use it to prevent a trait from mixing with anything else.
* **Always Pairs With** ensures that two **traits** are always selected together. If one **trait** is chosen, the paired **trait** will always be selected as well.
* You can add as many **rules** as you want, but you will need to add them **one by one**.
* Always **save your changes** to ensure your new **rules** are applied when you re/generate your **collection**.
* Experiment with re/generating your **collection** to see how the **rules** are applied.
If you find any bugs with the rules setup, please open a ticket on our Discord and send the link to your art project.
# IPFS Uploading
Source: https://kingdomly.mintlify.app/market/creator-mint/art-projects/ipfs-uploading
Uploading your art project to IPFS
## What is IPFS?
IPFS is a decentralized storage network that allows you to store and retrieve data without relying on a central server. It is a peer-to-peer network that allows you to store and retrieve data without relying on a central server.
## IPFS Uploading
**For 1 of 1s and generative art projects**, each generated asset will be uploaded to IPFS. Two respective uploads are needed to be made, one for the uploaded assets and one for the metadata json. Asset uploads are done by batches but the metadata json needs to be uploaded only once.
**What does this mean:**
* Upload speed will vary depending on the number of assets you are uploading.
* For every 500 assets (or one batch) uploaded, the image IPFS base uri will vary.
* The metadata json base URI will be the same for all assets.
**For single asset art projects**, only one asset and one metadata json will be uploaded to IPFS. The contract will point to one base URI instead of dynamically adding a token id to the end base URI.
**What does this mean:**
* Single asset art projects will be a lot faster to upload. This will be able to cater more supply of NFTs as well.
To bypass the 4000 NFT limit, please contact us on our Discord
* The metadata json base URI will be the same for all NFTs.
**For metadata art projects**, what you upload is what you get.
# JSON Structure
Source: https://kingdomly.mintlify.app/market/creator-mint/art-projects/json-structure
Sample metadata json for art projects
## Metadata Sample
Sample metadata json for art projects.
```
{
// Name of the NFT appended with the token id
"name": "NFT Sample #1",
// Description of the NFT
"description": "This is a sample NFT",
// Image is the IPFS CID of the NFT
"image": "ipfs://bafkreidhmbzhrei6tdvzblaizutlucqovkbypsz6icb3zwm4ja4dh7fqji/",
// Date is the timestamp of the NFT
"date": 1756288734923,
// Attributes is either auto generated or manually added
"attributes": [
{
"trait_type": "Background",
"value": "Beach"
},
{
"trait_type": "Hair",
"value": "Blonde"
},
{
"trait_type": "Clothing",
"value": "Tuxedo Suit"
},
{
"trait_type": "Eyes",
"value": "Honey"
},
{
"trait_type": "Mouth",
"value": "Bubblegum"
},
{
"trait_type": "Headwear",
"value": "McDonald Cap"
}
]
}
```
# Metadata
Source: https://kingdomly.mintlify.app/market/creator-mint/art-projects/metadata
Pre-built metadata to be used for an art project
## Metadata
The metadata upload feature is designed for advanced users who want full control over the metadata for their art project.
To use your own metadata, simply prepare two folders: one for your image assets and one for your metadata JSON files. You will upload both folders, and our system will take care of the rest.
**How to prepare your metadata:**
1. **Create a folder containing all your metadata JSON files.**
2. **Name each JSON file according to its token ID, starting from 1.**\
For example: `1.json`, `2.json`, `3.json`, and so on.
3. **Ensure that each JSON file has a matching image file in the assets folder.**\
The image file should have the same name as the JSON file (for example, `1.png` for `1.json`).
4. **Upload both folders:**
* One folder for your images
* One folder for your metadata JSON files\
The file names in both folders must match exactly, corresponding to the token IDs.
**Summary:**\
You will upload two folders, one for images and one for metadata. Each file in both folders should have the same name, matching the token ID for that asset.
Once uploaded, you can proceed and publish your art project.
# Single Asset
Source: https://kingdomly.mintlify.app/market/creator-mint/art-projects/single-assets
One NFT for all tokens in the collection
## Creating a single asset art project
To create a single asset art project, you can follow these steps:
Go to the Art Gallery.
Click on the "**Create**" button.
Select the "**Single Asset**" option.
Hit add asset and upload one image/video file.
Set the name, description, and quantity you want.
Upload asset and check the preview.
Publish your art project.
You will need to have atleast one asset uploaded to publish your art project
### Supported files
At the moment, these are the file types you can use for your single asset art project.
* Images (PNG, JPEG, GIF)
* Videos (MP4)
File sizes should be less than 10MB.
We are working on adding more options soon, so you will have even more flexibility in the future!
### Traits handling
To add traits to your single asset, you must set it up while uploading your assets.
You can add as many traits as you want, but you will need to a key and a value for each trait.
If you set the value of a trait to ``, the value will be the name of the file you uploaded.
# Best Practices
Source: https://kingdomly.mintlify.app/market/creator-mint/best-practices
Tips and strategies for running a successful mint on Kingdomly
# Best Practices
Running a mint isn’t just about deploying a contract. It’s about how you prepare, present, and keep your community engaged.
Here are some practical tips to help you set up your project and get the most out of Kingdomly.
***
## Tips to Setup Art Gallery
The Art Gallery is where collectors connect with your art.
Here’s how to set it up properly:
* Upload high quality images that are consistent in size and style.
* Double check metadata so traits display correctly later.
* Match supply in your gallery to the Mint Page so numbers line up.
* Test your gallery on mobile and desktop to be sure it looks good everywhere.
* Highlight some of your best pieces in previews to create excitement.
***
## Tips to Setup Mint Page
Your Mint Page is the first impression collectors get of your project.
Make it work for you by:
* Writing a clear, engaging project description.
* Adding strong visuals like banners, thumbnails, and art previews.
* Setting up mint groups in a way that makes sense, like presale, partner allowlist, and public mint.
* Using Gates to capture early interest and filter for serious collectors.
* Making supply, price, and start date easy to understand.
***
## Tips to Gather Whitelists
Whitelists are the backbone of early demand.
Here are some ways to build them up:
* Use Gated Forms to collect signups with requirements that filter for real users.
* Offer rewards for signing up, like raffles or early access perks.
* Cross promote whitelist spots with partner communities.
* Make sharing easy by running simple “share and tag” campaigns on X or Discord.
* Approve submissions regularly instead of waiting until the last minute.
***
## Tips to Do Within a Mint
When the mint goes live, it’s time to stay active:
* Announce your mint clearly across all social channels.
* Keep an eye on your Mint Admin dashboard to track how things are going.
* Use airdrops as a way to reward supporters or run giveaways.
* If things slow down, run a community push like a “mint party.”
* Post updates like “50% minted” or “Last 100 left” to keep energy high.
***
## Tips to Rank Higher (Mint Feed)
The Mint Feed rewards collections that get strong traction early.
Here’s how you can climb higher:
* Push early Gate signups and keep promoting until mint day.
* Offer preorders or early mint passes to build momentum before launch.
* Drive consistent mint activity right after launch to stay visible.
* Avoid going quiet, because the feed favors fresh activity.
* Rally your community across Discord, X, or Telegram to coordinate mint pushes.
***
## Summary
A successful mint comes from a mix of solid setup and consistent community energy.
Focus on driving early demand, presenting your project clearly, and keeping the hype alive during the mint.
The more momentum you build, the higher your chances of selling out.
# Go-Live Checklist
Source: https://kingdomly.mintlify.app/market/creator-mint/go-live-checklist
What creators need to prepare before launching their mint
# Go-Live Checklist
Before you launch your mint, make sure you’ve completed these key steps.\
This checklist is designed to help creators avoid common mistakes and ensure a smooth minting experience for collectors.
***
## 1. Art Gallery Setup
* You must have at least **one Art Gallery project** created.
* The Art Gallery needs to be connected to your Mint Page project.
* Double check that your **supply in the gallery** matches your planned mint supply.
The supply of your collection will be determined by the number of items in the art gallery.
***
## 2. Mint Page Project
* Your Mint Page project must be **published** before you can launch.
* Be sure you’ve set up:
* Carousel image
* Collection type
* Profile image
* Banner
* Collection name and description
* Configure your **Mint Groups** (supply, price, and whitelist rules).
* Connect your Art Gallery to the Mint Page.
* Deploy your contract once everything above is ready.
Your Mint Page won’t publish unless all required fields are filled in.
***
## 3. Mint Page Admin
* In the Admin tab, you must set the **mint live**.
* You also need to set the **mint group live** for the group you want to open.
* Both toggles must be active before collectors can start minting.
* For **private mints**, make sure to:
* Set a **mint quota** for each whitelisted wallet.
* Verify that addresses are properly approved before launch.
Think of it like a two-step lock: the Mint Page and the Mint Group both need to be live for minting to start.
***
## Final Reminder
Going live means everything becomes visible to the public.
Double check your **art, details, and settings** before flipping the switch. Once your mint is live, users can mint right away.
# Mint Feed
Source: https://kingdomly.mintlify.app/market/creator-mint/mint-feed
Overview of the Kingdomly Mint Feed
# Overview
The **Kingdomly Mint Feed** is an algorithmic ranking system that highlights projects launching permissionlessly through **Kingdomly Market**.\
It surfaces collections with strong early demand to the top of the **main Mint Page**, giving fair visibility without paid promotion.
***
## Mint Feed Spotlight
The Mint Feed highlights the most active and exciting collections in near real time.
### Key Points (Ranking Factors)
* **Mint activity**\
Collections with higher ongoing mint activity rise quickly in the feed.
* **Collector engagement**\
Gate signups and whitelist participation show early demand and improve visibility.
* **Momentum**\
Projects that continue to attract steady activity and signups are rewarded with sustained visibility.
* **Progress toward sellout**\
Collections closer to selling out are ranked higher, as they signal strong demand.
* **Freshness**\
Recent activity is prioritized over older engagement, keeping the feed dynamic and relevant.
> In short: **demand and momentum drive visibility**, while recency ensures the feed always feels fresh.
***
## Partner Collections
* **Partner Collections** are official collaborations with Kingdomly.
* They carry the **Kingdomly badge**, guaranteeing authenticity and credibility.
* Partners enjoy **exclusive benefits** within the mint feed:
* Always guaranteed a **top placement** in the Mint Feed.
* Permanent visibility in the **carousel spotlight** on the Mint Page.
* Additional trust and recognition across the ecosystem.
***
## Community Collections
* **Community Collections** are projects created by the broader NFT community.
* They showcase the **creativity and innovation** of independent creators.
* While they don’t have guaranteed placement like partners, they still benefit from the Mint Feed’s algorithmic discovery system, giving every project a chance to trend.
Testnets collectons has been moved to [https://testnet.kingdomly.app/](https://testnet.kingdomly.app/)
# Mint Page
Source: https://kingdomly.mintlify.app/market/creator-mint/mint-page
Front-facing home of your project
# Overview
The **Kingdomly Mint Page** serves as the front-facing home of your project, powered by your **Mint Page setup** and **Art Gallery integration**.
This is where collectors will discover your collection, explore its details, and ultimately mint NFTs directly under your guidance as the creator.
***
## Key Features
We've built the Mint Page to give creators flexibility and collectors a smooth, trusted experience.
### Gates (Whitelist Signups)
Before a mint even begins, collectors can **sign up through Gates**.\
This gives you valuable insights into early demand and allows you to adjust your collection strategy based on real interest from your community.
***
### Mint Groups (Phased Minting)
Every mint can be split into **phases** with independent rules:
* Each group has its **own supply allocation** and **price settings**.
* Whitelists are tied to specific groups, making it easy to run VIP phases, presales, or public mints side by side.
***
### Delegated Minting
Through **[delegates.xyz](https://delegates.xyz)**, collectors can assign minting rights to a hot wallet without giving up ownership of their NFTs.
This adds an extra layer of convenience and security, especially for collectors managing multiple wallets.
***
### Gated Whitelist Forms
Creators can set up **eligibility requirements** that must be met before joining the whitelist. Examples include:
* Wallet balance thresholds
* NFT ownership checks
* Discord role verification
* X (Twitter) follows
* Password or email verification
These gates ensure your whitelist is filled with genuinely engaged participants.
***
### Mint Button Embedding (NEW)
For creators who want to host their mint directly on their own site, we've added **Mint Button Embedding**.
No deep Web3 or contract knowledge required, just drop the button into your website and it connects securely to your Kingdomly Mint Page.
This way, you keep your **brand presence** while still leveraging Kingdomly's backend infrastructure.
***
## Summary
The **Kingdomly Mint Page** is more than a landing spot; it's your project's stage.
From signups and phased minting to delegated mints and embedded buttons, it equips you with everything you need to run a successful launch.
For collectors, it's the trusted place to discover, connect, and mint safely.
For creators, it's the command center that brings your collection to life.
# null
Source: https://kingdomly.mintlify.app/market/creator-mint/mint-projects/contract-deployment
## Overview
### Pre-requisites
* You must have a mint page created and published.
* You must have a mint groups created and supply allocated.
### Deploy your mint contract
Deploying your mint contract is the **final step** in setting up your mint page. Having a **deployed contract** enables you to access the following features:
* **Manage whitelists and mint quotas**
* **Enable eligibility checker** for your mint
* **Manage your mint's supply and price**
* **Airdrop your NFTs**
* **Set up your mint's schedule and visibility**
* **Start your mint!**
## Mint Contract Details
### Default Standard
* Our contracts use **ERC721AC** as the default token standard for chains that support it.
* For chains that don't yet support ERC721AC, we use **ERC721A** as an alternative.
* **ERC721AC** includes enforced royalties functionality, while **ERC721A** is the standard implementation without enforced royalties.
**Mainnet Chains**
| Chain | Enforced Royalties | Contract Standard |
| --------------- | ------------------ | ----------------- |
| Ethereum | ✅ Yes | ERC721AC |
| Arbitrum One | ✅ Yes | ERC721AC |
| Base Mainnet | ✅ Yes | ERC721AC |
| Berachain | ✅ Yes | ERC721AC |
| Mitosis Mainnet | ❌ No | ERC721A |
| HyperEVM | ❌ No | ERC721A |
| Sophon | ❌ No | ERC721A |
**Testnet Chains**
| Chain | Enforced Royalties | Contract Standard |
| ---------------- | ------------------ | ----------------- |
| Ethereum Sepolia | ✅ Yes | ERC721AC |
| Arbitrum Sepolia | ✅ Yes | ERC721AC |
| Base Sepolia | ✅ Yes | ERC721AC |
| MegaETH Testnet | ❌ No | ERC721A |
| Monad Testnet | ❌ No | ERC721A |
On some chains, we use ERC721A as an alternative to ERC721AC due to the lack of support for enforced royalties.
**Contract Standards Documentation:**
* [ERC721A Documentation](https://chiru-labs.github.io/ERC721A/) - Gas-optimized NFT contract standard
* [ERC721AC Documentation](https://github.com/chiru-labs/ERC721A/tree/main/contracts/extensions) - ERC721A with enforced royalties extension
***
### Factory Deployment
* Contracts are deployed through a **contract factory**.
* This ensures consistent deployment and allows Kingdomly to **easily index all mint contracts** created on the platform.
All contracts are deployed through our factory contract at the following address across all supported chains:
**Mainnet Chains**
| Chain | Factory Address |
| --------------- | -------------------------------------------- |
| Ethereum | `0x07b429f9dd10c3e6fa98467239df973633bb3fb3` |
| Arbitrum One | `0x07b429f9dd10c3e6fa98467239df973633bb3fb3` |
| Base Mainnet | `0x07b429f9dd10c3e6fa98467239df973633bb3fb3` |
| Berachain | `0x07b429f9dd10c3e6fa98467239df973633bb3fb3` |
| Mitosis Mainnet | `0x07b429f9dd10c3e6fa98467239df973633bb3fb3` |
| HyperEVM | `0x07b429f9dd10c3e6fa98467239df973633bb3fb3` |
| Sophon | `0x07b429f9dd10c3e6fa98467239df973633bb3fb3` |
**Testnet Chains**
| Chain | Factory Address |
| ---------------- | -------------------------------------------- |
| Ethereum Sepolia | `0x07b429f9dd10c3e6fa98467239df973633bb3fb3` |
| Arbitrum Sepolia | `0x07b429f9dd10c3e6fa98467239df973633bb3fb3` |
| Base Sepolia | `0x07b429f9dd10c3e6fa98467239df973633bb3fb3` |
| MegaETH Testnet | `0x07b429f9dd10c3e6fa98467239df973633bb3fb3` |
| Monad Testnet | `0x07b429f9dd10c3e6fa98467239df973633bb3fb3` |
The same factory address is used across all chains for consistency and easier contract verification.
***
### Fees
By default, Kingdomly charges:
* **\$3 + 3% of the total mint fee price** per mint.
* For airdrops, the fee is **\$0.33 per airdrop / burn**.
**Example**
* If a creator sets their mint price at **0.05 ETH** (assume 1 ETH = \$4,500):
* 0.05 ETH = \$50 mint price.
* Kingdomly's fee = **$3 + (3% of $50)** = $3 + $1.50 = **\$4.50**.
* Total cost to minter = $50 + $4.50 = **\$54.50**.
Since our fees are pegged to **USD**, a **price oracle** is used each time a mint occurs to ensure the native chain currency matches the correct fee equivalent.
***
### Custom Contracts
Custom contracts are available only to **Kingdomly Partners**.
We have a proven history of supporting advanced contract features, including:
* **Merkle Tree Contracts**: Ideal for L1 chains like Ethereum where gas costs are high, enabling cheaper whitelist management through merkle tree verification.
* **Open Edition Contracts**: Ready to use support for open edition style mints with unlimited supply capabilities.
* **Lucky Mint**: A randomized minting mechanism that gives users a chance to receive bonus NFTs beyond their initial purchase for added excitement.
* **Referral Systems**: Custom contract implementations that reward users for bringing new minters to a project, enabling viral growth through incentivized sharing.
For more custom contract support, please contact us at [dev@kingdomly.app](mailto:dev@kingdomly.app) or join our [Discord](https://discord.gg/DnGENNCMgs).
***
### Future Support
* We currently support **ERC721AC** contracts.
* **ERC1155 contracts** will be added in the future for creators who want to mint semi-fungible tokens or manage multiple token types under a single contract.
***
# Custom Mint Button Iframe
Source: https://kingdomly.mintlify.app/market/creator-mint/mint-projects/custom-iframe-embed
Customize your Kingdomly mint embed with your own design preferences
## Overview
This package contains your customized Kingdomly mint embed files with all your design preferences applied.
### Pre-requisites
* You must have a Kingdomly mint project deployed.
* The mint group must be set up and active.
### Iframes zip
To get the iframes zip file, you must be in the mint admin dashboard, navigate to the Iframes section, set your desired CSS styles, and then click on the download button.
The mint group and mint must be set up and active for the iframes to show properly. Please head to the mint admin dashboard and turn mint live and mint group on.
## Quick Implementation
### For React.js Projects
### Files Included
* `iframe.txt` - Your iframe embed code with auto-populated mint slug
* `InitializeIframe.js` - Customization script that applies your styling
* `README.md` - This instruction file
#### Step 1: Add Script to Public Folder
1. Copy the `InitializeIframe.js` file to your project's `public` folder
2. The file should be accessible at `/InitializeIframe.js` from your website root
#### Step 2: Add useEffect Hook
Wherever you want to display the iframe, add this useEffect hook to load the customization script:
```javascript
useEffect(() => {
// Load and execute the customization script
const script = document.createElement('script')
script.src = '/InitializeIframe.js'
script.async = true
document.body.appendChild(script)
return () => {
// Cleanup on unmount
document.body.removeChild(script)
}
}, [])
```
#### Step 3: Add the Iframe
1. Copy the content from `iframe.txt`
2. Paste it into your React component where you want the mint embed to appear
### For HTML Websites
#### Step 1: Add the Iframe to Your Website
1. Copy the content from `iframe.txt`
2. Paste it into your HTML where you want the mint embed to appear
#### Step 2: Include the Customization Script
1. Copy the content from `InitializeIframe.js`
2. Add it to your webpage either:
* **Option A**: Include it in a ``
**Important Implementation Requirements:**
1. **Iframe ID**: The iframe MUST have the ID `kingdomly-mint-iframe` for the customization script to work
2. **Script Placement**: Include the script AFTER the iframe in your HTML
3. **Same Domain**: Both files should be served from the same domain for optimal performance
4. **Background Transparency**: Background transparency doesn't work properly in React.js but works fine in HTML. If transparency doesn't work for you in React, set the background color to match your website's background color, or implement your own transparency solution.
### Modifying Customizations
To change colors or styling after download, edit the `config` object in the InitializeIframe.js file.
### Responsive Design
The embed automatically adjusts to smaller screens. You can modify the iframe width percentage for different breakpoints.
## Troubleshooting
**Customizations Not Applying?**
1. Check browser console for error messages
2. Ensure the iframe ID is exactly `kingdomly-mint-iframe`
3. Verify the script is loaded after the iframe
4. Make sure both iframe and script are on the same page
**Iframe Not Loading?**
1. Check that the mint slug is correct
2. Ensure your website allows iframe embedding
3. Verify the mint is published and accessible
## Mobile Compatibility
The embed is fully responsive and works on all modern browsers and mobile devices.
## You're All Set!
Your customized Kingdomly mint embed is ready to use. Place it anywhere on your website and your visitors can mint directly from your page with your custom styling applied.
For additional support, visit the Kingdomly documentation or contact support.
# Mint Admin
Source: https://kingdomly.mintlify.app/market/creator-mint/mint-projects/mint-admin
Manage and facilitate your mint contract after deployment
## Overview
The **Mint Admin** is the control center for managing your mint after contract deployment.\
Once you deploy your mint contract, you will be redirected to the **Admin Tab**. From here, you can:
* View an **overview** of your Mint Page.
* Continue editing connected elements such as **Art Gallery collections** (only if they match the same supply).
* Adjust **Mint Groups** as needed.
* Withdraw your funds and manage payout addresses.
* Set the start date and time for your mint.
* Set the base URI for your collection.
* Airdrop NFTs to your community.
* Enforce royalties on your collection. (for ERC721AC contracts)
***
## Mint admin features
### Mint Tracker
* Displays total minted supply vs total supply.
* Shows mint status (Open or Closed), scheduled mint date, and balance of fees collected.
* Includes a **Start Minting** button to begin the mint process when ready.
**Setting the start date and time for your mint**
The timestamp for your mint is linked to your local timezone. This means you will need to convert the timestamp to your local timezone.
To check if you have properly set the start date and time for your mint, you can check the **Mint Tracker** tab. It should show **Scheduled**
### Art Collection Panel
* Shows connected art collection details (name, type, total NFTs, date created).
* Displays the **Mint Fee Payout Address** with options to edit or update.
* Creators can update the **Mint Payout Address** and **Royalty Payout Address** at any time.
* If you want to change the base URI for your collection, you can do so here.
**Post-reveal collections:**
This is where you can change the base URI for your collection. This is useful for post-reveal collections, where pre-reveal tokens point to a placeholder and then update to unique metadata after reveal.
**Custom base URI:**
We have enabled a way for creators to set a custom base URI for their collection. This is useful for technical creators who want to use a custom base URI for their collection.
Make sure to enclose your custom base URI in forward slashes `/` with a prepending `ipfs://`
**Example:**
`ipfs://bafybeih5c6r52xxdv46j6nz3w344u4d7j5x2fhzod5vng254b2nd2p7sq4/`
The contract automatically appends the token ID to the base URI. The NFT might be broken if done incorrectly.
### Mint Performance Dashboard
Provides live charts and metrics for:
* **Mints**
* **Mint Velocity** (this is the number of mints per hour)
* **Gates Submissions**
* **Gates Submissions Velocity** (this is the number of gates submissions per hour)
Filters available by **Hour, Day, Week, Month, Year** to analyze mint activity over time.
### Airdrop NFTs
* Send NFTs directly to wallets from the Admin Tab.
* Perfect for rewarding early supporters, community giveaways, or team allocations.
* For airdrops, the fee is **\$0.33 per airdrop / burn**.
Make sure the addresses are EVM wallets. Airdrop wont work if the address is either non-EVM or a smart contract.
### Enforced Royalties Dashboard (ERC721AC)
* Available only for **ERC721AC contracts**.
* Lets you enforce or adjust royalties on your secondary sales.
* Gives creators control over the royalty percentage, royalty payout address, and token transfer validation.
* Creators can set their NFTs to temporarily be non-transferable by choosing the **Locked NFT** option.
Royalty adjustments may vary depending on the marketplace. You will need to change the royalty percentage manually on other marketplaces due to the nature of their implementation.
### Withdraw & Payout Controls
* Withdraw mint proceeds directly from the Admin Tab.
* Update both **Mint Fee Payout Address** and **Royalty Payout Address** securely at any time.
### (NEW) Iframe integration
* Easily embed your mint page in your own website.
* Manage your mint page from kingdomly admin panel and the iframe will update automatically.
* Use the iframe code to embed your mint page in your own website.
***
## Summary
The **Mint Admin** gives creators full control over their collection after contract deployment.
From here, you can monitor performance, manage payout addresses, schedule your mint, airdrop NFTs, and enforce royalties.
Key highlights include:
* **Mint Tracker**: Stay on top of mint progress and scheduling.
* **Art Collection Panel**: Update payout addresses and manage base URIs, including post-reveal changes.
* **Performance Dashboard**: Analyze activity with live charts and metrics.
* **Airdrops**: Reward your community with direct NFT distributions.
* **Royalties Control (ERC721AC)**: Enforce and configure royalties for your collection.
* **Withdrawals**: Securely claim proceeds and update payout settings.
* **Iframe Integration**: Embed your mint page into any website with live updates.
In short, the Mint Admin is your **command center**, a single place where you can launch, manage, and optimize every aspect of your NFT mint on Kingdomly.
# Mint Gates
Source: https://kingdomly.mintlify.app/market/creator-mint/mint-projects/mint-gates
Build your allowlist with mint gates.
## Overview
Mint gates are access forms that control who can participate in your mint. They give creators the ability to add requirements, tasks, or checks that whitelist applicants must complete before being approved for the whitelist. Think of them as customizable “entry conditions” for your NFT drop.
### Key features
**For Creators / Artists:**
* **Control access**: Decide exactly who can mint by setting eligibility rules.
* **Custom requirements**: Add wallet checks, NFT holdings, Discord membership, or X (Twitter) follows.
* **Collector engagement**: Collect details or require tasks (like social follows) before whitelist approval.
* **Flexible setup**: Gates can be created even before contract deployment.
**For Minters / Users:**
* **Transparent requirements**: See exactly what’s needed to qualify for a whitelist.
* **Easy verification**: Confirm eligibility by connecting a wallet or completing simple tasks.
* **Fair participation**: Gates ensure equal opportunities, reducing spam or bot registrations.
## Setting up a mint gate
Before setting up a Gate, make sure:
* You have a **published Mint Page** (this acts as the base for your collection).
* A **deployed contract is not required** yet, but the Mint Page must exist.
Go to a mint group you have created.
Mint groups are only available for private mint groups.
Click on the "Kingdomly Gates" tab.
Click on the "Open Gate" button.
Opening a gate will not allow you to close it anymore.
After opening the gate, you can setup forms and requriements for the gate.
Don't forget to enable visibility for the gate.
To make your mint project pop out on the mint feed, you will need to set the visibility on and set when the gates will close.
## Types of gates
Kingdomly offers different types of **Gates** that creators can configure to control access to their mint. Each Gate adds a layer of eligibility, ensuring that only qualified collectors can submit applications or be added to the whitelist.
The Wallet Balance Checker ensures that a collector holds at least the minimum balance specified by the creator.
**Creator setup**: Choose from any supported blockchain and set a required token amount.\
**Collector experience**: To submit the form, the connected wallet must meet or exceed the balance threshold.
> *Example: Require a minimum of 0.05 ETH on Ethereum, or 50 USDC on Polygon before allowing form submission.*
The NFT Checker verifies that a wallet contains at least one NFT.
**Creator setup**: Select the NFT collection to check against.\
**Collector experience**: Only wallets holding at least one NFT from the chosen collection will be able to submit the Gate form.
> *Example: Require whitelist applicants to hold at least one “Genesis Pass” NFT before joining the whitelist.*
The Discord Checker confirms community membership by integrating with the **Kingdomly Bot**.
**Creator setup**: Add the Kingdomly Bot to a Discord server and specify the required role.\
**Collector experience**: The collector must connect their Discord account and hold the correct role to complete the Gate.
> *Example: Require the “OG Member” role in Discord before mint eligibility.*
The X Checker ensures that whitelist applicants follow a specified Twitter (X) account.
**Creator setup**: Enter the account handle directly in the dashboard.\
**Collector experience**: The Gate verifies the follow before allowing submission.
This feature doesnt enforce the follow checking, its only a soft check by making the minter opens the X page.
> *Example: Require whitelist applicants to follow **@KingdomlyApp** on X before submitting the application.*
The Password Gate adds a simple access control layer.
**Creator setup**: Define a password in the dashboard.\
**Collector experience**: Users must enter the correct password before submitting the application.
> *Example: Share a password with VIP members to allow exclusive access.*
The Email Verification Gate confirms a collector’s identity via email.
**Creator setup**: Enable email verification for the Gate.\
**Collector experience**: Whitelist applicants must enter an email address and verify it before completing their submission.
> *Example: Require verified email addresses to help prevent spam or bot registrations.*
The Max Applications Gate controls the total number of submissions for a form.
**Creator setup**: Enter a submission limit in the dashboard.\
**Collector experience**: Once the maximum number of applications is reached, the form automatically closes.
> *Example: Only the first 500 verified applications will be accepted.*
## Whitelist applicants
Whitelist applicants are the users who have been approved for the whitelist. They are not yet added in the contract allowlist yet as you will be needing to set their mint quota in the contract first.
**Managing whitelist applicants**
You can go to submissions tab to see all the whitelist applicants. This is where you will see all the whitelist applicants. You can choose to accept or reject these applicants and even export them in your liking.
Note that the columns will vary depending on the gate you opened. For example, if you opened a gate that requires the X Follow Checker, you will see the X tags of the applicants and you can export them in your liking.
**Adding accepted applicants to the contract allowlist**
Pre-requisites:
* You must have a deployed contract.
You can add accepted applicants to the contract allowlist by moving accepted submissions to the whitelist. You are also able to move applicants back to submissions tab if you want to reject them.
After moving the applicants to the whitelist, all accepted applicants will be added to the contract allowlist and will be removed in this table. To manage whitelists you can go to the mintgroup's whitelist management tab.
# Mint groups
Source: https://kingdomly.mintlify.app/market/creator-mint/mint-projects/mint-groups
Also known as mint phases.
## Overview
Mint groups allow you to organize your collection into different phases with independent settings. Each mint group can have its own whitelist, mint price, supply allocation, and start time, giving you complete control over your minting strategy.
### Flexibility and deployment states
Kingdomly provides flexibility in managing mint groups regardless of your contract deployment status:
**Before contract deployment:**
* Create and publish mint groups for display purposes
* Set tentative pricing and supply allocations
* Whitelists cannot be set until after contract deployment, this means that people will not see they are eligible for the mint yet.
**After contract deployment:**
* Add whitelists to your mint groups
* Finalize pricing and supply settings that is directly linked to the contract
* All group configurations become active and enforceable, users can now see they are eligible for the mint
* Continue editing, adding, or removing groups as needed
This approach allows you to prepare your mint strategy early while maintaining the ability to make adjustments throughout your project lifecycle.
### Adding mintgroups
Adding mint groups allows you to control who can mint your collection. You can add mintgroups by following the steps below:
Go to the mint groups tab
Click add mint group
Fill in the mint group name and description
**Optional:** Fill in the mint group price and supply
Set the visibility of the mint group and hit save.
This is in an **undeployed state**, we can skip for now but it needs to be finalized before contract deployment. (It will still be able to be edited once deployed)
Video might show "max mints per wallet" but this will be deprecated in the future.
**What does this look like on the mint page**
What you set is what you see on the mint page. The only difference is that the mint price and supply are not linked to a contract yet.
**Update:** Undeployed mint groups will not be visible on the mint page without a mint gate connected.
### Finalizing mint allocation and contract details
Finalizing mint group details and alloocation allows you to control the mint price and supply for your collection. You can finalize mint group details and alloocation by following the steps below:
Go to launch tab
Fill in the contract symbol (limited to 8 characters)
Set the mint fee and royalty fee payout address (connected wallet is the default)
You can connect a smart wallet to these fields so that when you withdraw funds, the funds will be sent to your safe.
Set the secondary sales royalty percentage.
Select the chain to deploy on
Testnets are going to be on a different domain in the future. ([https://testnets.kingdomly.app](https://testnets.kingdomly.app))
Set supply and price for each mint group
Max mints per wallet is going to be deprecated in the future.
Finalize check your allocation and hit continue.
You can not exceed the total supply of your collection. The total supply is linked from the art project connected to your mint page.
**What you need to know about finalizing mint allocation and contract details:**
* The **contract Notermation** that you set here is **permanent once deployed**.
* You **can not exceed the total supply** of your collection.
* The **total supply is linked** from the art project connected to your mint page.
* If you plan to **airdrop NFTs** you must **allocate spare supply** to your total supply.
* The **sum of all mint groups** can not exceed the total supply of your collection but **can be less**.
### Manging mint groups
Managing mint groups will vary depending on your **contract deployment status**. For the following guide, we will explain how to manage mint groups with a **deployed contract scenario**. If you have not deployed yet, features like **adding whitelists**, **starting mint live**, and **editing mint groups** will not be available.
Go to the **mint groups tab**
Click on **manage mint group** of the mint group you want to manage
To edit mint group details, click on **Edit mint group**
Set the details you want and hit **save**.
Each value changed on the right side will reflect **one transaction on the blockchain**. Please make sure to have enough funds to cover the transaction fees.
To make the mint group live, click on **Start mint live**
This will ask for your confirmation on your wallet.
Optional: Set **mint group live timestamp** by clicking on the clock icon next to the start mint live button.
This will tell the contract to **enable users to mint** from this mint group if the timestamp has been passed.
**What you need to know when managing mint groups:**
* You can set the **mint group live time in advance**. The time set is based on your **LOCAL TIMEZONE**.
* Changing **mint price**, **supply**, and **max mints per wallet** (will be deprecated in the future) will reflect **one transaction on the blockchain**. Please make sure to have enough funds to cover the transaction fees.
* **Setting mint group live** is different from **start mint live**. Setting mint group live only opens the specific mint group for minting. You will still need to start mint live to start minting (think of it as a **2 way switch**)
### Managing whitelists
Allow users to mint from a specific mint group by adding them in the whitelists.
There are 2 ways to add whitelists:
1. Add whitelist by collection snapshot. E.g. "Whitelist all holders of \[collection]"
2. Add whitelist by csv.
**How to add whitelist by collection snapshot:**
Click on **Add mint quota**
Set the **initial amount option**
Initial amount is the number of mint quota we will allocate for each address when the snapshot is taken.
E.g: If its set to **Address Token Balance**, the mint quota for each address will depend on the number of tokens they hold. And if its **User set** then you can set the initial amount for each address.
Click on **Add whitelist**
To make sure that the transaction is successful, transactions will be batched depending on the number of addresses you are adding. (**1000 addresses per transaction**)
Set the whitelist details and hit **save**.
**How to add whitelist by csv:**
Click on **Add mint quota**
Select CSV Upload
Upload your CSV file
**Your CSV file should follow this format:**
(address, amount)
| | |
| ------------------------------------------ | - |
| 0x1Ab5A783FD275ABB49b59e6409C1ba0BDbd45f04 | 5 |
| 0x95E82486fD030F3615725e8a62004788E4e1C592 | 3 |
| 0xE7c2a733983886D5eCD446886A5C13120286150a | 1 |
Make sure your CSV file has exactly two columns: **Address** (wallet addresses) and **Amount** (mint quota for each address).
Please make sure that all addresses here are valid EVM addresses. Failure to comply will result the batch to fail.
Click on **Add whitelist**
To make sure that the transaction is successful, transactions will be batched depending on the number of addresses you are adding. (**1000 addresses per transaction**)
### What you need to know when managing mint whitelists:
* You can add **whitelists** by **collection snapshot** or **CSV upload**.
* **Mint quota** is the number of NFTs that each address is allowed to mint.
* **Whitelists** are independent from each **mint group**, allowing you to customize access for different phases.
* Always verify that the addresses you are adding are **valid EVM addresses**. **Invalid addresses** will cause the entire batch to fail.
* The **CSV format** for adding whitelists must follow this structure: **(address, amount)** with exactly **two columns**.
* **Whitelist transactions** are processed in batches of **1000 addresses per transaction** to ensure successful execution.
* You can **modify** or **remove** whitelist entries after they have been added if needed.
* Setting whitelists for existing addresses will **overwrite** the existing **mint quota**.
* **Whitelist settings** take effect immediately once the transaction is confirmed on the **blockchain**.
* You can export a csv of the whitelists uploaded by clicking on the **Export** button.
# Mint page setup
Source: https://kingdomly.mintlify.app/market/creator-mint/mint-projects/mint-projects-overview
The front-face of your NFT collection
## Overview
Mint page projects are the storefronts for your NFT projects. In this project you will be able to create a page that act as the public-facing landing page where collectors can mint your NFTs, while you manage everything in the backend as a creator.
### What you need to know about **mint page projects**
* This is where you can **create your mint page** and **link it to your art collections**.
* **Contract deployment** happens directly within the mint page project.
* Creators can **publish your mint page** even if you have not deployed your contract yet. This **flexible publishing** lets you prepare everything in stages before going live.
* Our new **gates feature** allows you to **gauge interest and collect pre-mint information** before you deploy your contract.
* Once your contract is deployed, you can **manage and facilitate the mint process** from the **mint page admin dashboard**.
* **Whitelist setting** is available in the mint page admin dashboard.
***
## How to create a mint page project
You can follow the steps below to create a mint page project from beginning to end.
Certain steps can be skipped and be completed later. We added more flexibility to allow creators setup a mint page without deploying any contracts immediately.
Go to your mint projects page.
Open the creation modal by hitting "**Create**"
Select the **chain** you want to deploy your contract to.
Fill in the **details** of your mint page project.
Hit "**Create**"
Your mint page project will be created and you will be redirected to the project page where you can start **setting up your mint page**.
Link an **art collection** to your mint page project.
Fill out your **Mint Page Details**. And publish your mint page.
Each mint page has 6 subtabs that cover all information collectors need to know about your project: Profile, Art Collection, Roadmap, Team, FAQs, Music.
You are not allowed to publish your mint page until you finished the follwing:
* Link an **art collection**
* Set your **collection category**
* Set a **collection name and description**
* Uploaded a **banner image**
* Uploaded a **profile image**
* Uploaded atleast one **carousel image**
This is necessary to have your mint page loaded on the mint feed with complete information.
Organize your **Mint Groups**.
Mint Groups are used to organize your mint page into different sections.
**Launch your Mint Page.**
When you’re ready to go live, move to the Launch Tab.
* You will be prompted to review Contract Info, Supply and Price Preview. The system will also prompt you to complete any missing information.
* Once done filling out all necessary information, you can now finalize by completing the following steps:
* Compile Smart Contract
* Deploy Smart Contract
* Verify Smart Contract
Once Smart Contract has been deployed, collection name and supply lock in permanently.
**Manage via Admin Tab.**
After deployment, you’ll be redirected to the Admin Tab, where you can do the following:
* View an overview of your Mint Page.
* Continue editing connected elements like Art Gallery collections (only if they match the same supply).
* Adjust Mint Groups as needed.
The Launch Tab will no longer be available once your smart contract is deployed.
### Video tutorial
## Setup breakdown
Let's break down and explain each step in more detail.
The **header section** displays the **collection name**, **links**, **collection profile image**, and the **Kingdomly verified tag** (if applicable). This is the first thing **minters** will see when they visit your **mint page**.
A clean **header section** helps your **mint page** stand out and makes a strong first impression.
**What does this look like on the mint page:**
**Secondary trading data** is not yet available for **mint page**.
The **about section** displays the **collection description**, **category**, **contract address** (and its link to the scanner), **NFT standard** (we use **721AC** by default), and the **creator royalties percentage**.
The **about section** allows more transparent information to be displayed for the **minters**.
**What does this look like on the mint page:**
The **roadmap section** displays the **timeline** and **future plans** for your collection. Use this area to outline your project's **milestones** and **vision**.
A clear **roadmap** helps **minters** understand the direction and goals of your collection.
**What does this look like on the mint page:**
The **team section** highlights the people behind your collection. Introduce your **team members** and share what they are working on.
A transparent **team section** helps **minters** connect with the **creators** and builds trust.
**What does this look like on the mint page:**
The **FAQs section** answers common questions about your collection. Use this space to address important topics and provide clarity for your audience.
A helpful **FAQs section** makes it easier for **minters** to find the information they need.
**What does this look like on the mint page:**
# Quickstart
Source: https://kingdomly.mintlify.app/market/creator-mint/quickstart
Launch your NFT collection under 10 minutes
## Get started
In this guide, we will walk you through the process of creating a simple single asset NFT collection in Kingdomly and go live with it.
### Create your art collection
Go to your art projects page.
Select the single asset option.
Upload any image you want to use as your NFT.
Set the quantity and name of your NFT.
Your collection supply will depend on the items within the art collection.
Upload assets.
### Setup and publish your mint page
Go to your mint projects page.
Create your mint page and select your chain.
Fill in your mint page details.
Required fields: Category, Name, Description, Profile Image, Banner, Carousel Image, and a linked art collection
Set up your mint groups (optional).
Publish your mint page.
### Deploy your smart contract
* This is where you will setup and deploy your contract.
Your mint will be published to the network you select.
### Go live
* This is where you will go live with your NFT collection.
Your NFT collection will be live on the network you select.
## Next steps
You've launched your first NFT collection, great work! But there's so much more you can do with Kingdomly:
* **Experiment with Mint Gates:** Set up allowlists, presales, or custom eligibility rules to control who can mint your NFTs.
* **Create More Art Collections:** Try making different types of art collections to expand your creative portfolio.
* **Deploy on Multiple Chains:** Launch your collections on various supported networks to reach a wider audience.
* **Boost Your Visibility:** Engage your community and aim to rank up on the Mint Feed for more exposure.
* **Explore Advanced Features:** Dive into collection management, analytics, and more to maximize your project's success.
Ready to go further? Check out the other guides in this section to unlock the full potential of Kingdomly Market!
# Overview
Source: https://kingdomly.mintlify.app/market/overview
Overview of Kingdomly Market
Kingdomly Market is our all-in-one no-code NFT suite that brings creation, minting, and trading together in a single platform. It’s built to simplify workflows, reduce friction, and provide a whole different experience for the next generation of NFTs
## What is Kingdomly Market?
Kingdomly Market unifies the entire NFT journey. **Creator**, **Mint & Marketplace**, and **Inventory** merged into one seamless workflow. Instead of juggling multiple platforms or tools, you can:
* **Create**: Design and generate your NFT collection with no code required.
* **Mint & Marketplace**: Launch your collection and make it available for minting and trading, all in one place.
* **Inventory**: Effortlessly manage your NFTs, track ownership, and interact with your assets.
This integrated approach streamlines every step, making it easy for creators and collectors alike to participate in the NFT ecosystem without technical barriers or fragmented experiences.
Generate and launch your NFT collection with no code required.
# Supported Chains
Source: https://kingdomly.mintlify.app/market/supported-networks
List of all supported chains for Kingdomly Market
# Supported Chains
Kingdomly Mint currently supports the following networks across both **mainnet** and **testnet** environments.
Use this table as a quick reference for the **Chain ID** when connecting your wallet or deploying contracts.
***
## Chain List
| Chain Name | Type | Chain ID |
| ---------------- | ------- | -------- |
| Ethereum | mainnet | 1 |
| Ethereum Sepolia | testnet | 11155111 |
| Arbitrum One | mainnet | 42161 |
| Arbitrum Sepolia | testnet | 421614 |
| Berachain | mainnet | 80094 |
| Base Mainnet | mainnet | 8453 |
| Base Sepolia | testnet | 84532 |
| MegaETH Testnet | testnet | 6342 |
| Monad Testnet | testnet | 10143 |
| HyperEVM | mainnet | 999 |
| Sophon | mainnet | 50104 |
| Mitosis Mainnet | mainnet | 124816 |
# Welcome
Source: https://kingdomly.mintlify.app/welcome
Greetings, noble traveler, and welcome to the Kingdomly Knowledge Keep!
## What is Kingdomly?
Welcome to Kingdomly, your all-in-one solution for an enriching and inclusive NFT experience. We're on a mission to revolutionize the NFT landscape with our comprehensive ecosystem designed to empower creators, collectors, and communities.
## Core products
Explore the tools we offer to make your NFT experience seamless.
Edit your docs locally and preview them in real time.
Experience the ease of minting an NFT with Kingdomly.
Create your own staking pool to entice your community to stake their NFTs and earn rewards.
Auto-generate API documentation from OpenAPI specifications.
## Support and feedback
You can reach out to us at any time for questions, issues, concerns, product ideas, or random thoughts. Here are some ways to do so:
Catch the next NFT drop and get the latest updates on Kingdomly.
Join our Discord community to chat, earn roles, and get support.
Email us at [dev@kingdomly.app](mailto:dev@kingdomly.app) for any questions or feedback.
For bug reports, please open a ticket in Discord.
## Need inspiration?
Browse our catalouge of case studies from partners and customers that launched and used Kingdomly to create their NFT Ecosystem.
# null
Source: https://kingdomly.mintlify.app/what-we-offer
## Kingdomly Market
**Your Complete NFT Ecosystem**
Kingdomly Market is our unified platform that combines the power of creation, minting, and trading into one seamless experience. This all-in-one solution eliminates the complexity of managing multiple platforms while providing everything you need for your NFT journey.
### Core Highlights
* **Flexible Mint Pages**: Not sure what to launch yet? No problem. Start with a blank mint page without needing an NFT collection. Use it to gather insights from your community, like what type of art they want, how many pieces to generate, and how much hype is building. When you are ready, finish setting it up, deploy your collection, and launch. Each contract automatically comes with its own mint page.
* **No-Code Asset Generation**: Create your NFT assets directly on the platform without coding. With a wide variety of project types to choose from, you can build and generate your entire collection without writing a single line of script.
* **Smart Whitelisting**: Our Kingdomly Gates let your community sign up for whitelists in a simple way. This makes it easy to track demand for your collection and helps prevent failed mints since only real community members can join.
* **In-House Indexer**: Kingdomly has its in-house indexer that makes sure NFTs are visible as soon as your mint goes live. Users can immediately see and interact with their NFTs without needing to go anywhere else.
* **Algorithmic Mint Feed**: With our automated mint feed, every collection has a chance to rise. NFTs that show real demand naturally move to the top and even into the carousel. This helps other users discover trending mints and join the excitement.
See a detailed overview of Kingdomly Market features, workflows, and how to get started.
***
## Kingdomly Bridge
**Permissionless Cross-Chain NFT Movement**
Break down blockchain barriers with Kingdomly's permissionless NFT Bridge. Using LayerZero's omnichain operability, we enable seamless NFT transfers across multiple blockchains.
### Core Highlights:
* **Permissionless Access**: No restrictions on who can use the bridge
* **Multi-Chain Support**: Move NFTs between various blockchain networks
* **LayerZero Integration**: Leveraging cutting-edge omnichain technology
* **Creator Empowerment**: Enable your collections to reach new audiences across chains
See a detailed overview of Kingdomly Bridge features, workflows, and how to get started.
***
## Kingdomly Staking
**Permissionless NFT-Fi Launchpad**
Discover innovative NFT-Fi solutions with Kingdomly's permissionless staking platform. Create, manage, and participate in staking pools that build communities and reward holders.
### Core Highlights:
* **Pool Creation**: Easily set up your own staking pools
* **Flexible Management**: Full control over pool parameters and rewards
* **Multiplier System**: Add excitement with token multipliers and address-specific boosts
* **Community Building**: Foster engagement through gamified staking mechanics
* **Permissionless Design**: Open access for all participants
See a detailed overview of Kingdomly Staking features, workflows, and how to get started.
***
## Why Kingdomly?
### **For Creators**
* Launch NFT ecosystems without coding knowledge
* Access to built-in minting, marketplace, and staking tools
* Cross-chain distribution capabilities
* Community building through Kingdomly's Ecosystem
### **For Collectors**
* Discover unique collections in our curated marketplace
* Seamless trading experience across the ecosystem
* Access to exclusive staking rewards
### **For the Community**
* Permissionless access to all features
* Cross-chain interoperability
* Innovative NFT-Fi solutions
* Growing ecosystem of creators and collectors
## Our Mission
As we continue to grow and align with the evolving Web3 ecosystem, we remain dedicated to making Kingdomly a go-to platform for everyone. Join us in this exciting journey and redefine your NFT experience with Kingdomly.
Join us in this exciting journey and redefine your NFT experience with Kingdomly.
***
*Ready to get started? Explore our [Market](https://kingdomly.app) to begin your NFT journey today.*
 You can add as many traits as you want, but you will need to a key and a value for each trait.

 ### Rule types:
* **Doesn't mix with:** This rule will **prevent** the trait you add the rule to from **appearing together** with the selected traits.\
 To use your own metadata, simply prepare two folders: one for your image assets and one for your metadata JSON files. You will upload both folders, and our system will take care of the rest.
**How to prepare your metadata:**
1. **Create a folder containing all your metadata JSON files.**
2. **Name each JSON file according to its token ID, starting from 1.**\
For example: `1.json`, `2.json`, `3.json`, and so on.
3. **Ensure that each JSON file has a matching image file in the assets folder.**\
The image file should have the same name as the JSON file (for example, `1.png` for `1.json`).
4. **Upload both folders:**
* One folder for your images
* One folder for your metadata JSON files\
The file names in both folders must match exactly, corresponding to the token IDs.
**Summary:**\
You will upload two folders, one for images and one for metadata. Each file in both folders should have the same name, matching the token ID for that asset.
Once uploaded, you can proceed and publish your art project.
# Single Asset
Source: https://kingdomly.mintlify.app/market/creator-mint/art-projects/single-assets
One NFT for all tokens in the collection
## Creating a single asset art project
To create a single asset art project, you can follow these steps:
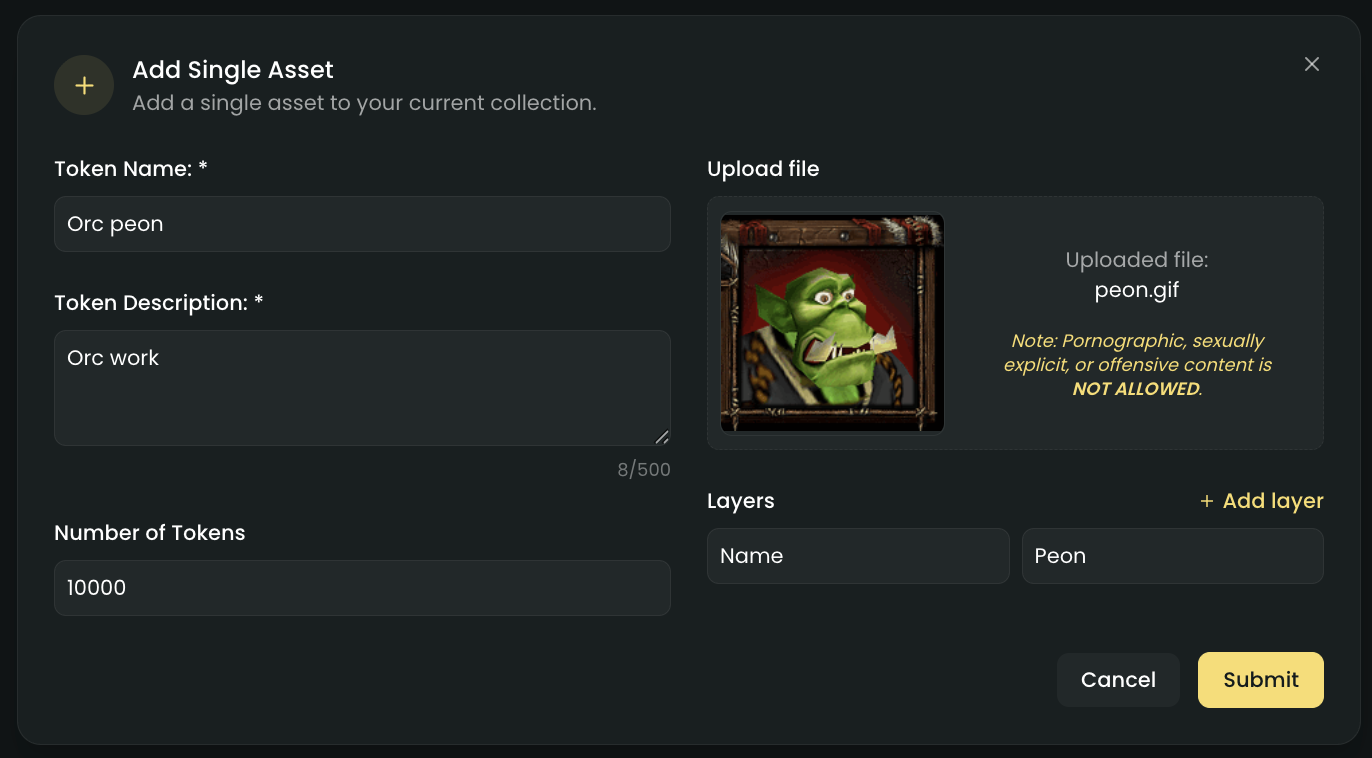
 ## Mint Contract Details
### Default Standard
* Our contracts use **ERC721AC** as the default token standard for chains that support it.
* For chains that don't yet support ERC721AC, we use **ERC721A** as an alternative.
* **ERC721AC** includes enforced royalties functionality, while **ERC721A** is the standard implementation without enforced royalties.
**Mainnet Chains**
| Chain | Enforced Royalties | Contract Standard |
| --------------- | ------------------ | ----------------- |
| Ethereum | ✅ Yes | ERC721AC |
| Arbitrum One | ✅ Yes | ERC721AC |
| Base Mainnet | ✅ Yes | ERC721AC |
| Berachain | ✅ Yes | ERC721AC |
| Mitosis Mainnet | ❌ No | ERC721A |
| HyperEVM | ❌ No | ERC721A |
| Sophon | ❌ No | ERC721A |
**Testnet Chains**
| Chain | Enforced Royalties | Contract Standard |
| ---------------- | ------------------ | ----------------- |
| Ethereum Sepolia | ✅ Yes | ERC721AC |
| Arbitrum Sepolia | ✅ Yes | ERC721AC |
| Base Sepolia | ✅ Yes | ERC721AC |
| MegaETH Testnet | ❌ No | ERC721A |
| Monad Testnet | ❌ No | ERC721A |
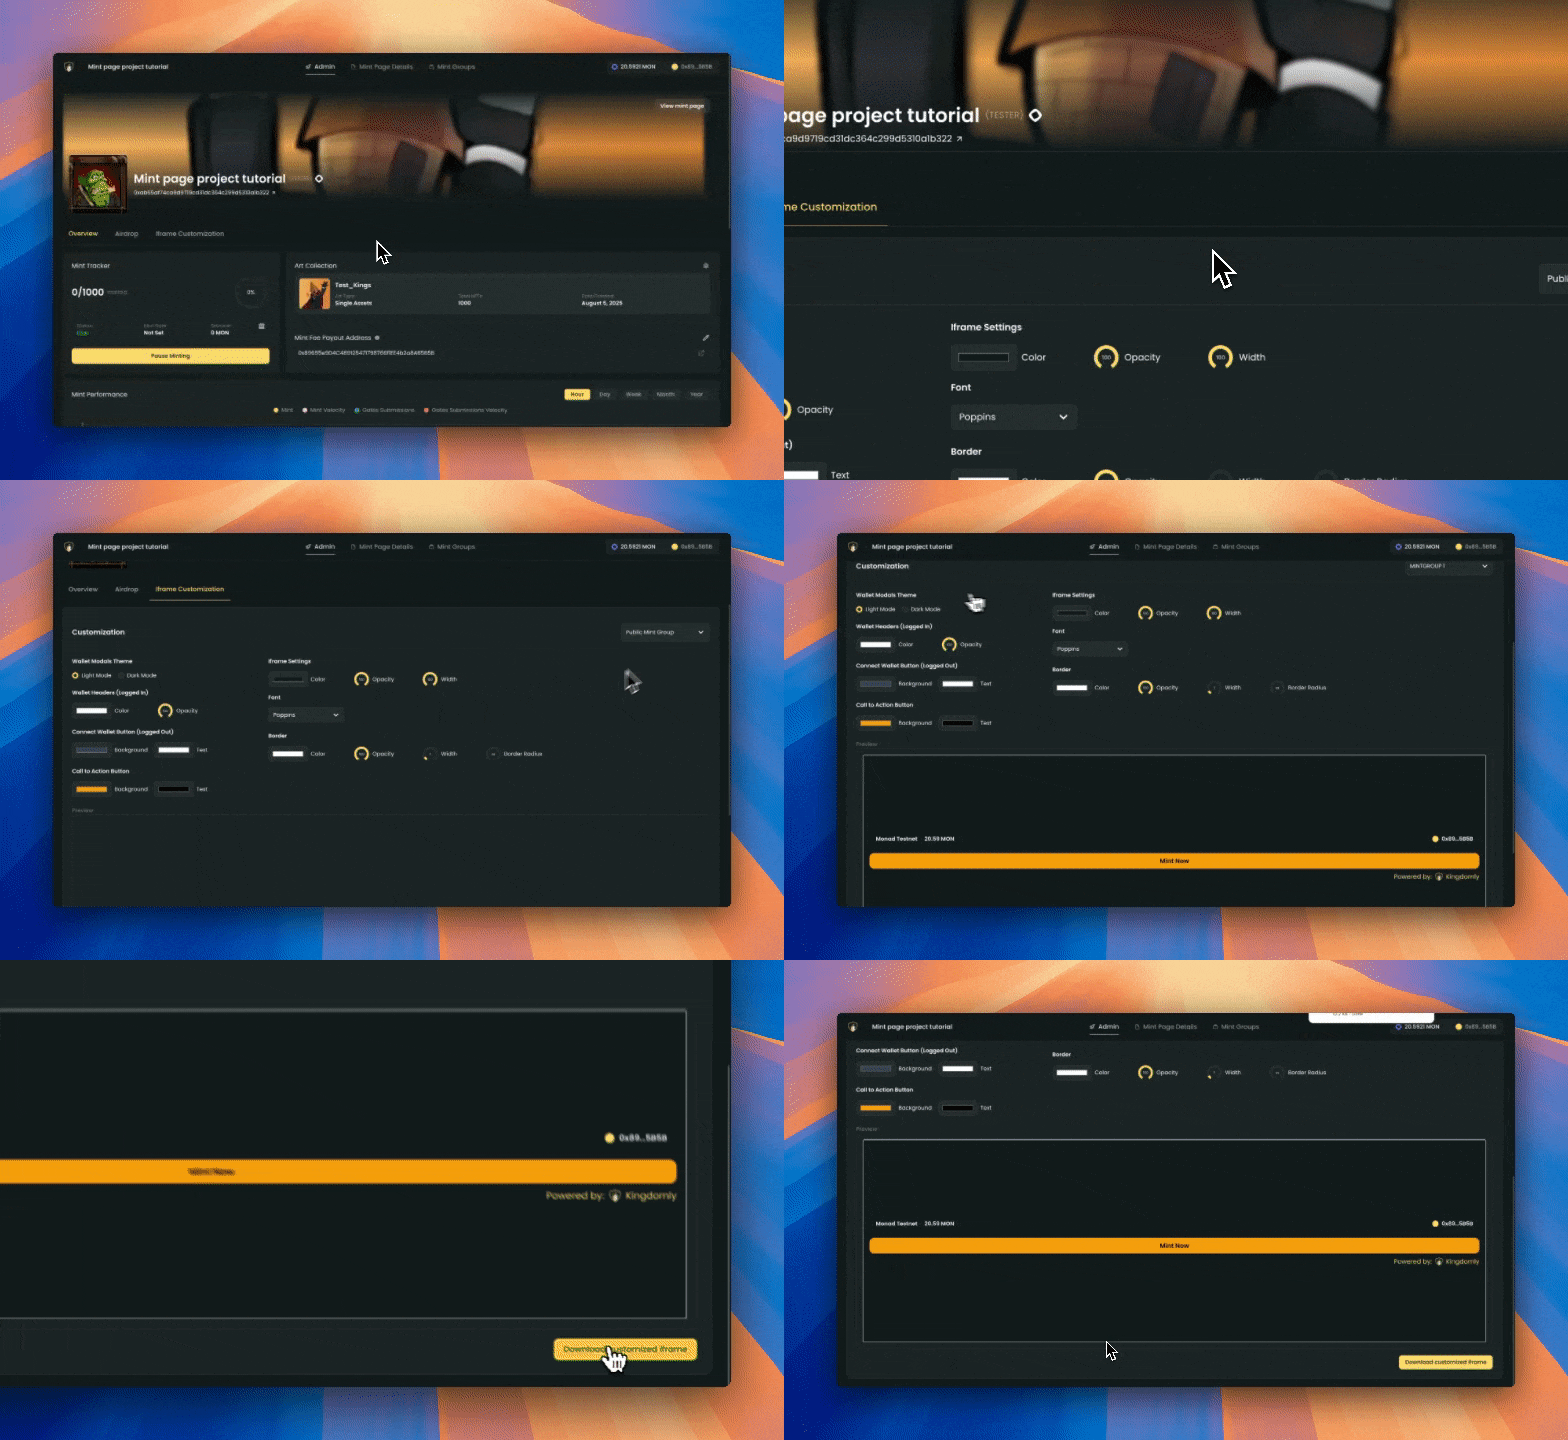
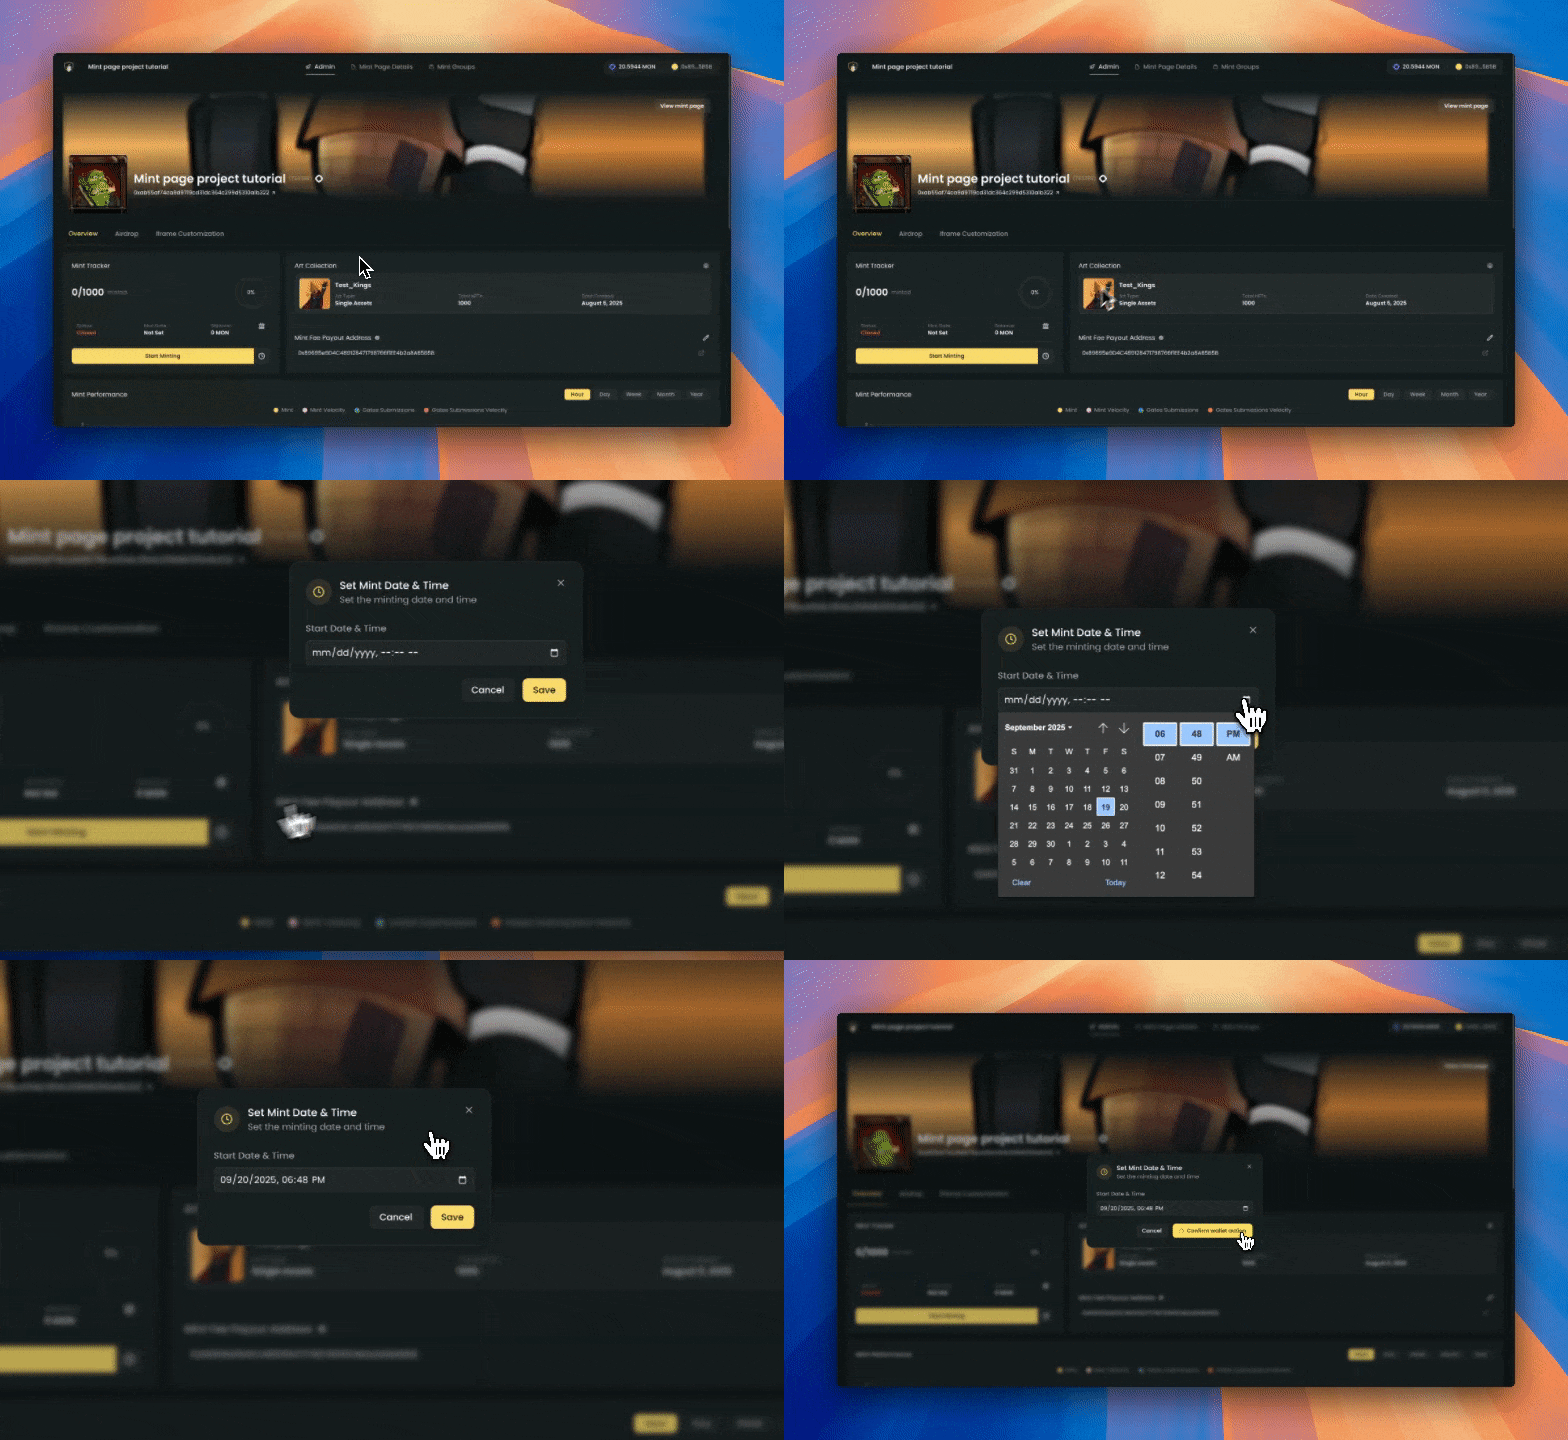
 **Post-reveal collections:**
This is where you can change the base URI for your collection. This is useful for post-reveal collections, where pre-reveal tokens point to a placeholder and then update to unique metadata after reveal.
**Custom base URI:**
We have enabled a way for creators to set a custom base URI for their collection. This is useful for technical creators who want to use a custom base URI for their collection.
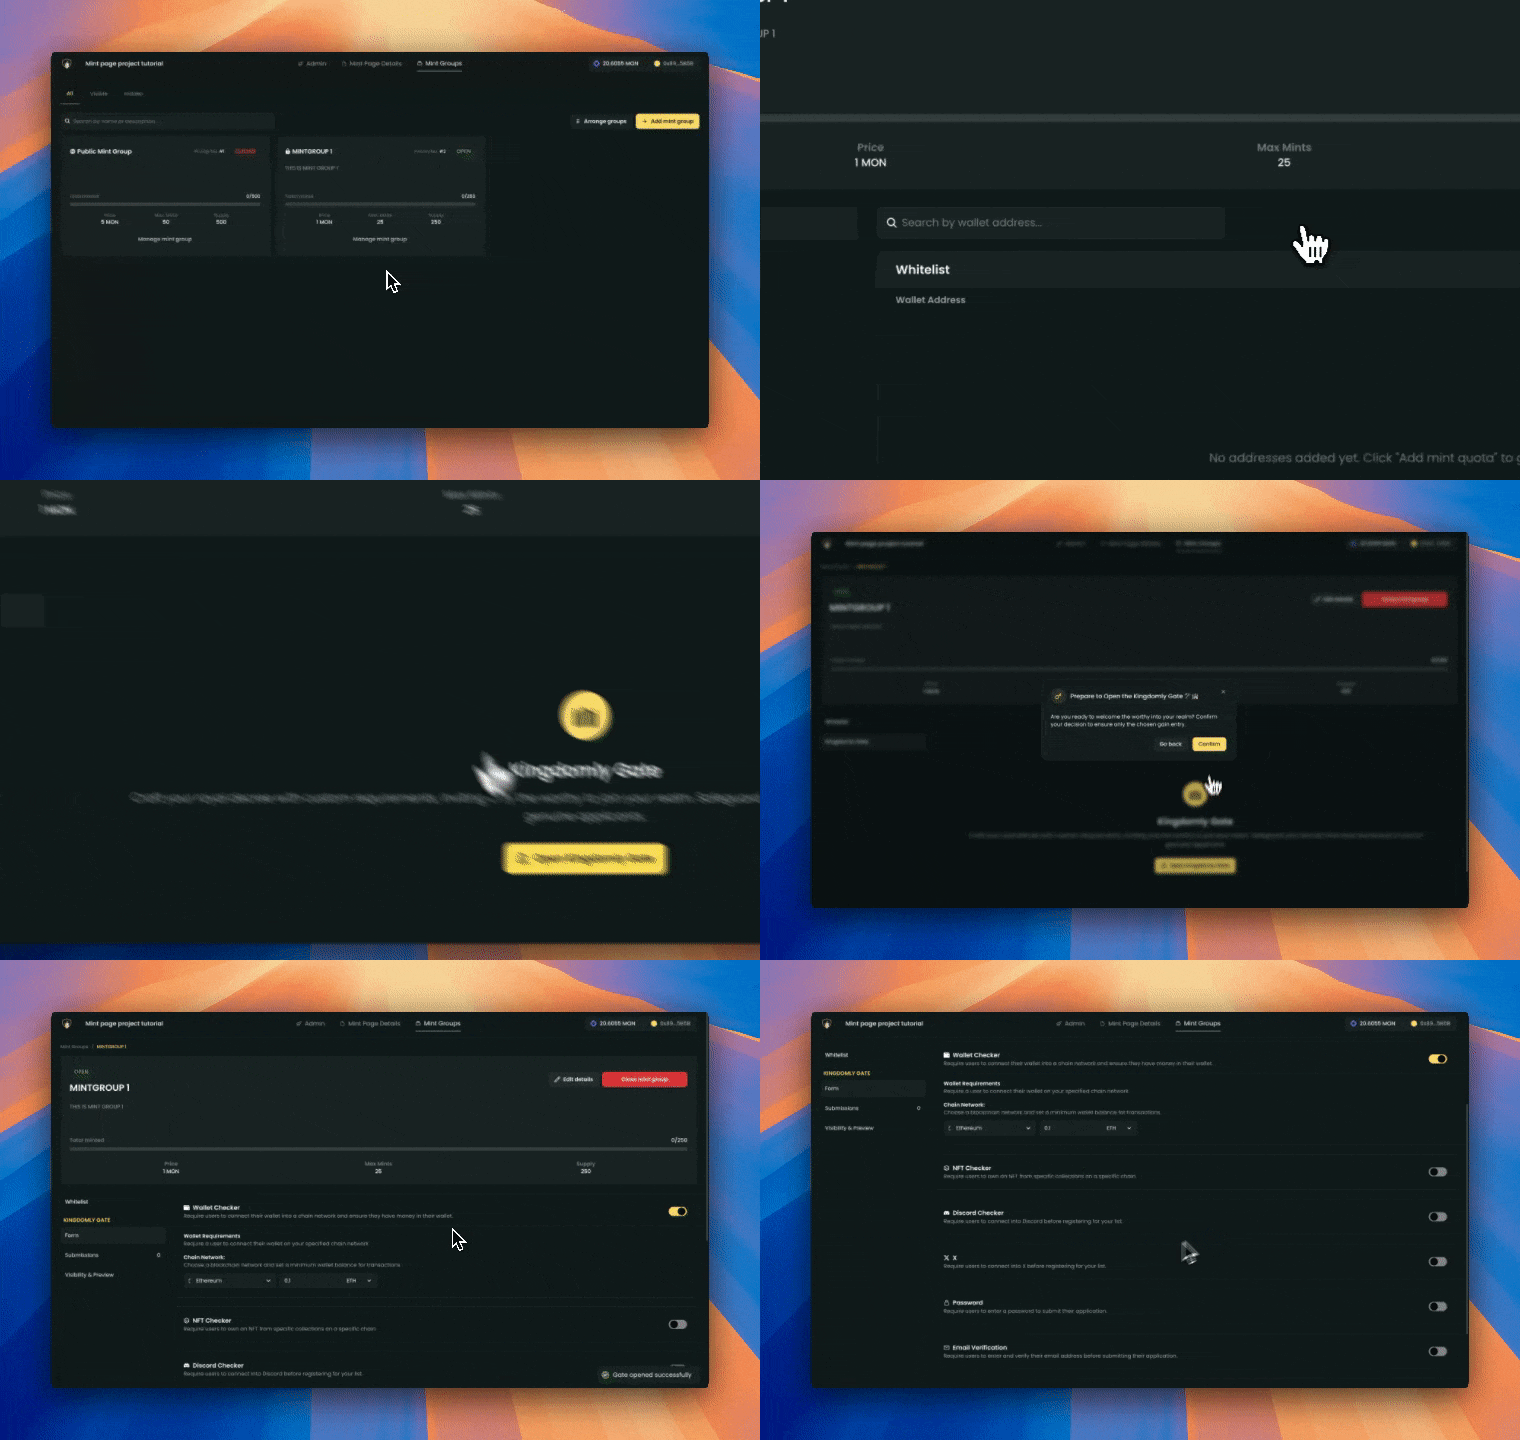
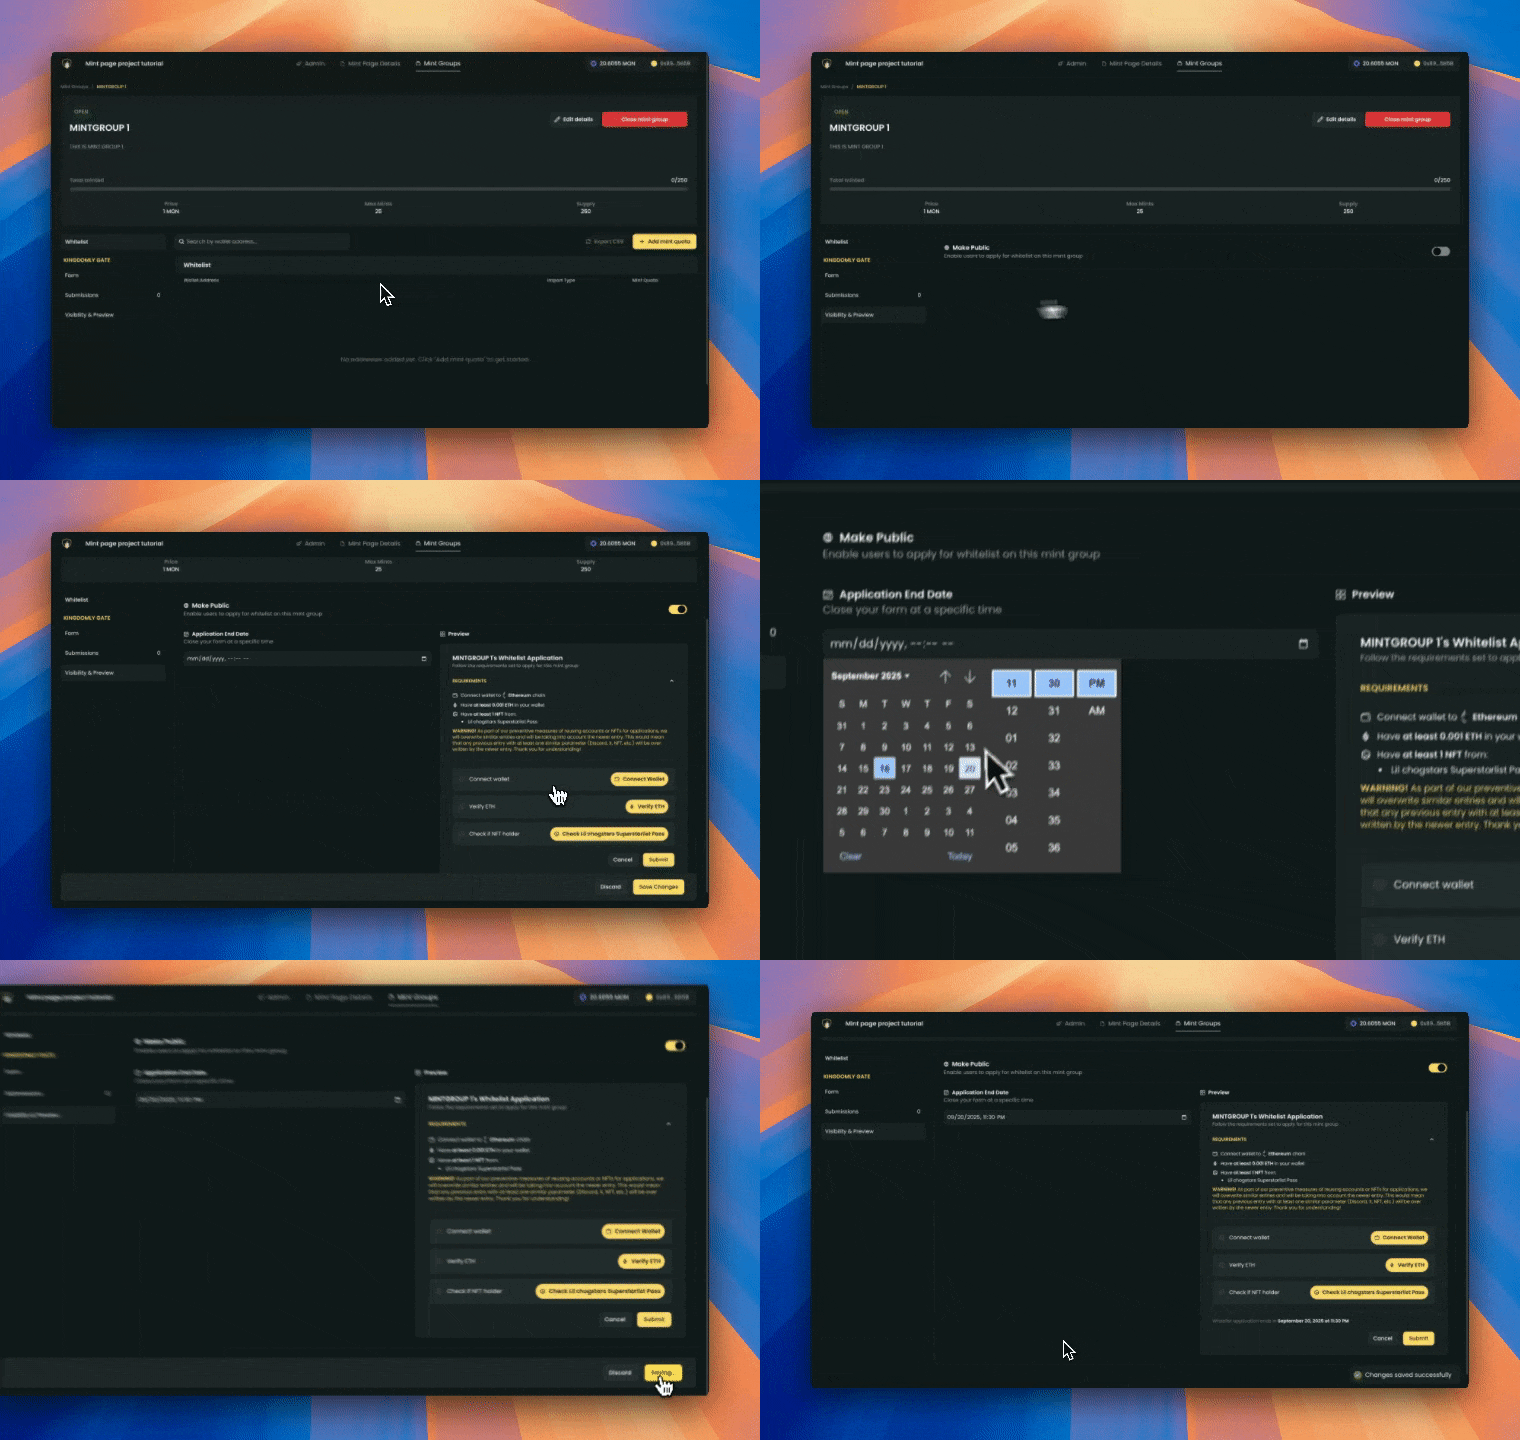
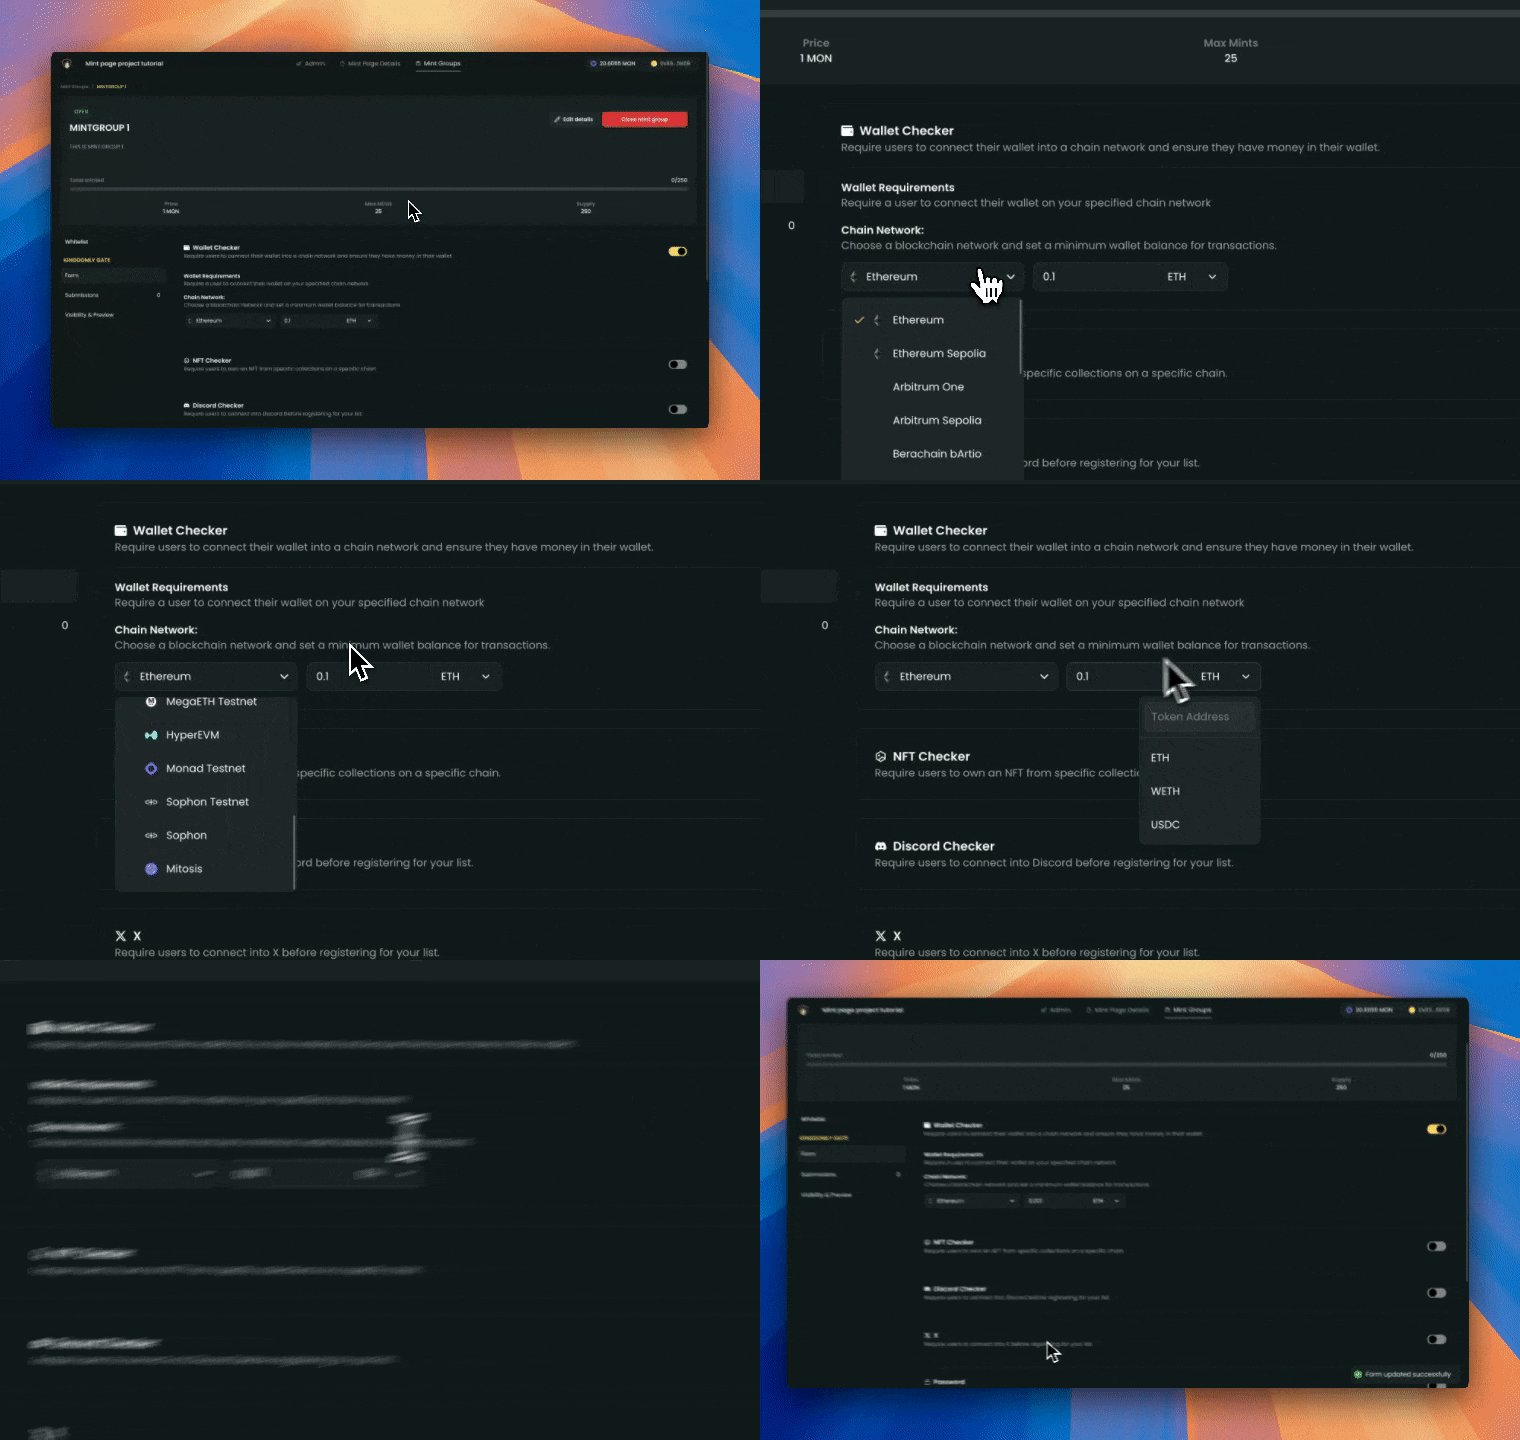 > *Example: Require a minimum of 0.05 ETH on Ethereum, or 50 USDC on Polygon before allowing form submission.*
 > *Example: Require whitelist applicants to hold at least one “Genesis Pass” NFT before joining the whitelist.*
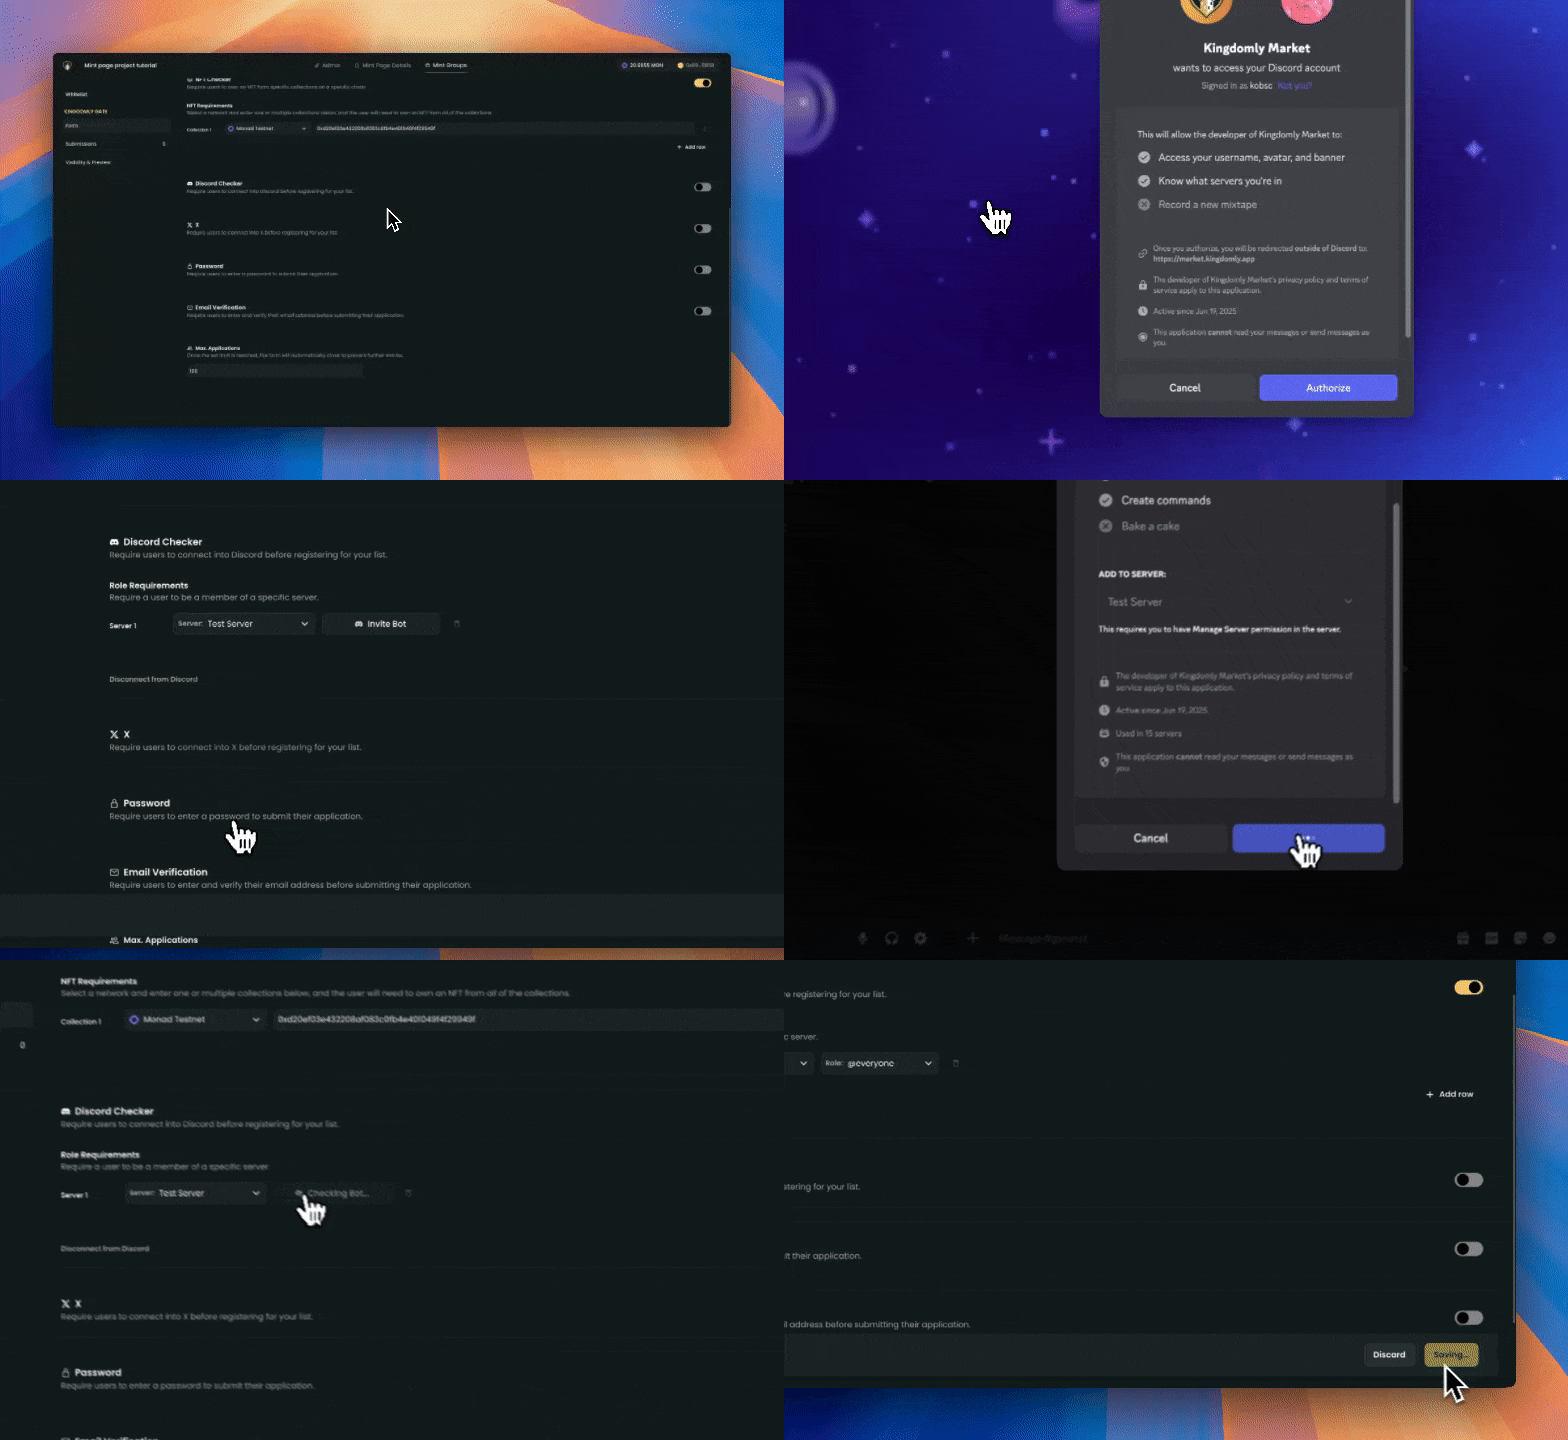 > *Example: Require the “OG Member” role in Discord before mint eligibility.*
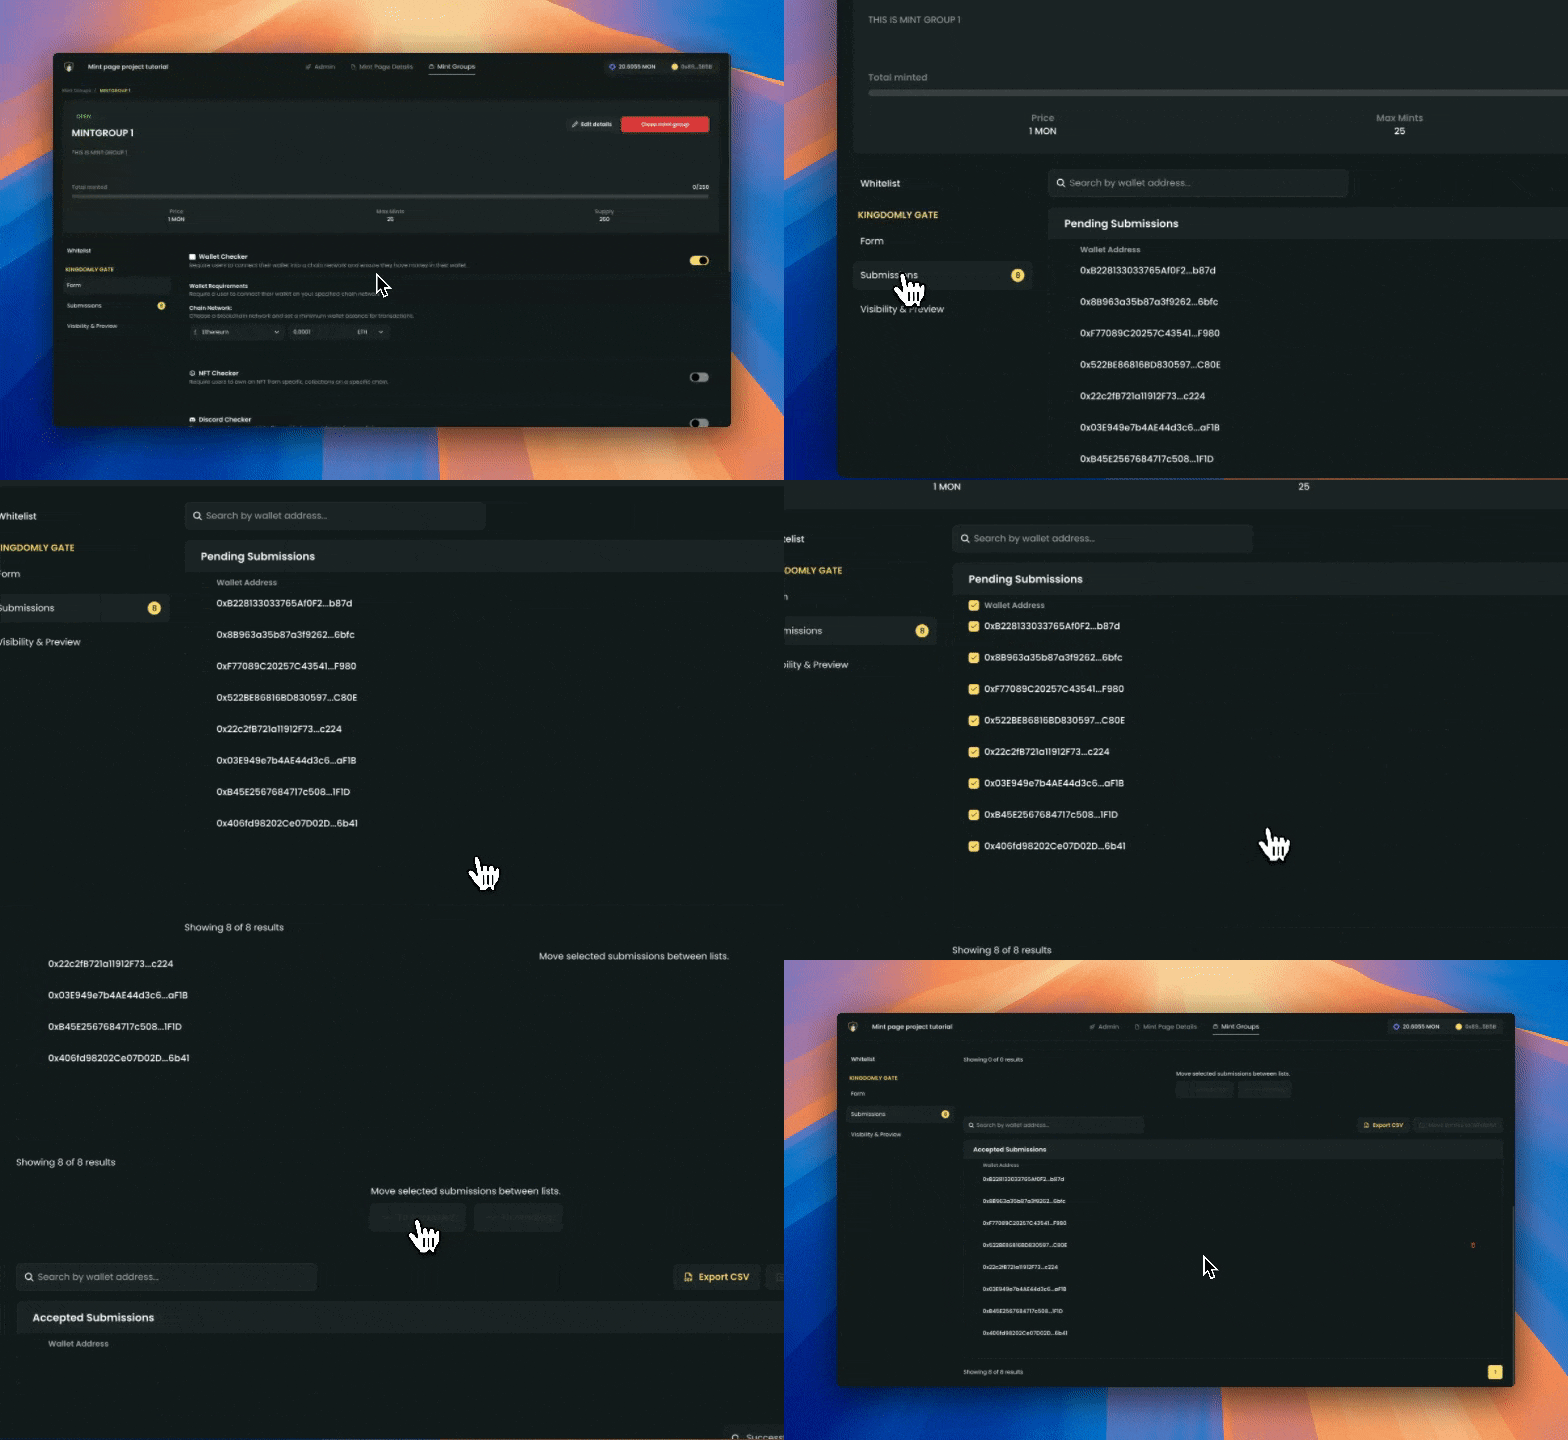
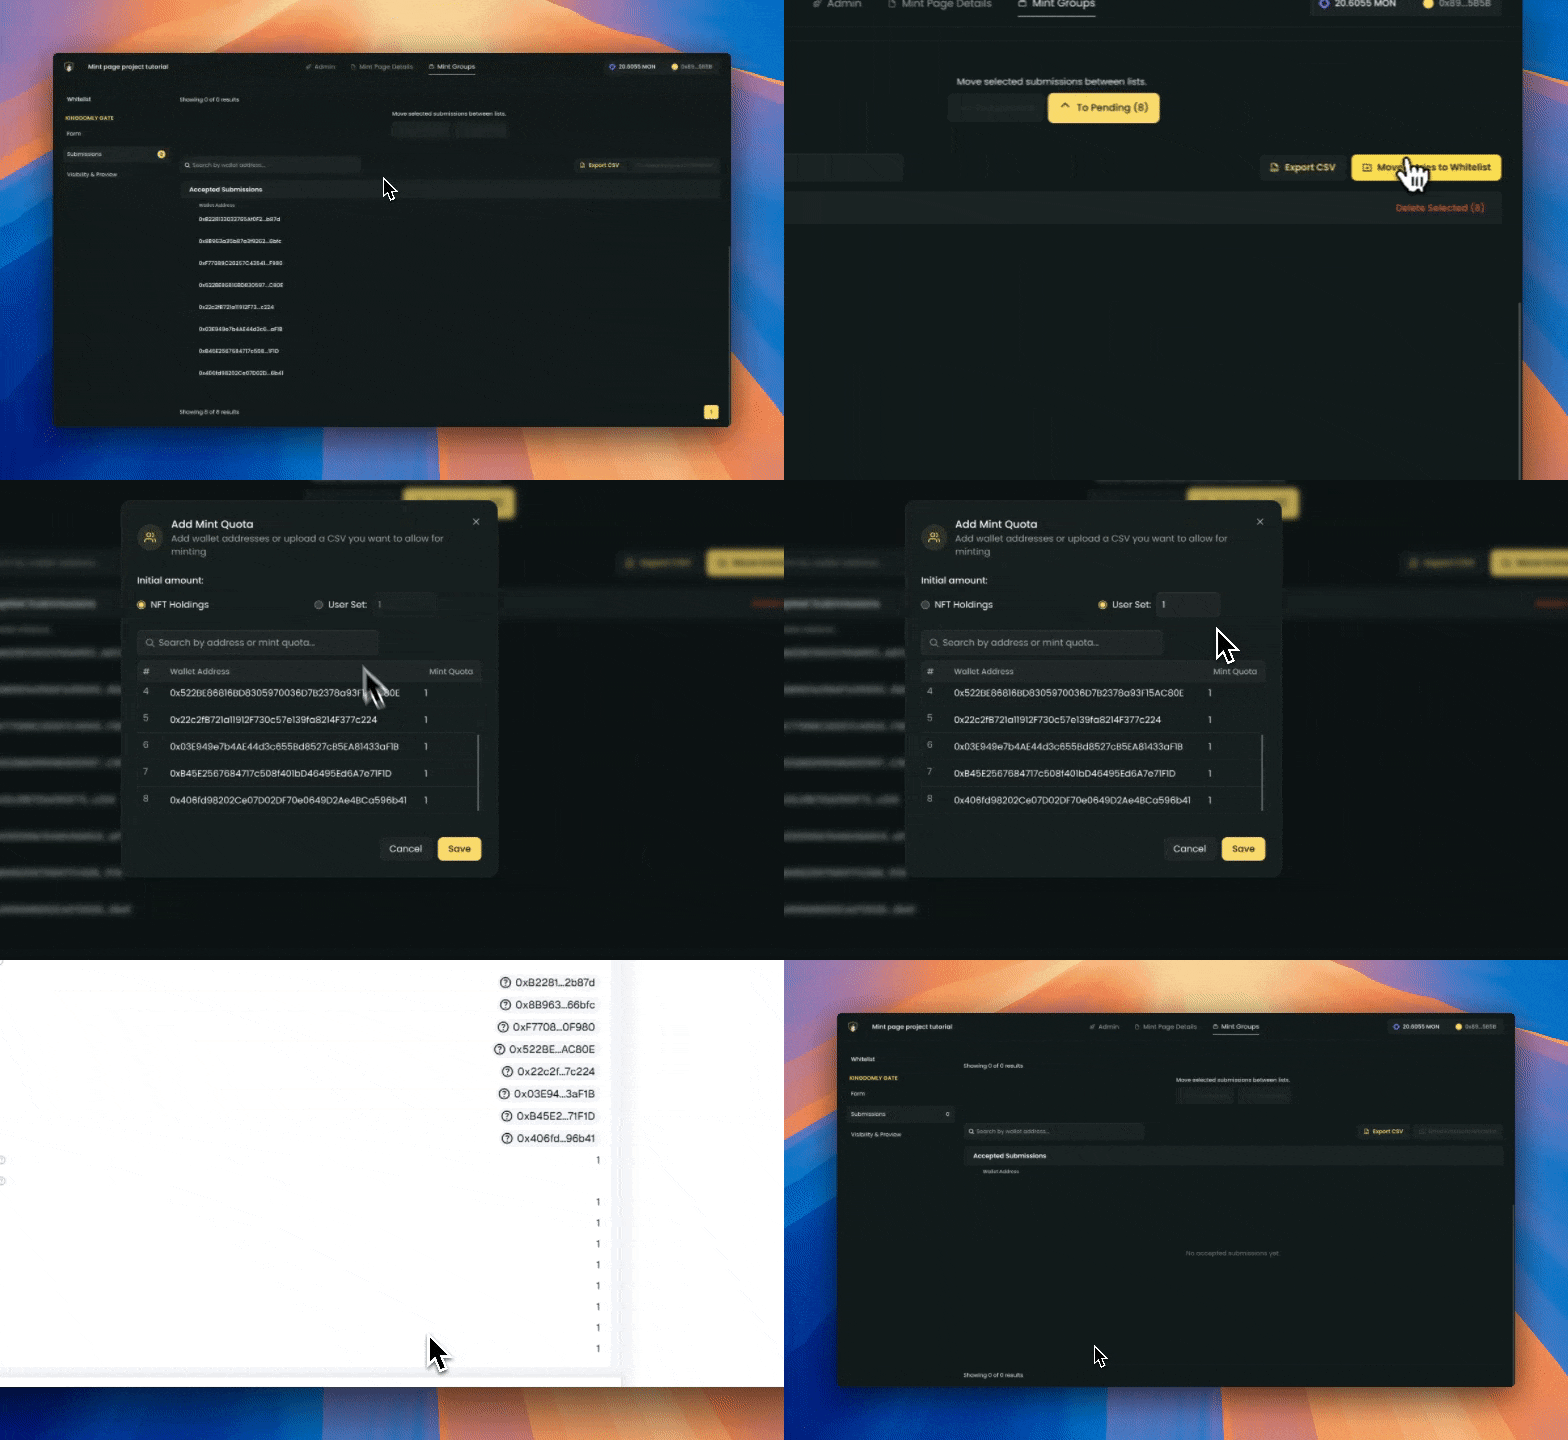 After moving the applicants to the whitelist, all accepted applicants will be added to the contract allowlist and will be removed in this table. To manage whitelists you can go to the mintgroup's whitelist management tab.
# Mint groups
Source: https://kingdomly.mintlify.app/market/creator-mint/mint-projects/mint-groups
Also known as mint phases.
## Overview
Mint groups allow you to organize your collection into different phases with independent settings. Each mint group can have its own whitelist, mint price, supply allocation, and start time, giving you complete control over your minting strategy.
### Flexibility and deployment states
Kingdomly provides flexibility in managing mint groups regardless of your contract deployment status:
**Before contract deployment:**
* Create and publish mint groups for display purposes
* Set tentative pricing and supply allocations
* Whitelists cannot be set until after contract deployment, this means that people will not see they are eligible for the mint yet.
**After contract deployment:**
* Add whitelists to your mint groups
* Finalize pricing and supply settings that is directly linked to the contract
* All group configurations become active and enforceable, users can now see they are eligible for the mint
* Continue editing, adding, or removing groups as needed
This approach allows you to prepare your mint strategy early while maintaining the ability to make adjustments throughout your project lifecycle.
### Adding mintgroups
Adding mint groups allows you to control who can mint your collection. You can add mintgroups by following the steps below:
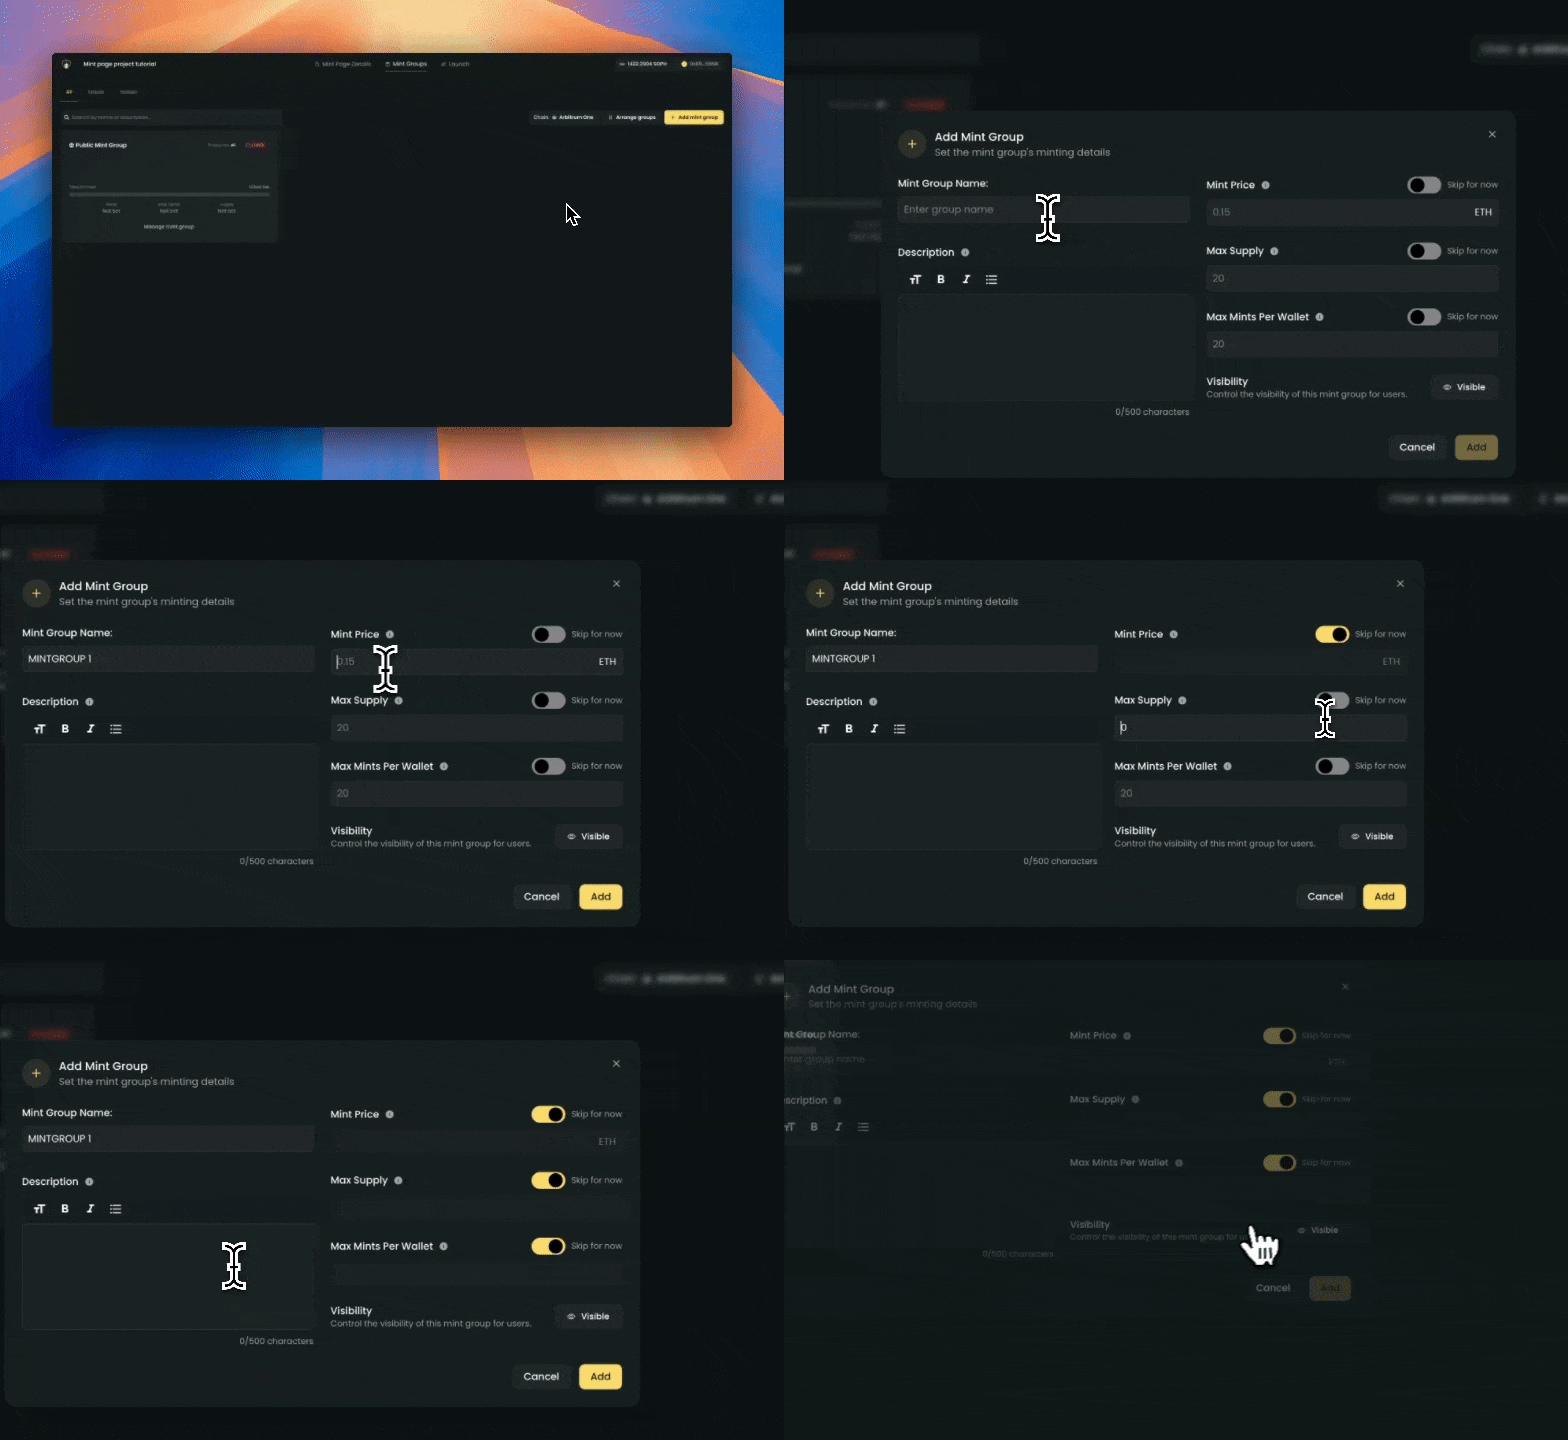
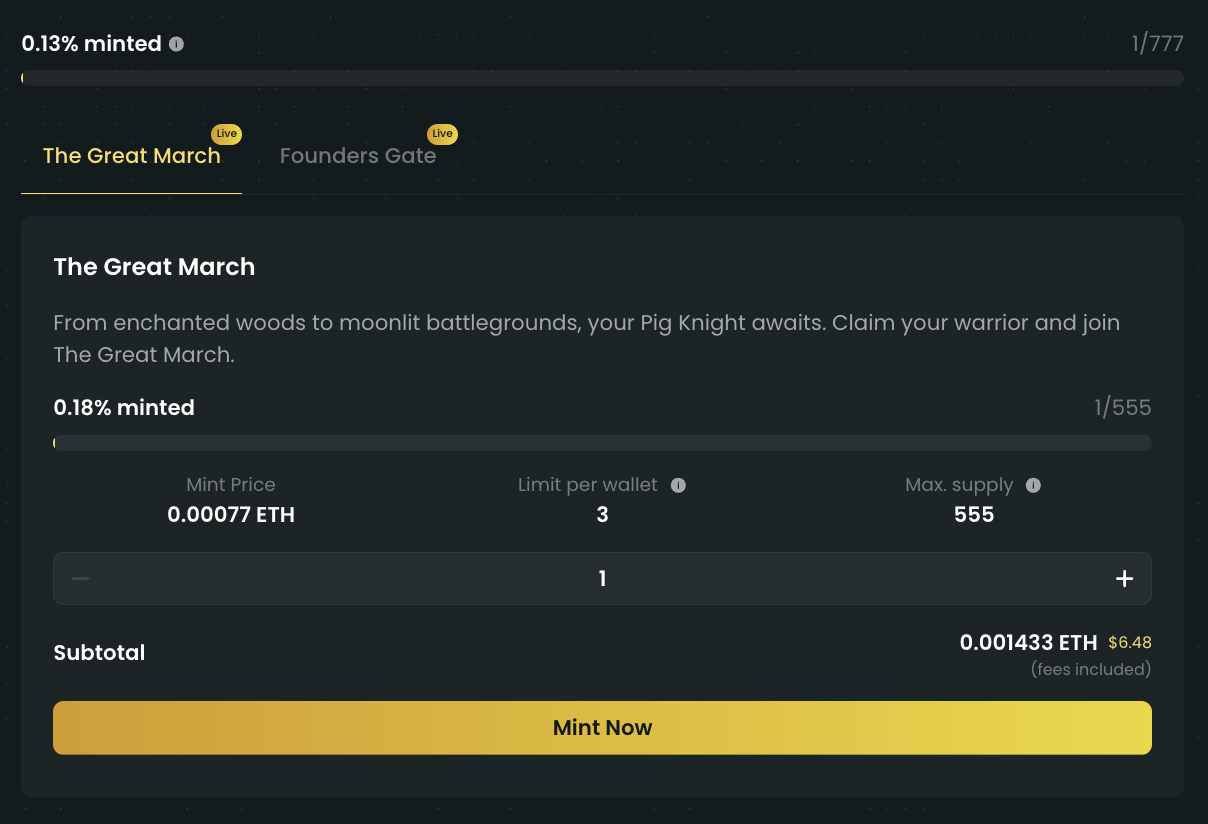
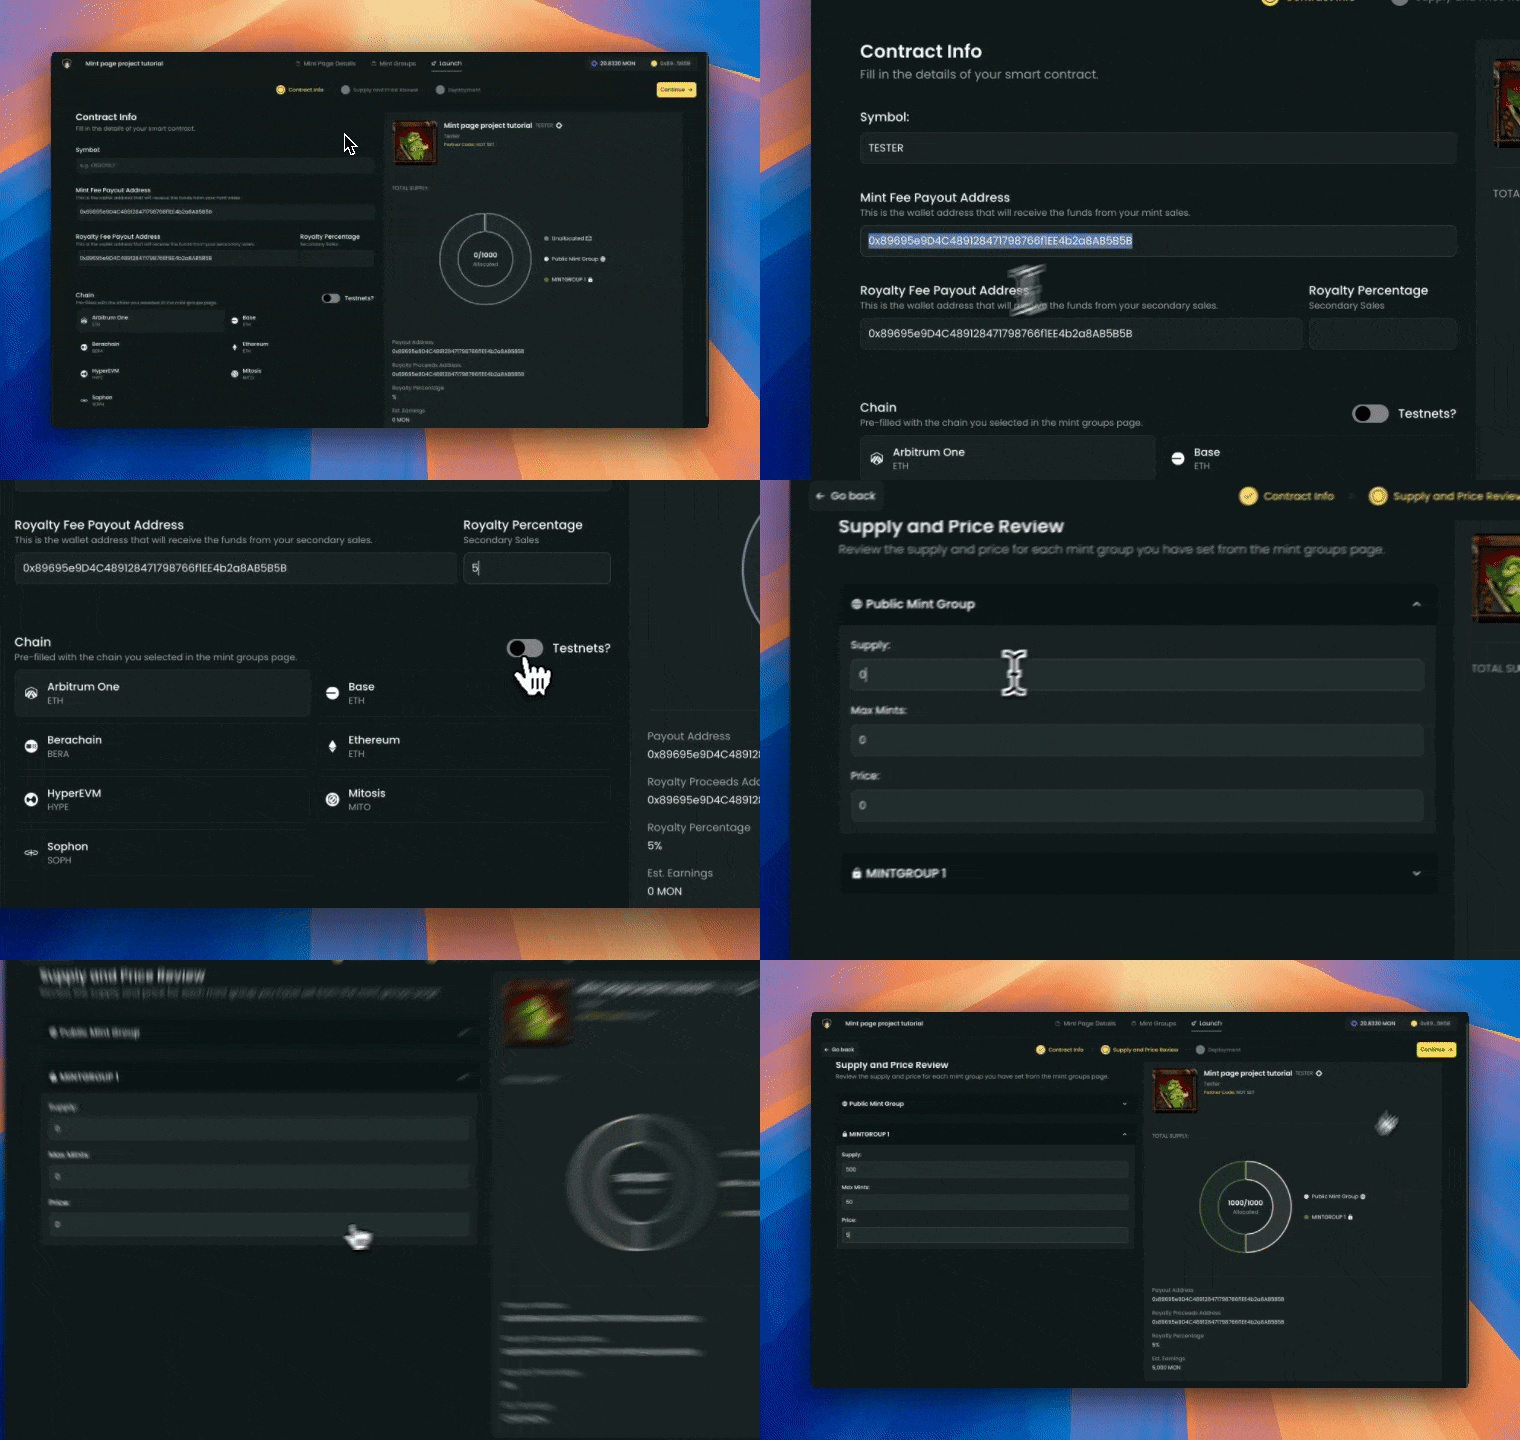 **What you need to know about finalizing mint allocation and contract details:**
* The **contract Notermation** that you set here is **permanent once deployed**.
* You **can not exceed the total supply** of your collection.
* The **total supply is linked** from the art project connected to your mint page.
* If you plan to **airdrop NFTs** you must **allocate spare supply** to your total supply.
* The **sum of all mint groups** can not exceed the total supply of your collection but **can be less**.
### Manging mint groups
Managing mint groups will vary depending on your **contract deployment status**. For the following guide, we will explain how to manage mint groups with a **deployed contract scenario**. If you have not deployed yet, features like **adding whitelists**, **starting mint live**, and **editing mint groups** will not be available.
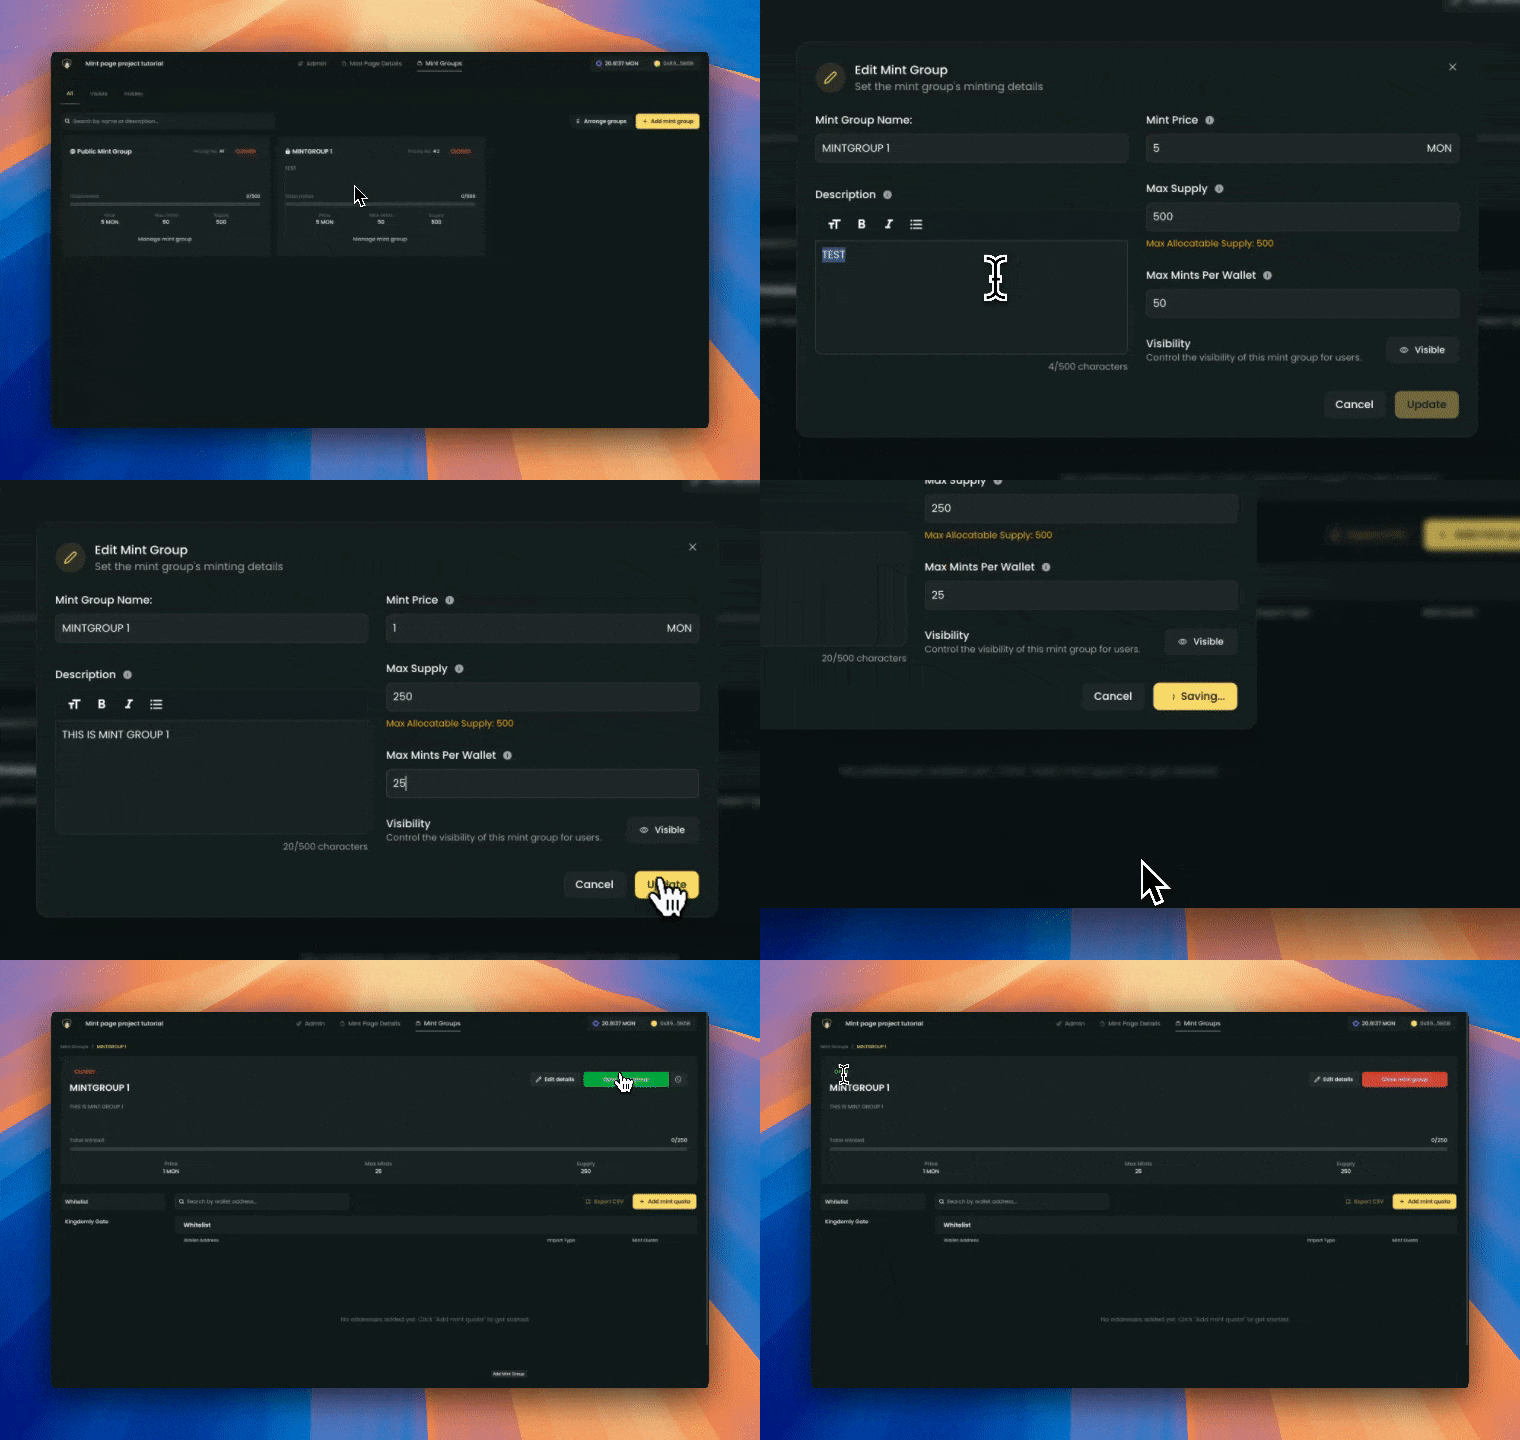 **What you need to know when managing mint groups:**
* You can set the **mint group live time in advance**. The time set is based on your **LOCAL TIMEZONE**.
* Changing **mint price**, **supply**, and **max mints per wallet** (will be deprecated in the future) will reflect **one transaction on the blockchain**. Please make sure to have enough funds to cover the transaction fees.
* **Setting mint group live** is different from **start mint live**. Setting mint group live only opens the specific mint group for minting. You will still need to start mint live to start minting (think of it as a **2 way switch**)
### Managing whitelists
Allow users to mint from a specific mint group by adding them in the whitelists.
There are 2 ways to add whitelists:
1. Add whitelist by collection snapshot. E.g. "Whitelist all holders of \[collection]"
2. Add whitelist by csv.
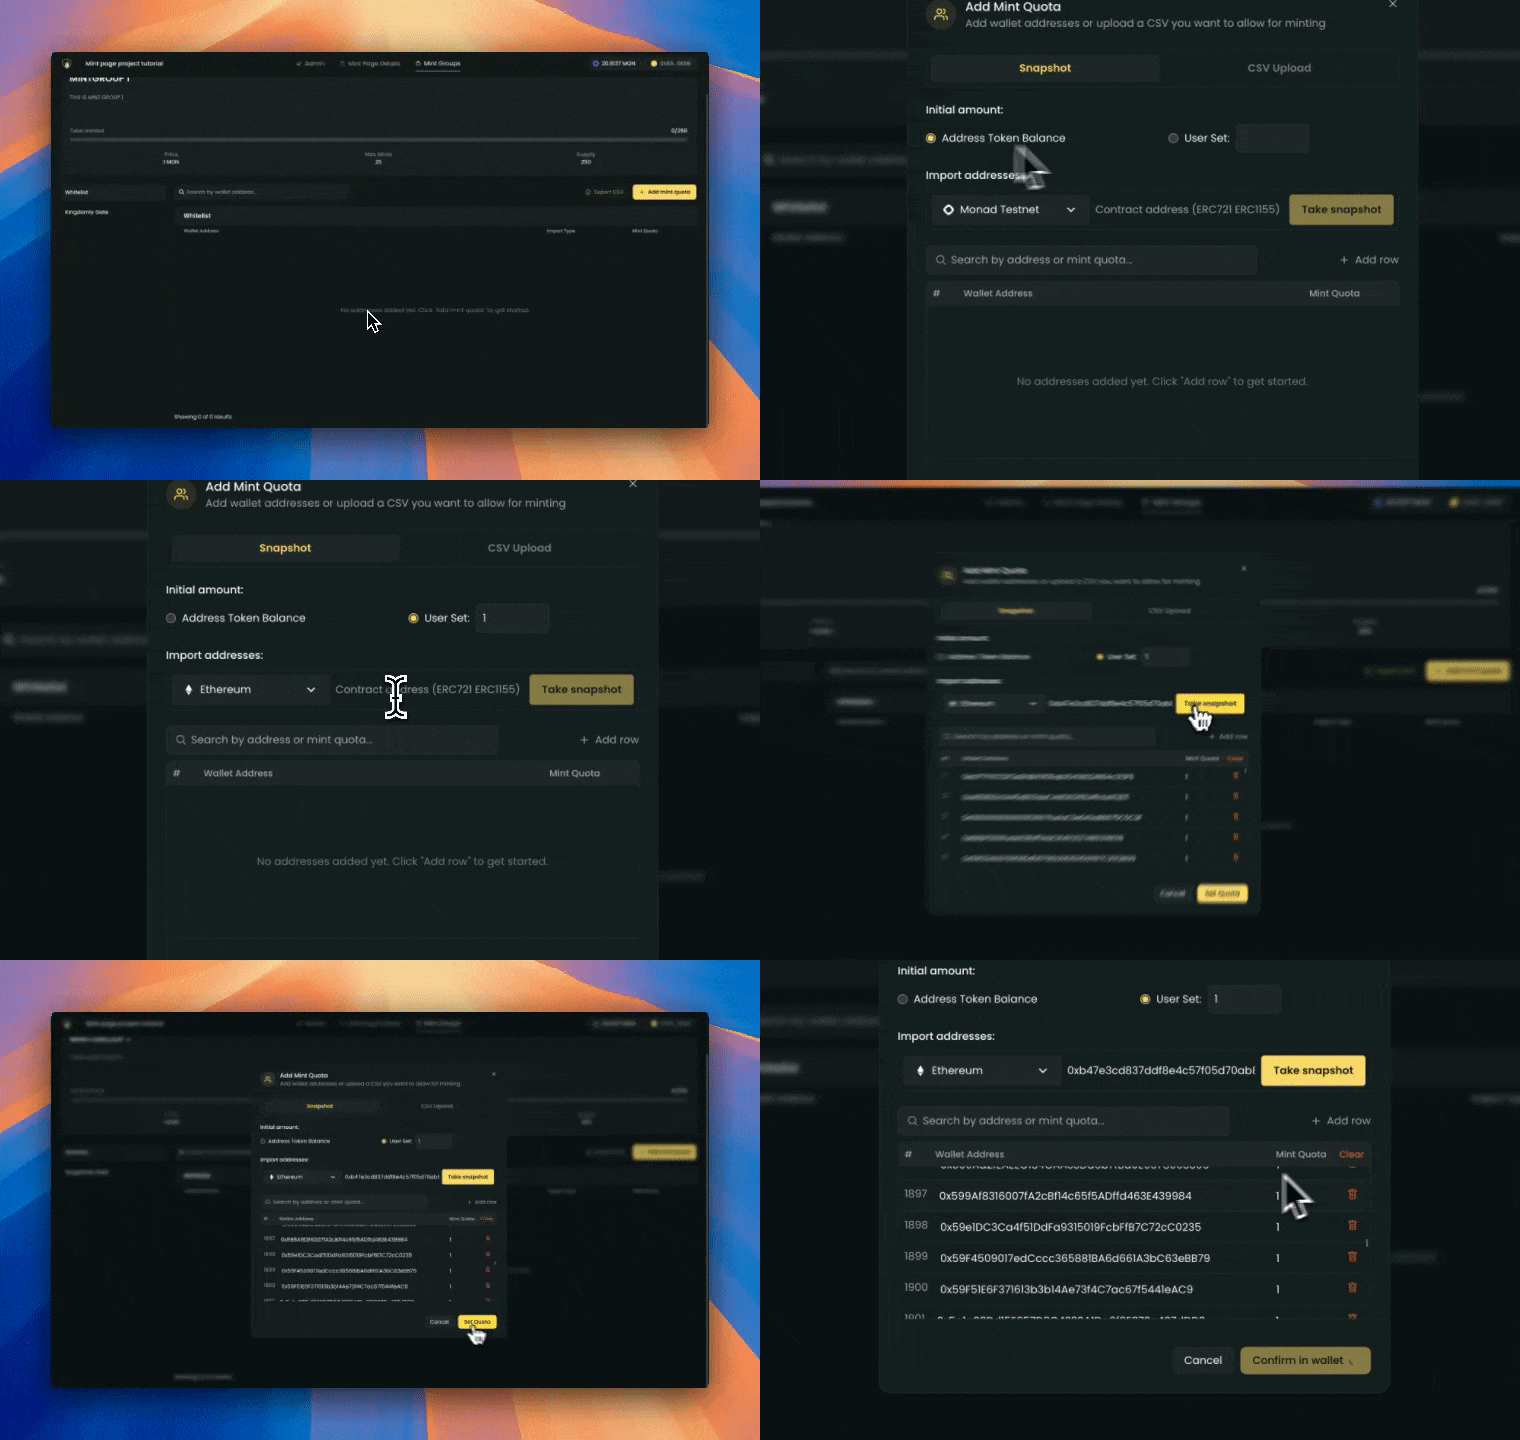
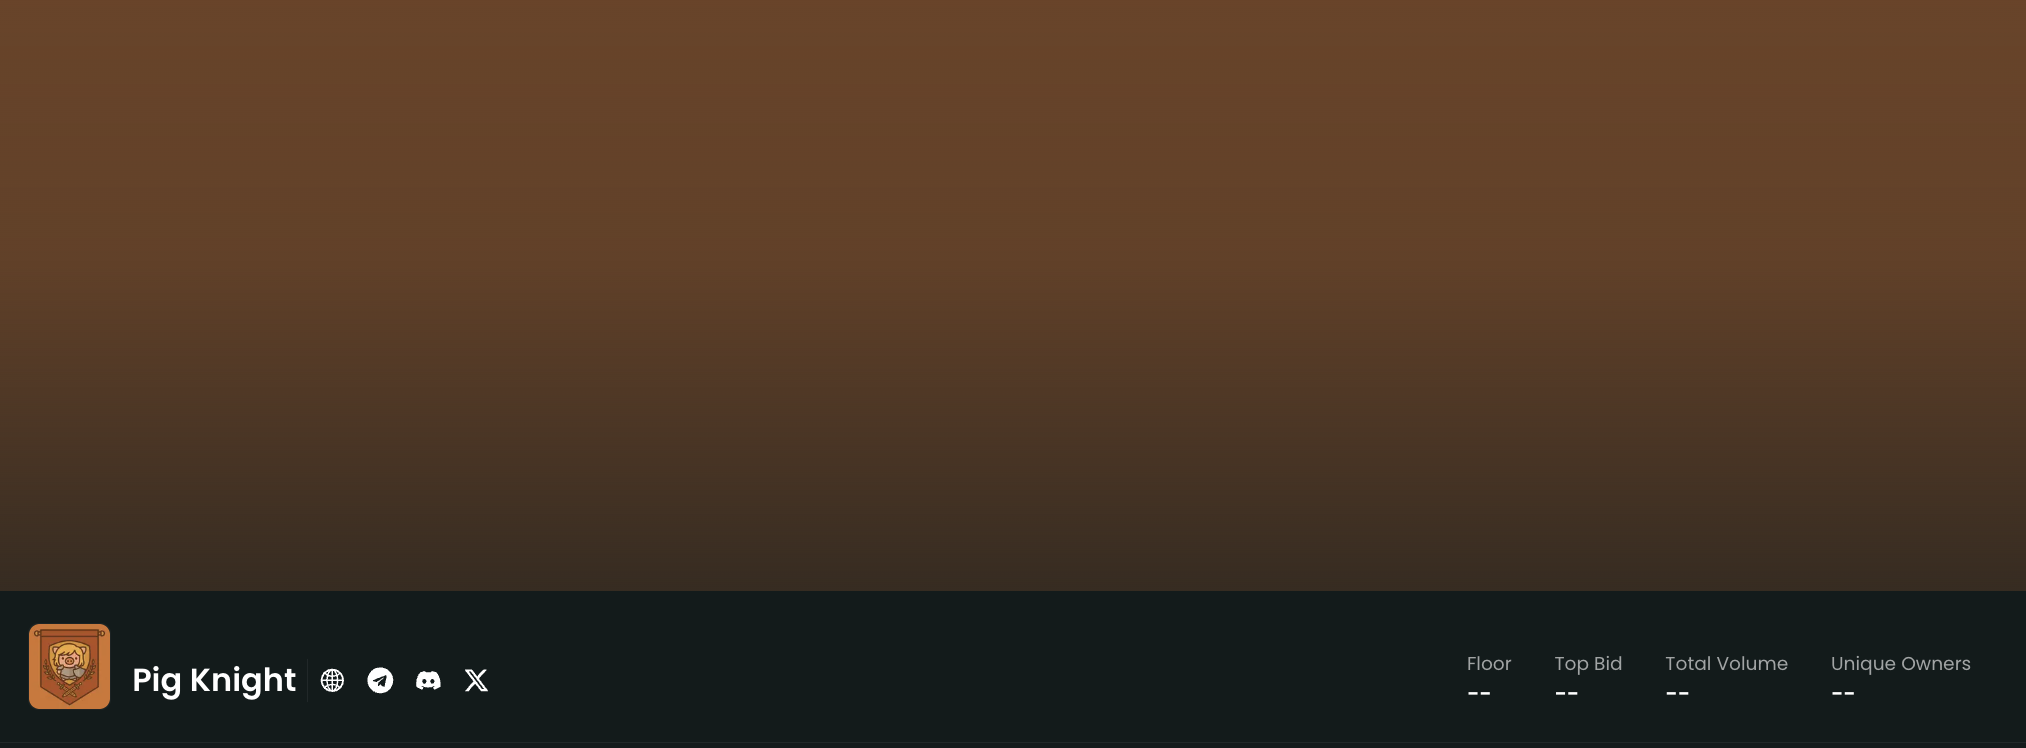
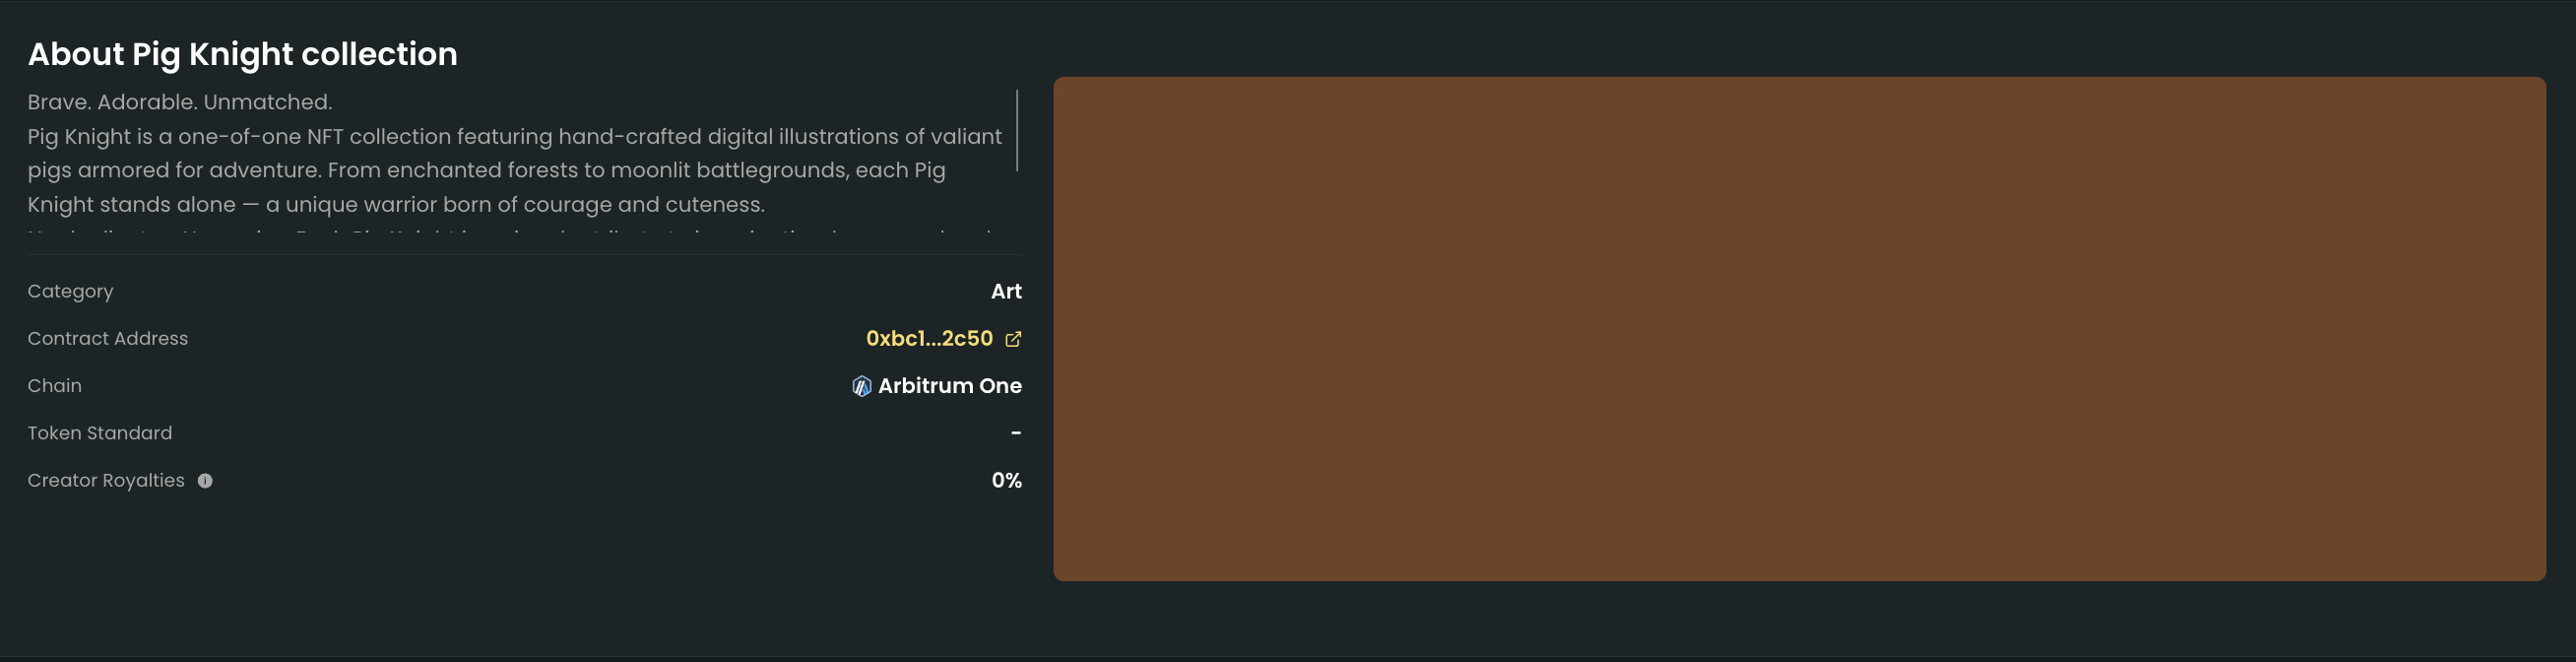
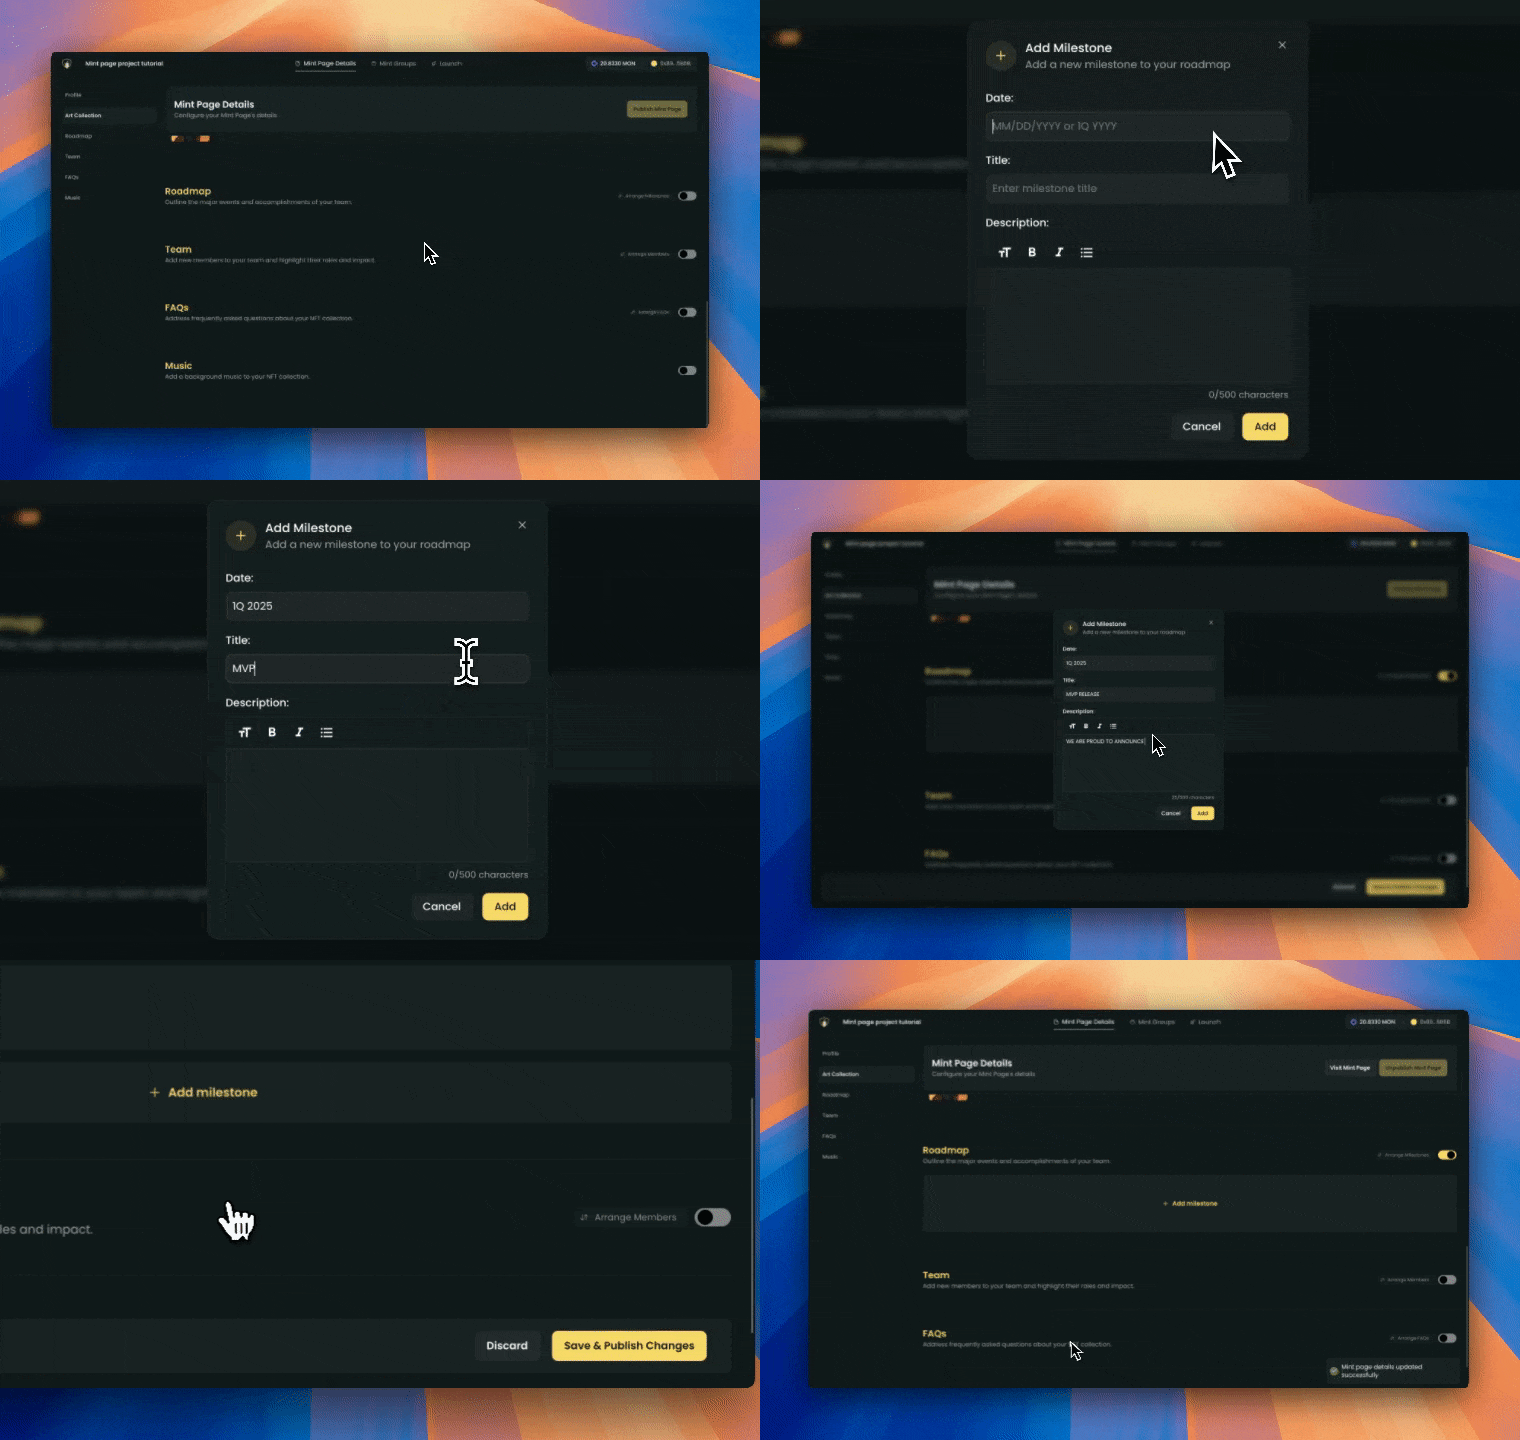 **What does this look like on the mint page:**
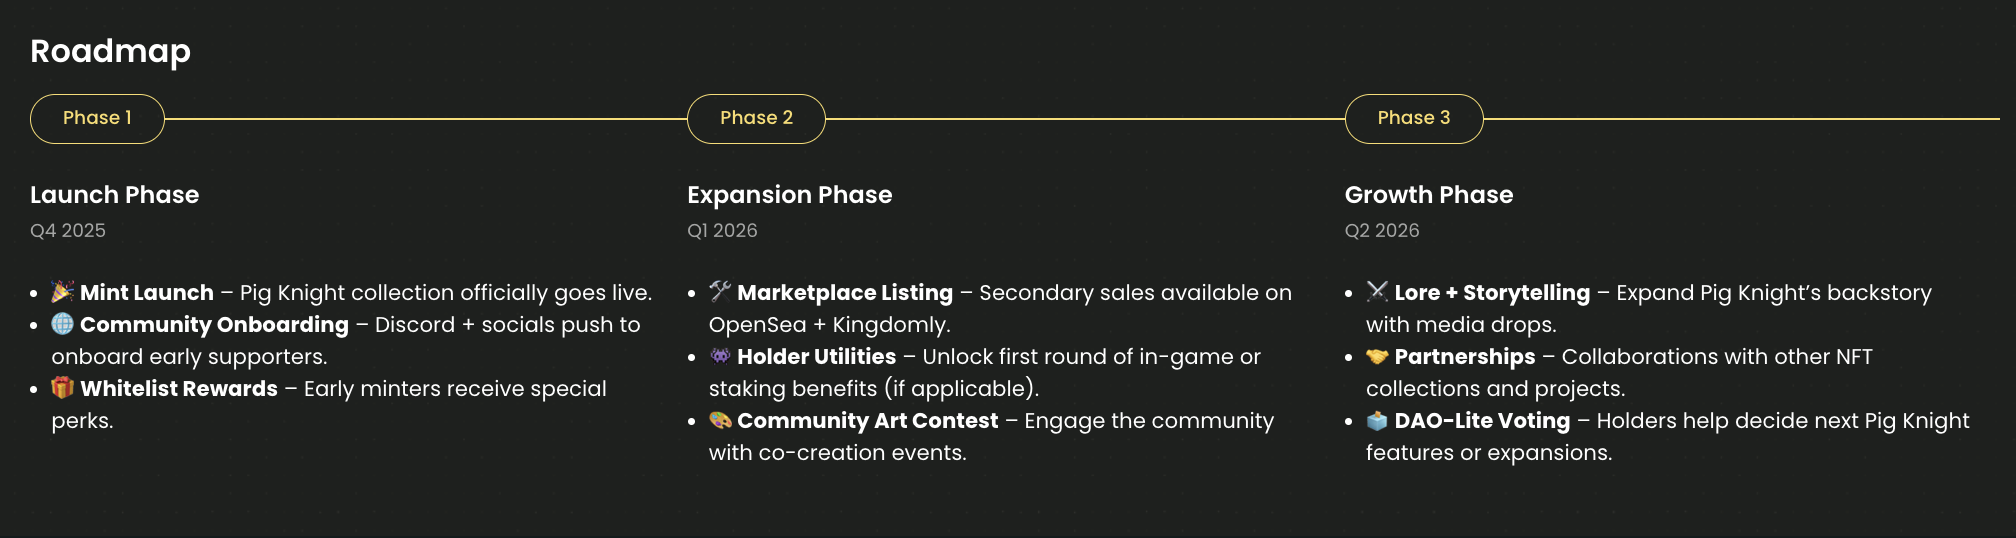
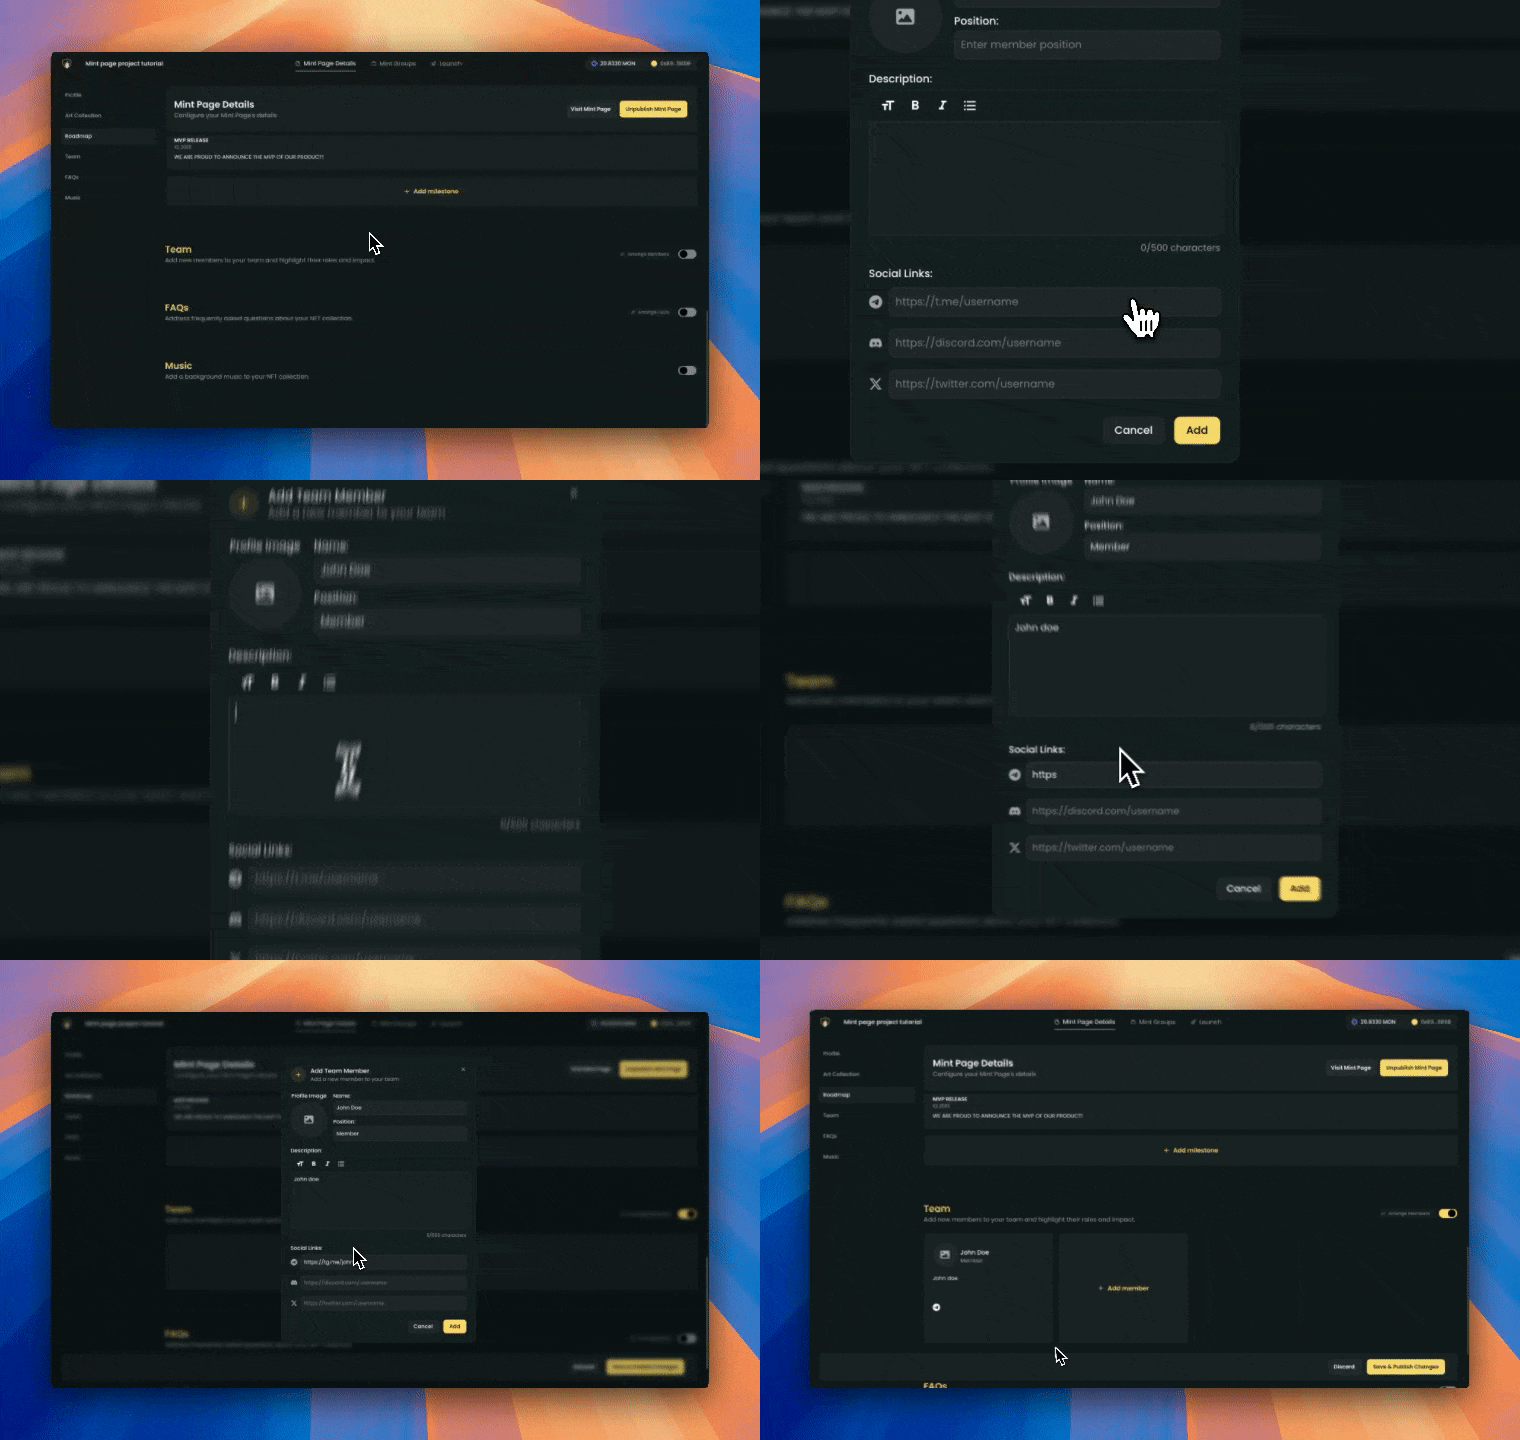 **What does this look like on the mint page:**
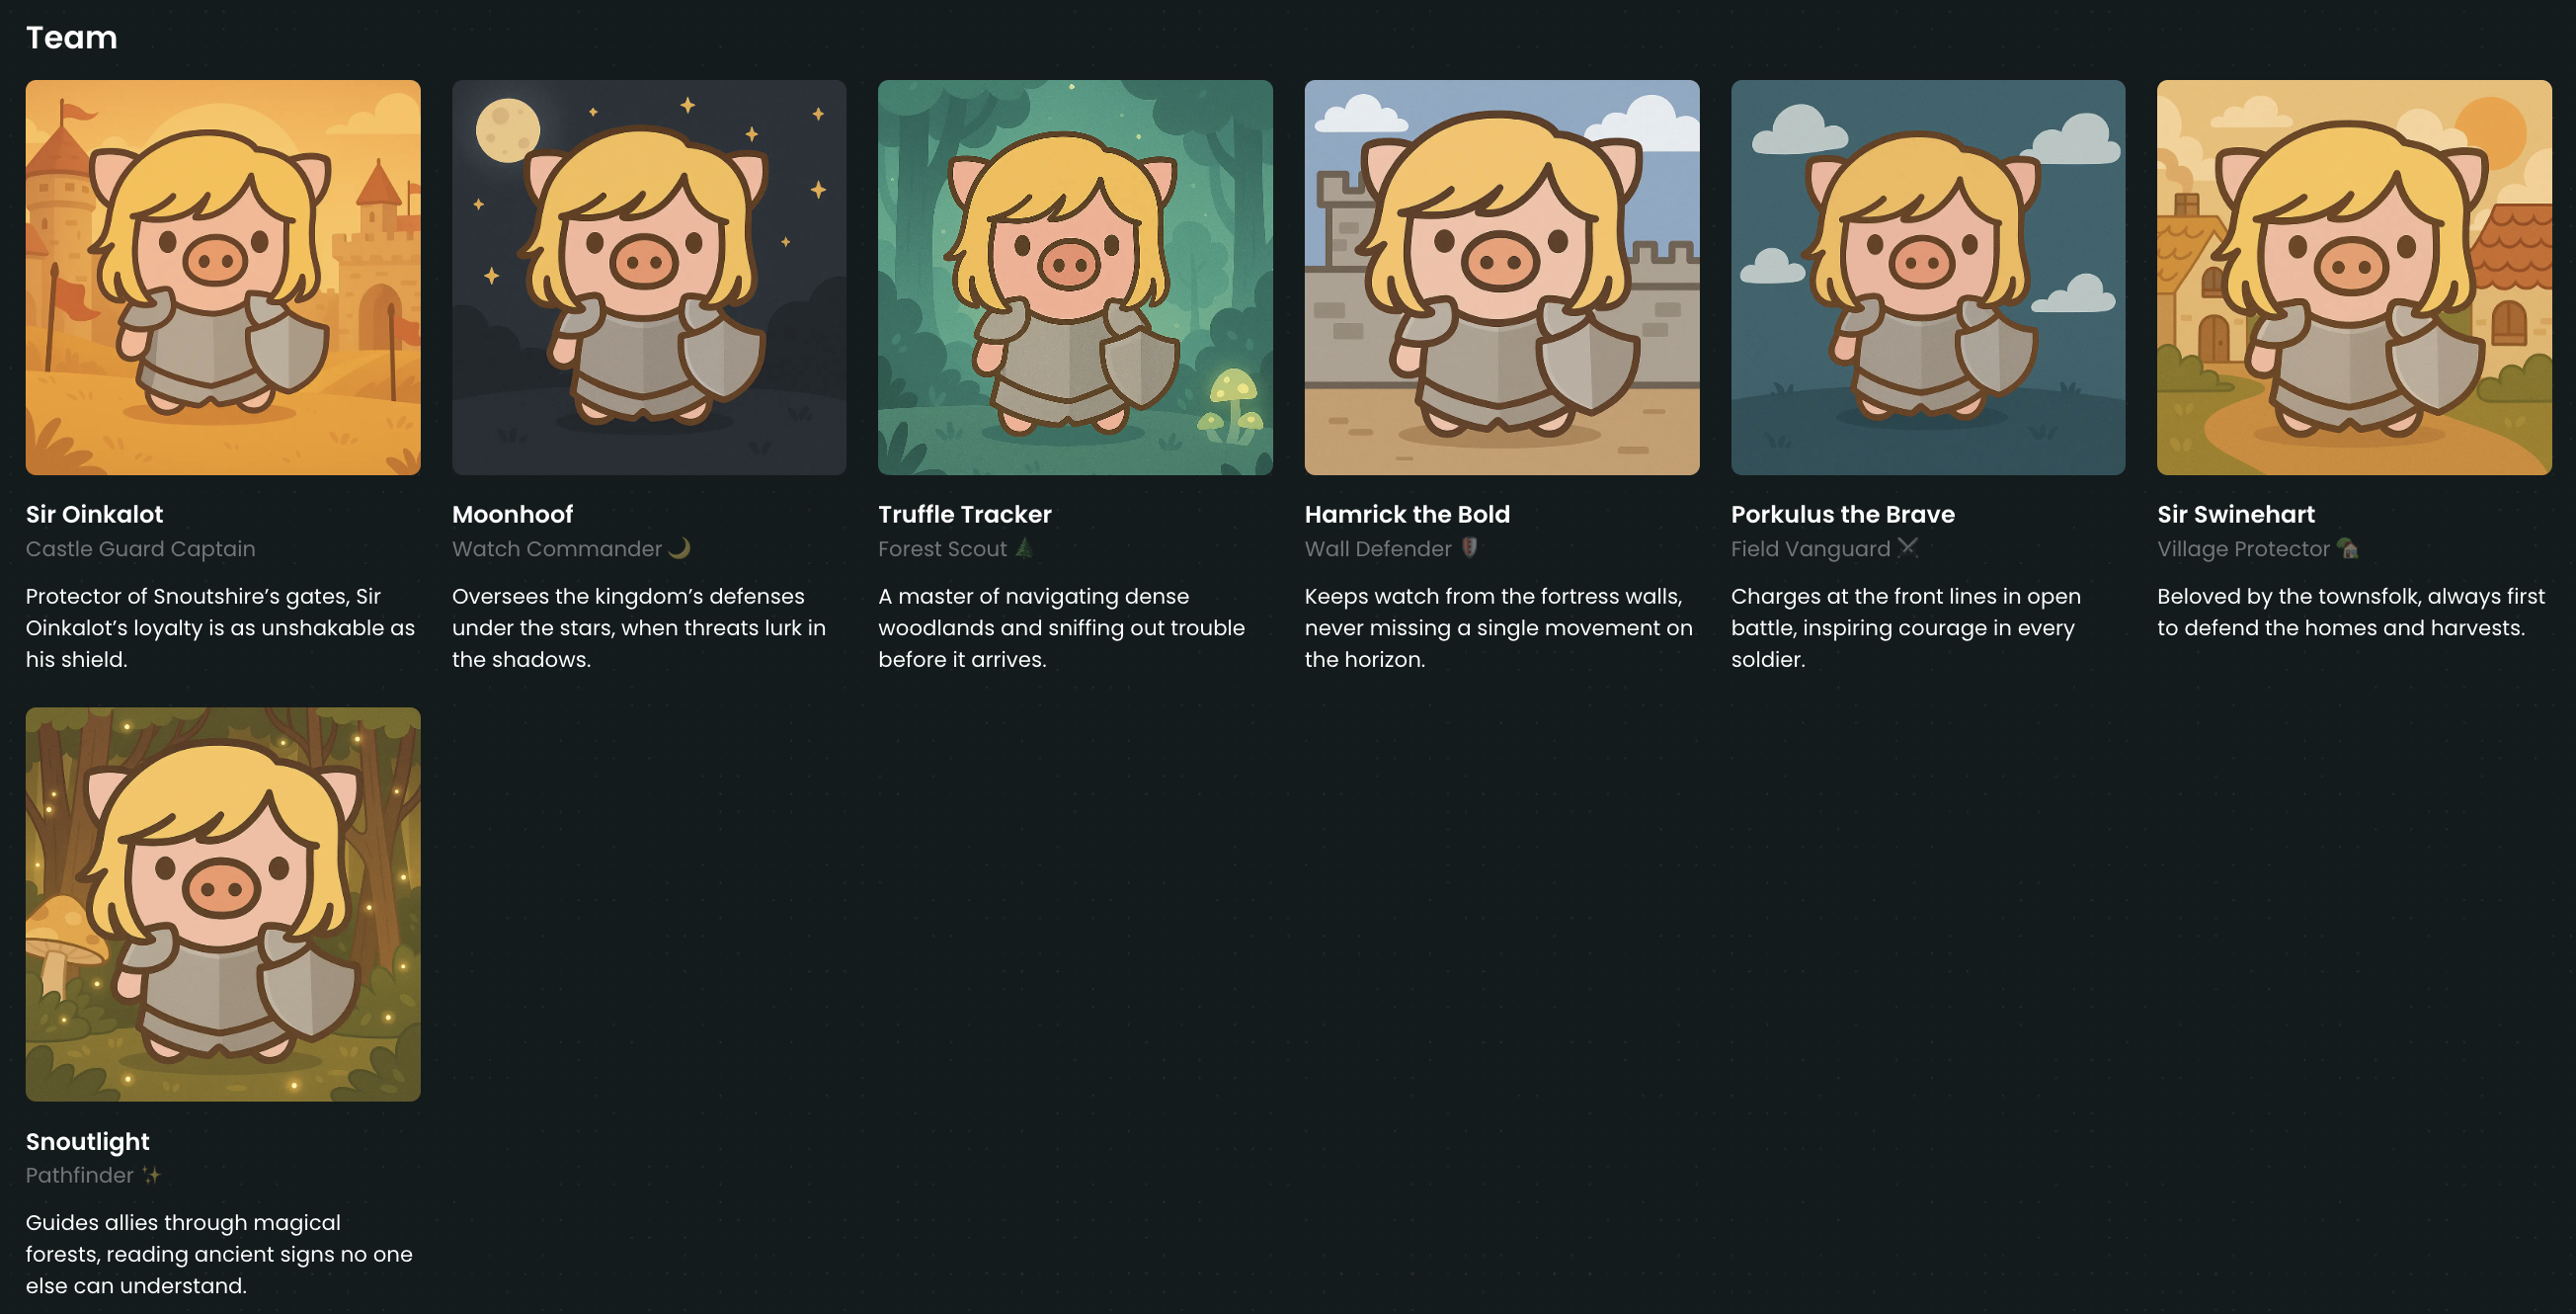
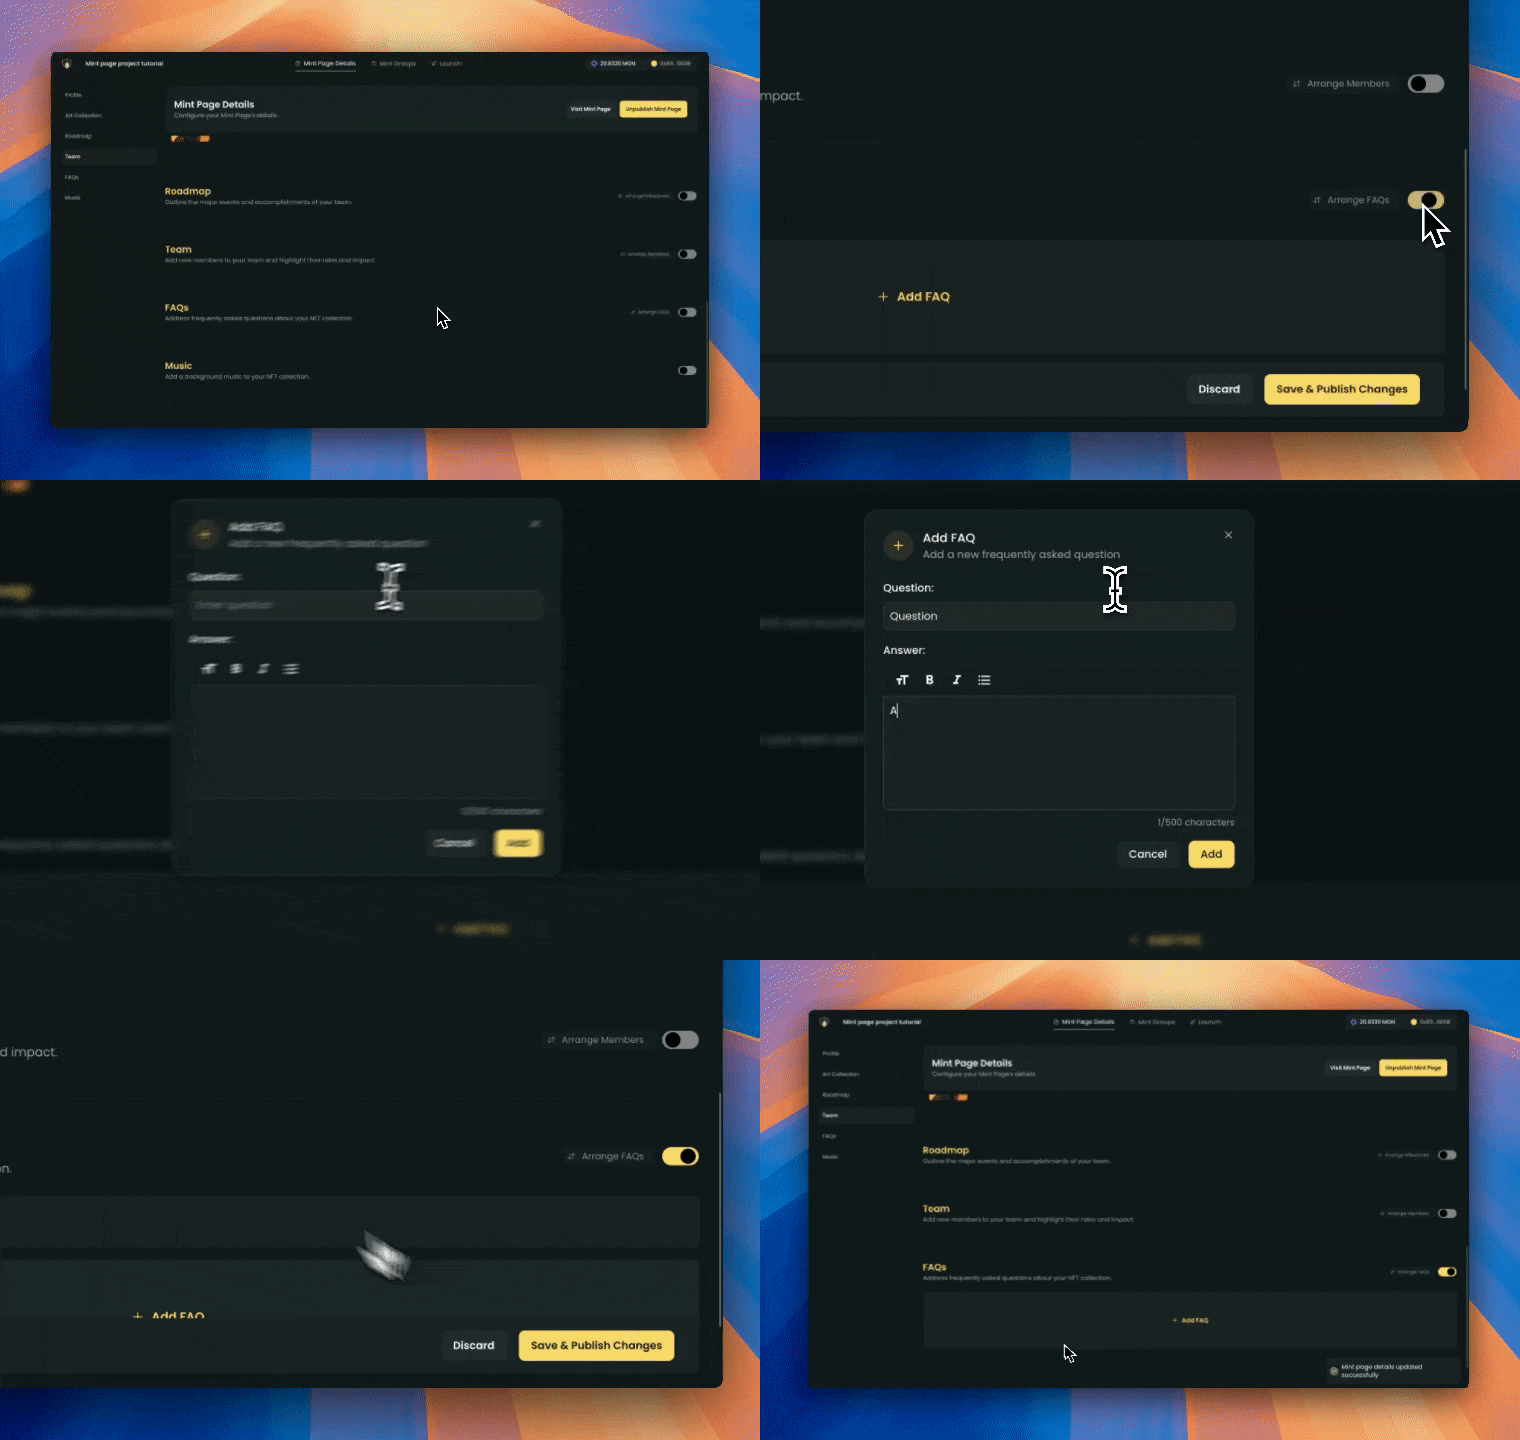 **What does this look like on the mint page:**