> ## Documentation Index
> Fetch the complete documentation index at: https://docs.kingdomly.app/llms.txt
> Use this file to discover all available pages before exploring further.
# Generative
## Creating a generative art project
Generative art projects can be simple and complex, depending on the complexity of the layers you want to add. Creativity is the key to a successful generative art project.
To create a generative art project, you can follow these steps or watch the video tutorial below:
Go to the Art Gallery.
Click on the "**Create**" button.
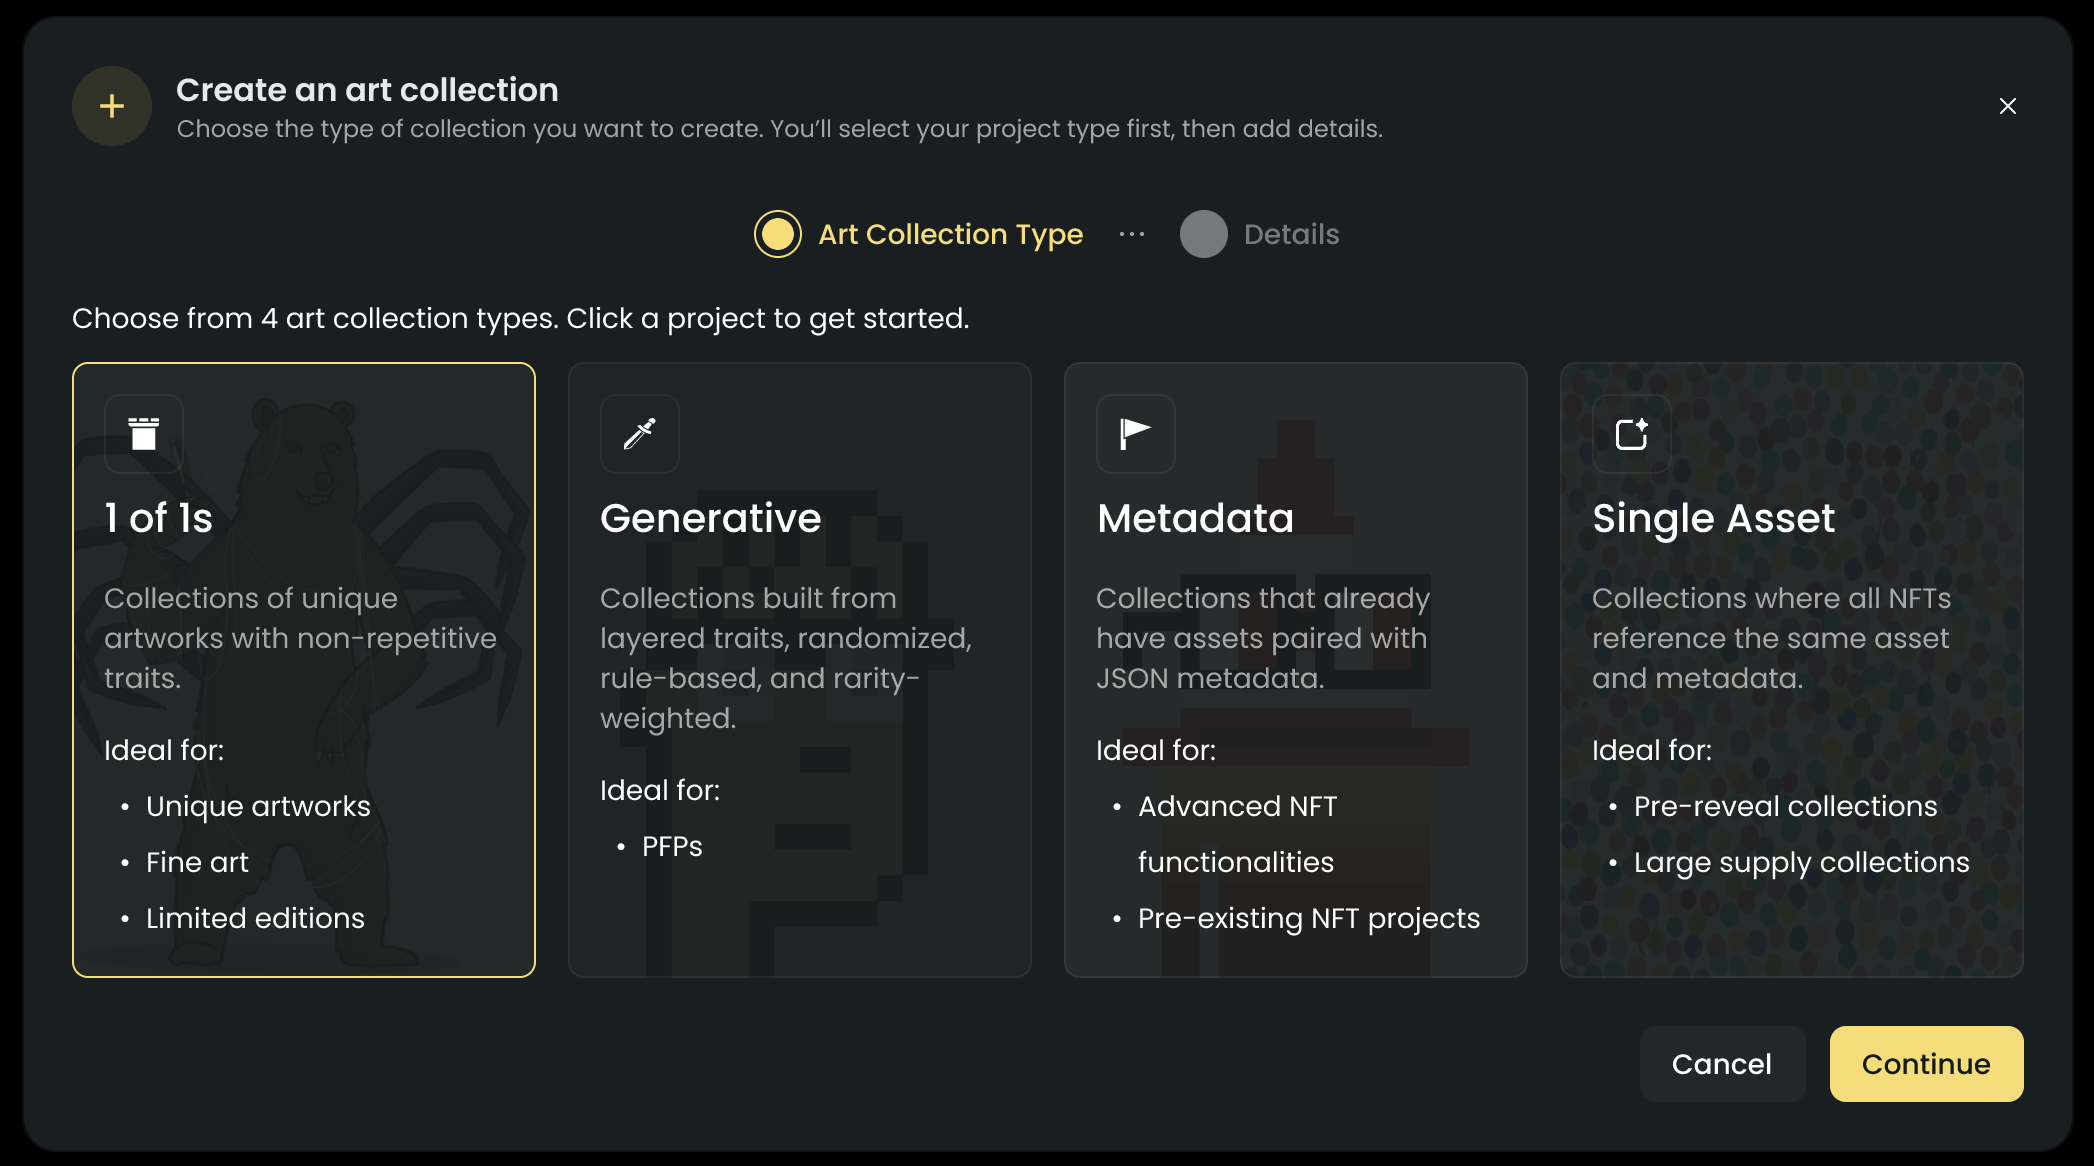
Select the "**Generative**" option.
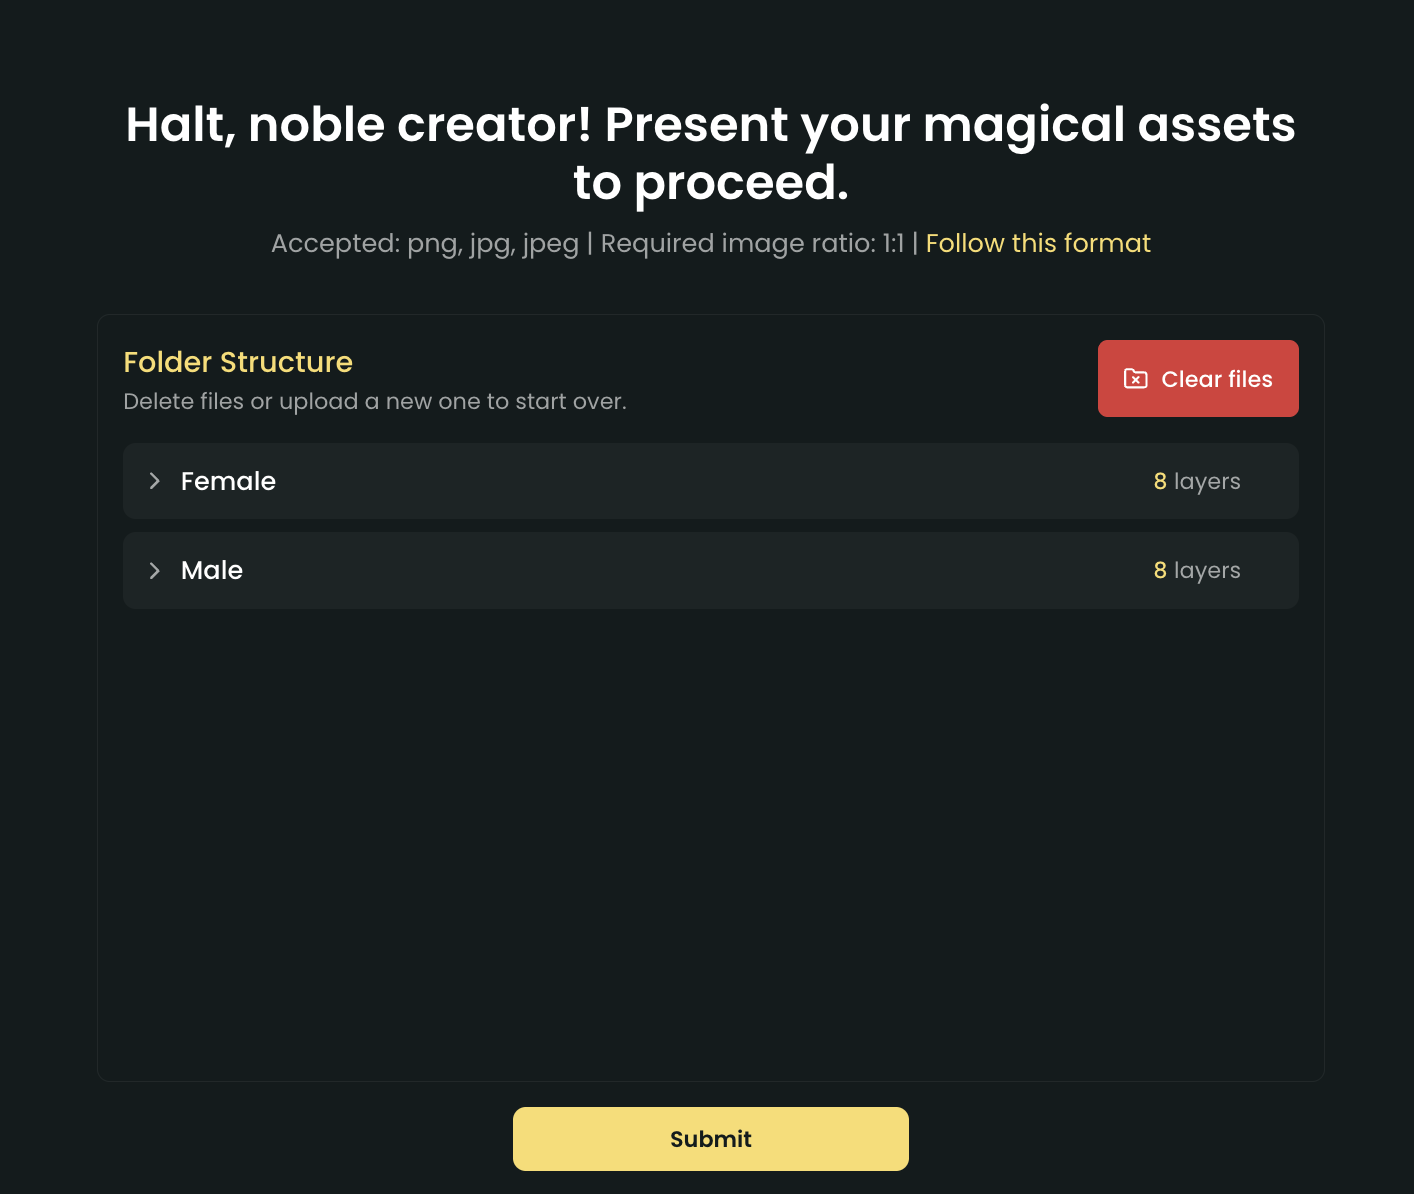
Upload your generative asset folder. You may refer here for the folder structure
Setup your layer hierarchy to make sure that your image are on top of the correct layers
Setup your trait rarity if you want to make certain traits more rare than others
Setup your rules to make sure that your traits will only appear if the certain rules are met
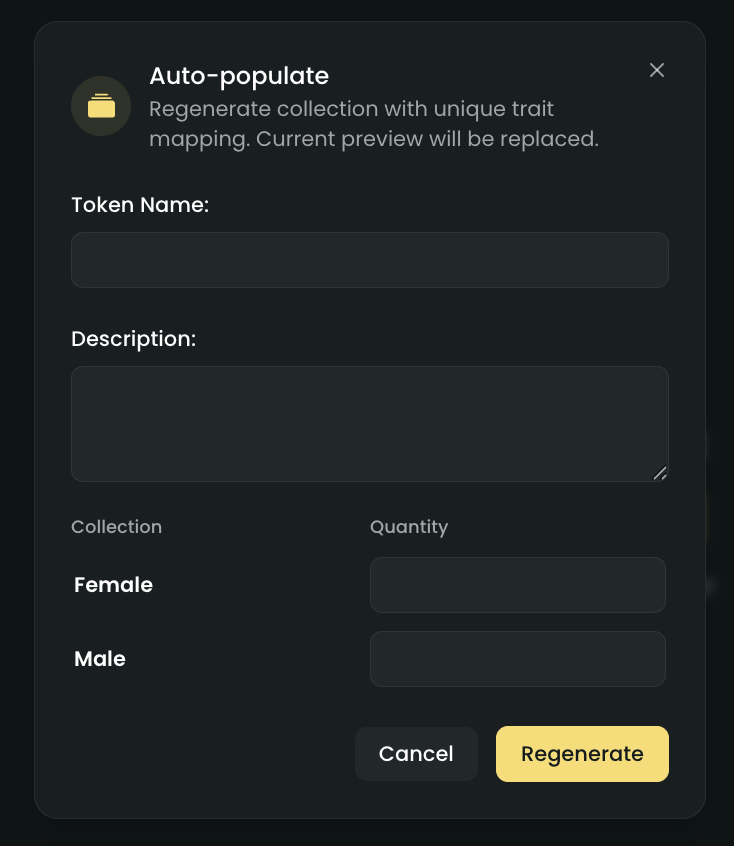
Set the **token name, description, and quantity** for each collection and generate your NFTs
The maximum quantity is determined by multiplying the number of traits in each layer together.
E.g, if you have 3 layers with 4, 5, and 6 traits respectively:\
Maximum Quantity = 4 × 5 × 6 = 120
Optional: Add 1 of 1s
Finalize your preview
Publish your art project.
You will need to have atleast one asset generated to publish your art project
### Video tutorial
***
## Generative folder structure
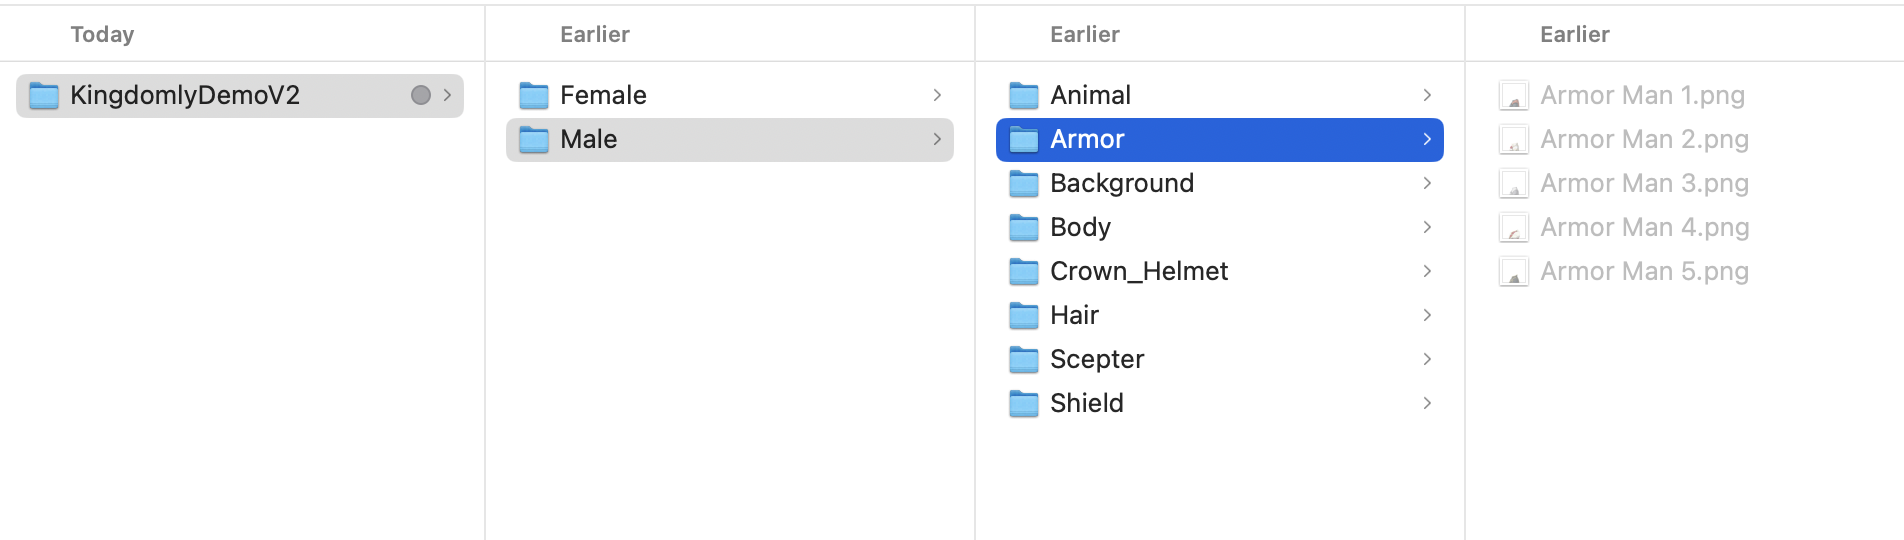
The folder structure for a generative art project is as follows:
```
- collection_1
- layer_1
- trait_1.png
- trait_2.png
- layer_2
- trait_3.png
- trait_4.png
- collection_2 (optional)
- layer_1
- trait_1.png
- trait_2.png
- layer_2
- trait_3.png
- trait_4.png
```
**Warning:** Make sure that the **resolution of the traits are the same**. E.g. all ratio are set to 1:1
## Hierarchy setup
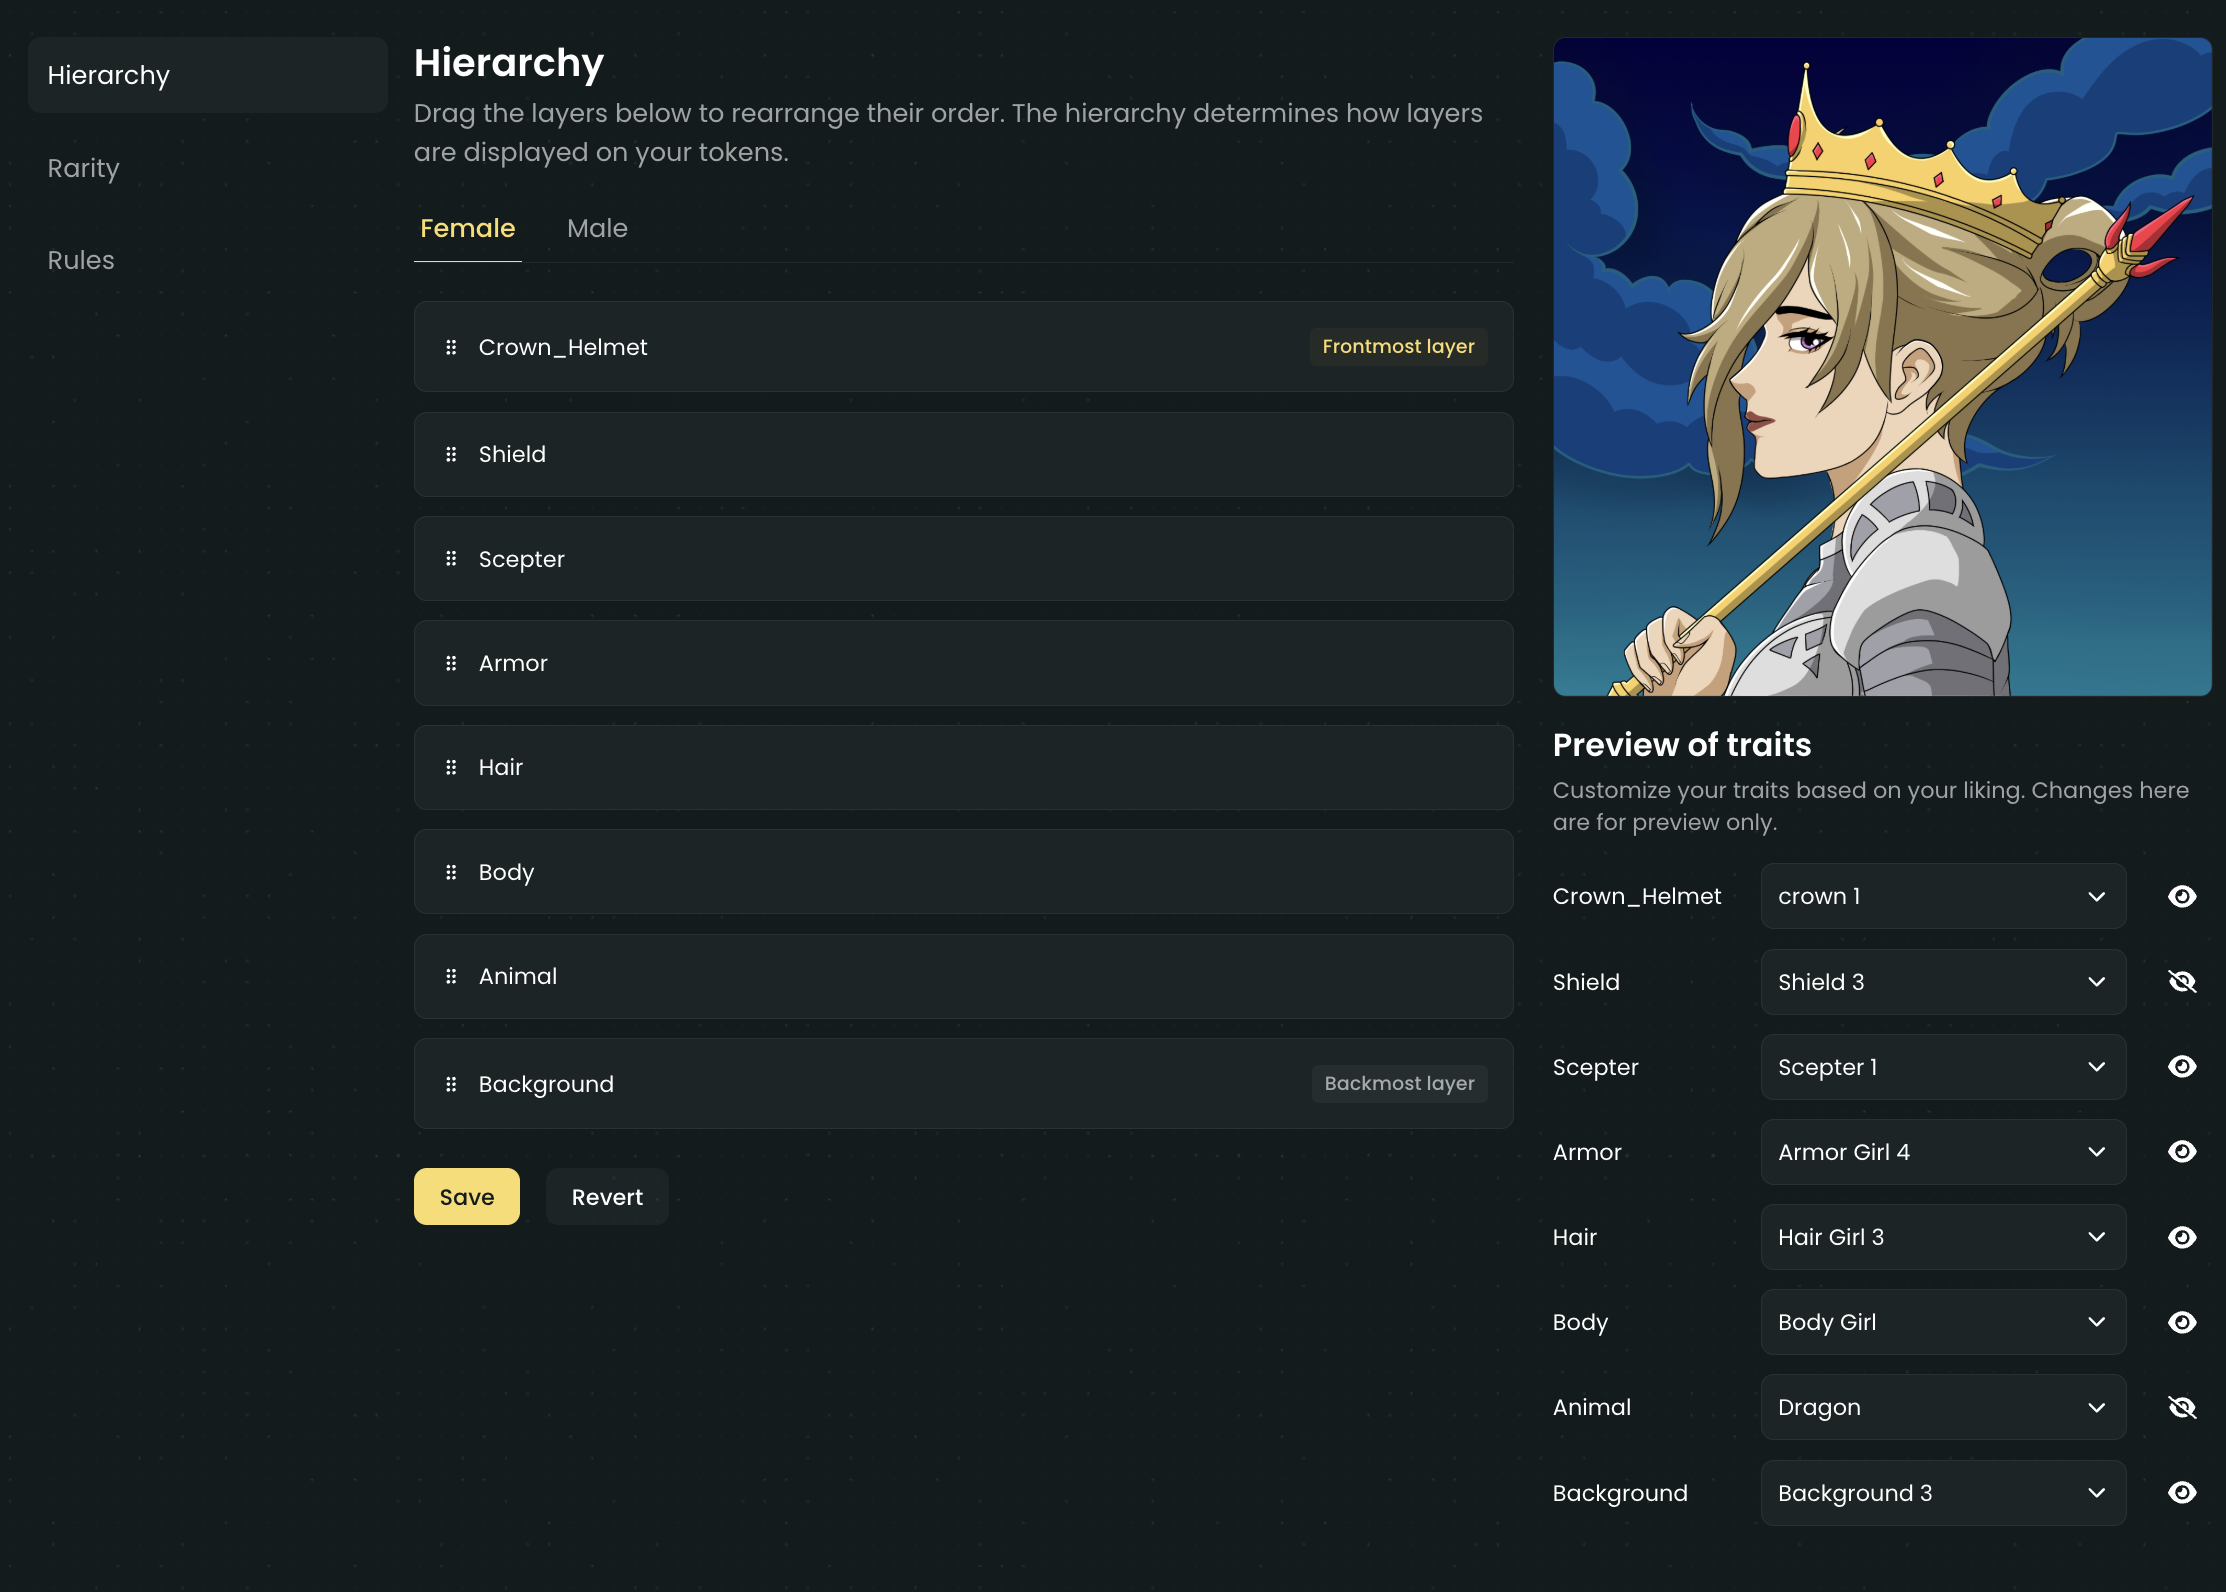
Hierarchy is important to make sure that your image are on top of the correct layers. You can setup your hierarchy by dragging and dropping the layers in the order you want.
To rename layers, you will need to go to the **rarity tab** and click on the **layer settings icon**. ""
**Hierarchy setup playbook:**
* **Folder structure** is important. Make sure that the **folder** and **file names** are final so that you will not need to bother with renaming them.
* The **first layer** is the **frontmost layer**. This layer will be the one that appears on top of the other layers.
* The **last layer** is the **backmost layer**. This layer will be the one that appears on the bottom of the other layers.
* Play around with the **trait preview** to ensure that all of your **traits** match the **layer hierarchies**. You can **select** or **hide** any trait and see how it looks on the preview.
* **Hierarchy** for each **collection** will be independent of each other. Double check the **collection tabs** and see if the hierarchy is set for each collection.
* Do not forget to **save your hierarchy** after you have set it up.
## Rarity setup
Rarity is important to make sure that your traits are distributed correctly across the collection. To edit the rarities of your traits in a generative art project, follow these steps:
Go to the **Rarity** tab in your project dashboard.
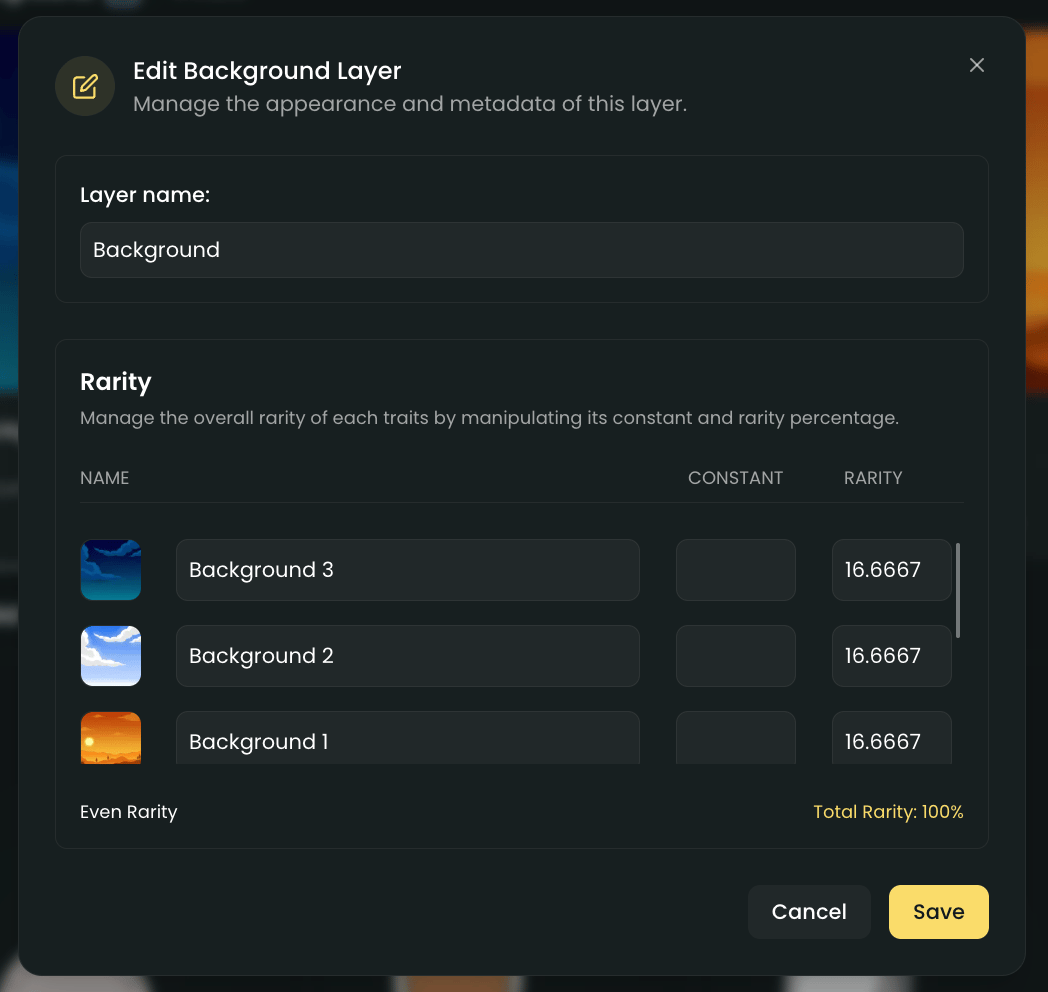
Find the layer you want to edit. Open the layer menu by clicking on the three dots or settings icon next to the layer name.
Click on **Edit Layer** to open the layer settings.
In the layer settings, you will see a list of traits. For each trait, set the desired rarity percentage or weight. This determines how often each trait will appear in your generated NFTs.
Make sure the total rarity for all traits in a layer adds up to 100 percent or the correct total weight, depending on the collection plan.
Optional: Utilize the **Constant** option to set a rarity cap for that specific trait.
The constant setting is not a sure fire way to guarantee a trait to appear in your collection. It is a way to limit the number of times a trait can appear randomly.
Save your changes to apply the new rarities.
Your updated rarities will now be used when re/generating your collection.To rename traits, you will need to go to the **rarity tab** and click on the **trait settings icon**.Adding layers/traits will set the rarity settings back to default. You will need to set them again.
**Rarity setup playbook:**
* Make sure the **total rarity** for all traits in a layer adds up to **100 percent** or the correct **total weight**, based on your collection plan.
* The **constant** setting does not guarantee that a trait will appear in your collection. It only limits how many times a trait can appear randomly.
* Create and follow a clear **rarity plan**. Keep it simple, as overly complex rarity settings can cause some traits to not appear in your collection.
* If the **rarity** and **rules** are not set correctly, a trait may not show up in your collection.
* Keep in mind that **art generation** is random. The **rarity setting** is a guide and does not guarantee an exact percentage.
* Make sure to **finalize your layers and traits before you setup your rarity settings**. Adding layers/traits will set the rarity settings back to default and you will need to set rarity settings again.
* **Rarity** for each **collection** will be independent of each other. Double check the **collection tabs** and see if the rarity is set for each collection.
* Always **save your changes** to ensure your new rarities are applied upon re/generating your collection.
## Rules setup
Rules is the final piece of the puzzle for your generative art project. Setting up your rules correctly will ensure that some traits are going to appear according to the rules you have set.
To edit the rules of your generative art project, follow these steps:
Go to the **Rules** tab in your project dashboard.
Select the collection you want to edit. (If you have multiple collections)
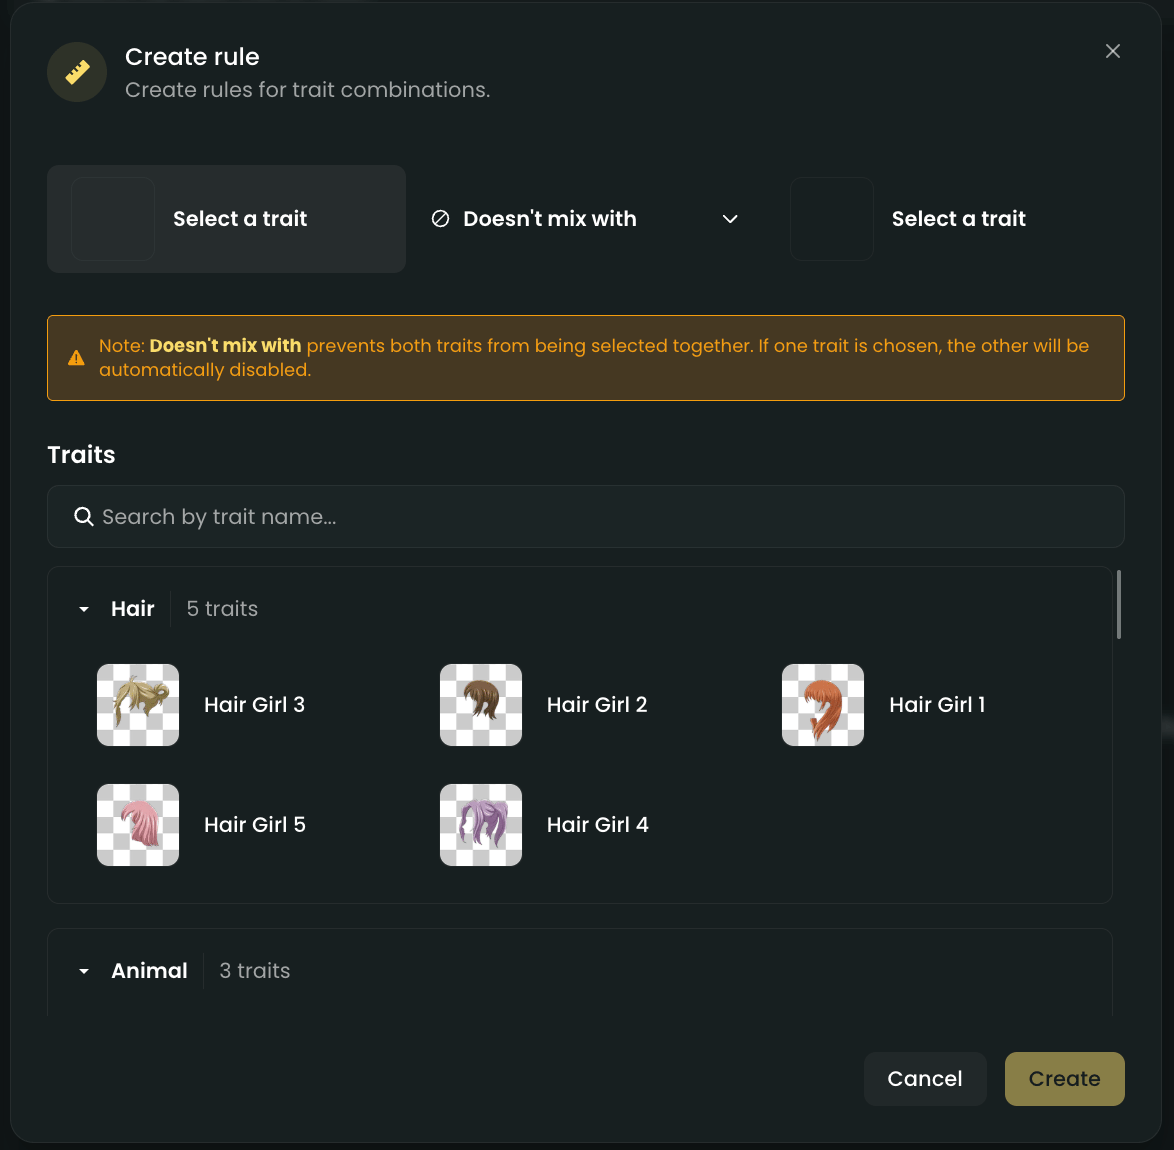
Click on **Add Rules** to open the rules settings.
Select first the rule you want to add.
Rule options are: **Doesnt mix with, Must pair with, and Always pairs with**
Select the trait you want to add the rule to, and select the other traits you want to apply the rule to.
Doesnt pair with will allow you to select multiple traits, but Always and Must pair with will only allow you to select one trait.
Hit create to add the rule.
Your updated rarities will now be used when re/generating your collection.
### Rule types:
* **Doesn't mix with:** This rule will **prevent** the trait you add the rule to from **appearing together** with the selected traits.\
Example: If you set "Red Hat" to not mix with "Blue Shirt", then no generated artwork will have both "Red Hat" and "Blue Shirt" at the same time.
* **Must pair with:** This rule will **ensure** that the trait you add the rule to will **always appear together** with the selected trait.\
Example: If you set "Sunglasses" to must pair with "Yellow Scarf", then every time "Sunglasses" appears, "Yellow Scarf" will also appear in that artwork.
* **Always pairs with:** This rule will **strictly require** that the trait you add the rule to will **only appear together** with the selected trait, and never separately.\
Example: If you set "Robot Arm" to always pair with "Metal Body", then "Robot Arm" will only ever show up when "Metal Body" is present, and never with any other body type
### **Rules Setup Playbook:**
* Make sure to **finalize** your **layers** and **traits** before you set up your **rules**.
* **Rules** for each **collection** are **independent** of each other. Double-check the **collection tabs** to ensure the **rules** are set for each **collection**.
* Try not to overuse **Must Pair With** and **Always Pairs With**. It is better to use **Doesn't Mix With**, since **Must Pair With** and **Always Pairs With** are strict rules and will limit the number of **traits** that can appear in your **collection**.
* You can add a **"None" trait** (a blank image) and use it to prevent a trait from mixing with anything else.
* **Always Pairs With** ensures that two **traits** are always selected together. If one **trait** is chosen, the paired **trait** will always be selected as well.
* You can add as many **rules** as you want, but you will need to add them **one by one**.
* Always **save your changes** to ensure your new **rules** are applied when you re/generate your **collection**.
* Experiment with re/generating your **collection** to see how the **rules** are applied.
If you find any bugs with the rules setup, please open a ticket on our Discord and send the link to your art project.
 ### Rule types:
* **Doesn't mix with:** This rule will **prevent** the trait you add the rule to from **appearing together** with the selected traits.\
### Rule types:
* **Doesn't mix with:** This rule will **prevent** the trait you add the rule to from **appearing together** with the selected traits.\