> ## Documentation Index
> Fetch the complete documentation index at: https://docs.kingdomly.app/llms.txt
> Use this file to discover all available pages before exploring further.
# Mint groups
> Also known as mint phases.
## Overview
Mint groups allow you to organize your collection into different phases with independent settings. Each mint group can have its own whitelist, mint price, supply allocation, and start time, giving you complete control over your minting strategy.
### Flexibility and deployment states
Kingdomly provides flexibility in managing mint groups regardless of your contract deployment status:
**Before contract deployment:**
* Create and publish mint groups for display purposes
* Set tentative pricing and supply allocations
* Whitelists cannot be set until after contract deployment, this means that people will not see they are eligible for the mint yet.
**After contract deployment:**
* Add whitelists to your mint groups
* Finalize pricing and supply settings that is directly linked to the contract
* All group configurations become active and enforceable, users can now see they are eligible for the mint
* Continue editing, adding, or removing groups as needed
This approach allows you to prepare your mint strategy early while maintaining the ability to make adjustments throughout your project lifecycle.
### Adding mintgroups
Adding mint groups allows you to control who can mint your collection. You can add mintgroups by following the steps below:
Go to the mint groups tab
Click add mint group
Fill in the mint group name and description
**Optional:** Fill in the mint group price and supply
Set the visibility of the mint group and hit save.
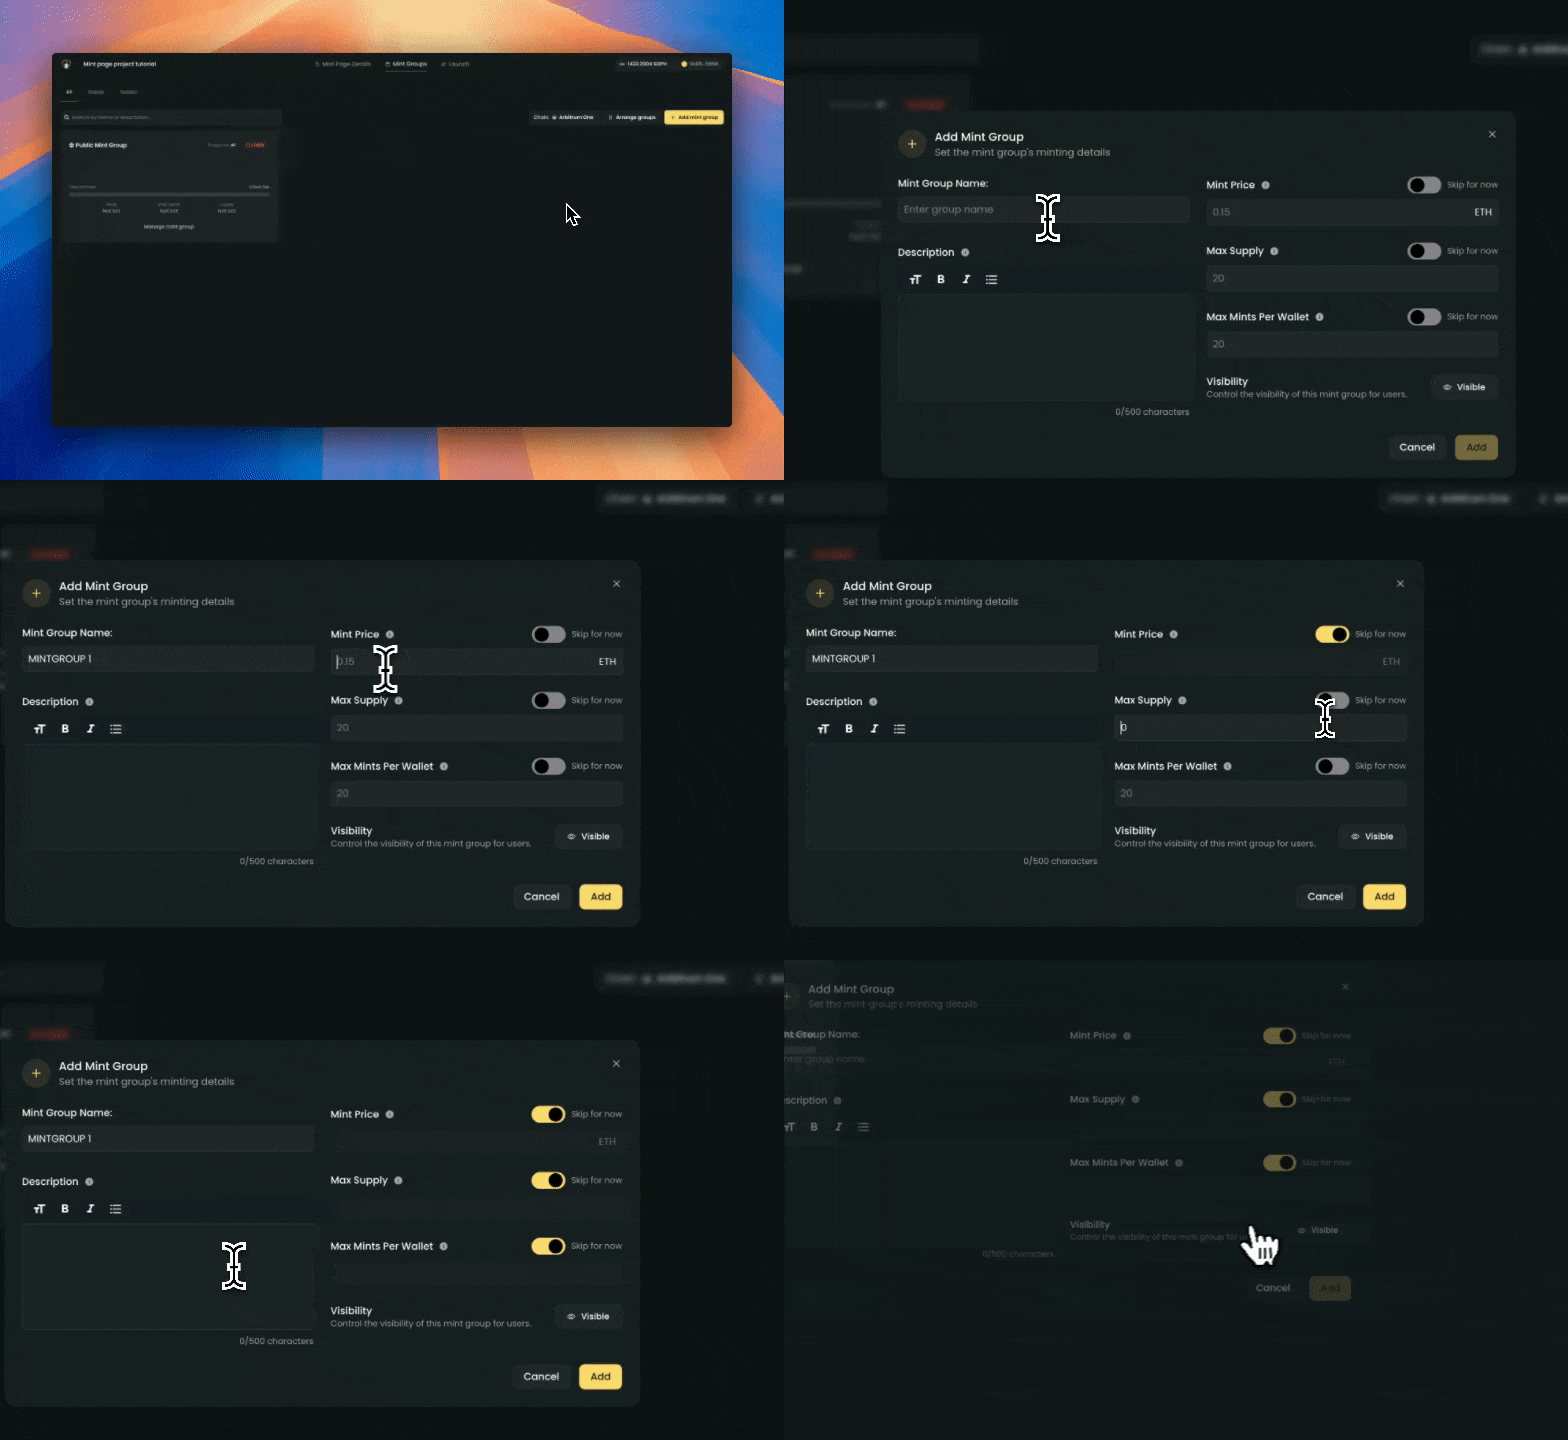 This is in an **undeployed state**, we can skip for now but it needs to be finalized before contract deployment. (It will still be able to be edited once deployed)
Video might show "max mints per wallet" but this will be deprecated in the future.
**What does this look like on the mint page**
What you set is what you see on the mint page. The only difference is that the mint price and supply are not linked to a contract yet.
This is in an **undeployed state**, we can skip for now but it needs to be finalized before contract deployment. (It will still be able to be edited once deployed)
Video might show "max mints per wallet" but this will be deprecated in the future.
**What does this look like on the mint page**
What you set is what you see on the mint page. The only difference is that the mint price and supply are not linked to a contract yet.
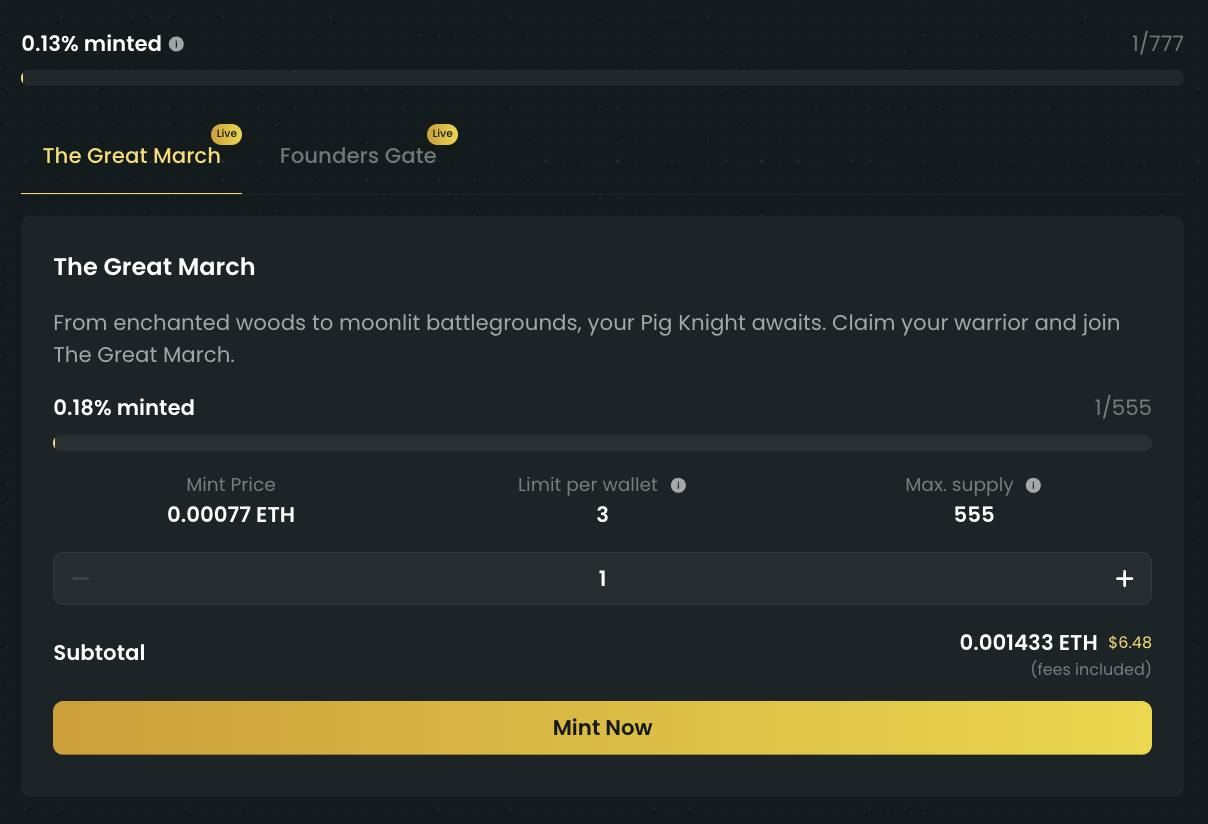 **Update:** Undeployed mint groups will not be visible on the mint page without a mint gate connected.
### Finalizing mint allocation and contract details
Finalizing mint group details and alloocation allows you to control the mint price and supply for your collection. You can finalize mint group details and alloocation by following the steps below:
Go to launch tab
Fill in the contract symbol (limited to 8 characters)
Set the mint fee and royalty fee payout address (connected wallet is the default)
You can connect a smart wallet to these fields so that when you withdraw funds, the funds will be sent to your safe.
Set the secondary sales royalty percentage.
Select the chain to deploy on
Testnets are going to be on a different domain in the future. ([https://testnets.kingdomly.app](https://testnets.kingdomly.app))
Set supply and price for each mint group
Max mints per wallet is going to be deprecated in the future.
Finalize check your allocation and hit continue.
You can not exceed the total supply of your collection. The total supply is linked from the art project connected to your mint page.
**Update:** Undeployed mint groups will not be visible on the mint page without a mint gate connected.
### Finalizing mint allocation and contract details
Finalizing mint group details and alloocation allows you to control the mint price and supply for your collection. You can finalize mint group details and alloocation by following the steps below:
Go to launch tab
Fill in the contract symbol (limited to 8 characters)
Set the mint fee and royalty fee payout address (connected wallet is the default)
You can connect a smart wallet to these fields so that when you withdraw funds, the funds will be sent to your safe.
Set the secondary sales royalty percentage.
Select the chain to deploy on
Testnets are going to be on a different domain in the future. ([https://testnets.kingdomly.app](https://testnets.kingdomly.app))
Set supply and price for each mint group
Max mints per wallet is going to be deprecated in the future.
Finalize check your allocation and hit continue.
You can not exceed the total supply of your collection. The total supply is linked from the art project connected to your mint page.
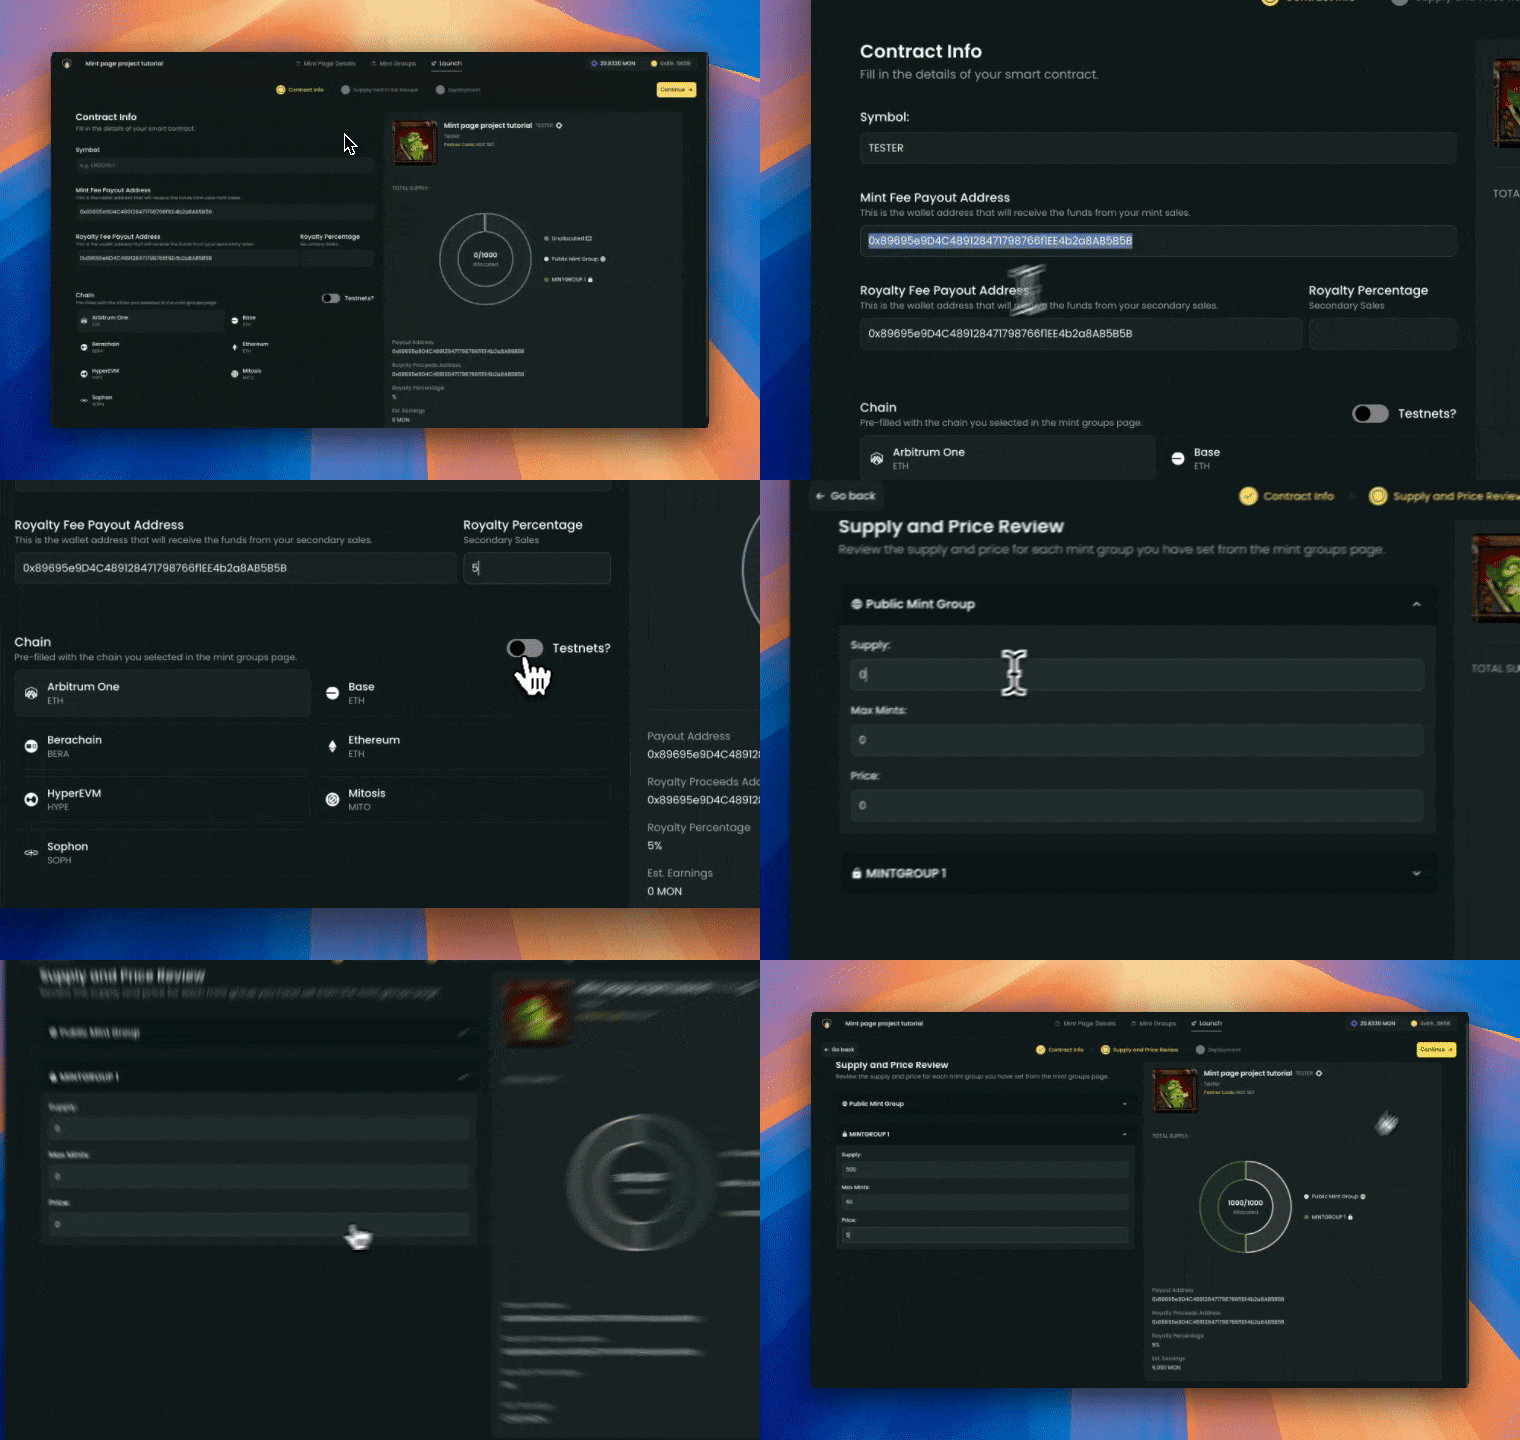 **What you need to know about finalizing mint allocation and contract details:**
* The **contract Notermation** that you set here is **permanent once deployed**.
* You **can not exceed the total supply** of your collection.
* The **total supply is linked** from the art project connected to your mint page.
* If you plan to **airdrop NFTs** you must **allocate spare supply** to your total supply.
* The **sum of all mint groups** can not exceed the total supply of your collection but **can be less**.
### Manging mint groups
Managing mint groups will vary depending on your **contract deployment status**. For the following guide, we will explain how to manage mint groups with a **deployed contract scenario**. If you have not deployed yet, features like **adding whitelists**, **starting mint live**, and **editing mint groups** will not be available.
Go to the **mint groups tab**
Click on **manage mint group** of the mint group you want to manage
To edit mint group details, click on **Edit mint group**
Set the details you want and hit **save**.
Each value changed on the right side will reflect **one transaction on the blockchain**. Please make sure to have enough funds to cover the transaction fees.
To make the mint group live, click on **Start mint live**
This will ask for your confirmation on your wallet.
Optional: Set **mint group live timestamp** by clicking on the clock icon next to the start mint live button.
This will tell the contract to **enable users to mint** from this mint group if the timestamp has been passed.
**What you need to know about finalizing mint allocation and contract details:**
* The **contract Notermation** that you set here is **permanent once deployed**.
* You **can not exceed the total supply** of your collection.
* The **total supply is linked** from the art project connected to your mint page.
* If you plan to **airdrop NFTs** you must **allocate spare supply** to your total supply.
* The **sum of all mint groups** can not exceed the total supply of your collection but **can be less**.
### Manging mint groups
Managing mint groups will vary depending on your **contract deployment status**. For the following guide, we will explain how to manage mint groups with a **deployed contract scenario**. If you have not deployed yet, features like **adding whitelists**, **starting mint live**, and **editing mint groups** will not be available.
Go to the **mint groups tab**
Click on **manage mint group** of the mint group you want to manage
To edit mint group details, click on **Edit mint group**
Set the details you want and hit **save**.
Each value changed on the right side will reflect **one transaction on the blockchain**. Please make sure to have enough funds to cover the transaction fees.
To make the mint group live, click on **Start mint live**
This will ask for your confirmation on your wallet.
Optional: Set **mint group live timestamp** by clicking on the clock icon next to the start mint live button.
This will tell the contract to **enable users to mint** from this mint group if the timestamp has been passed.
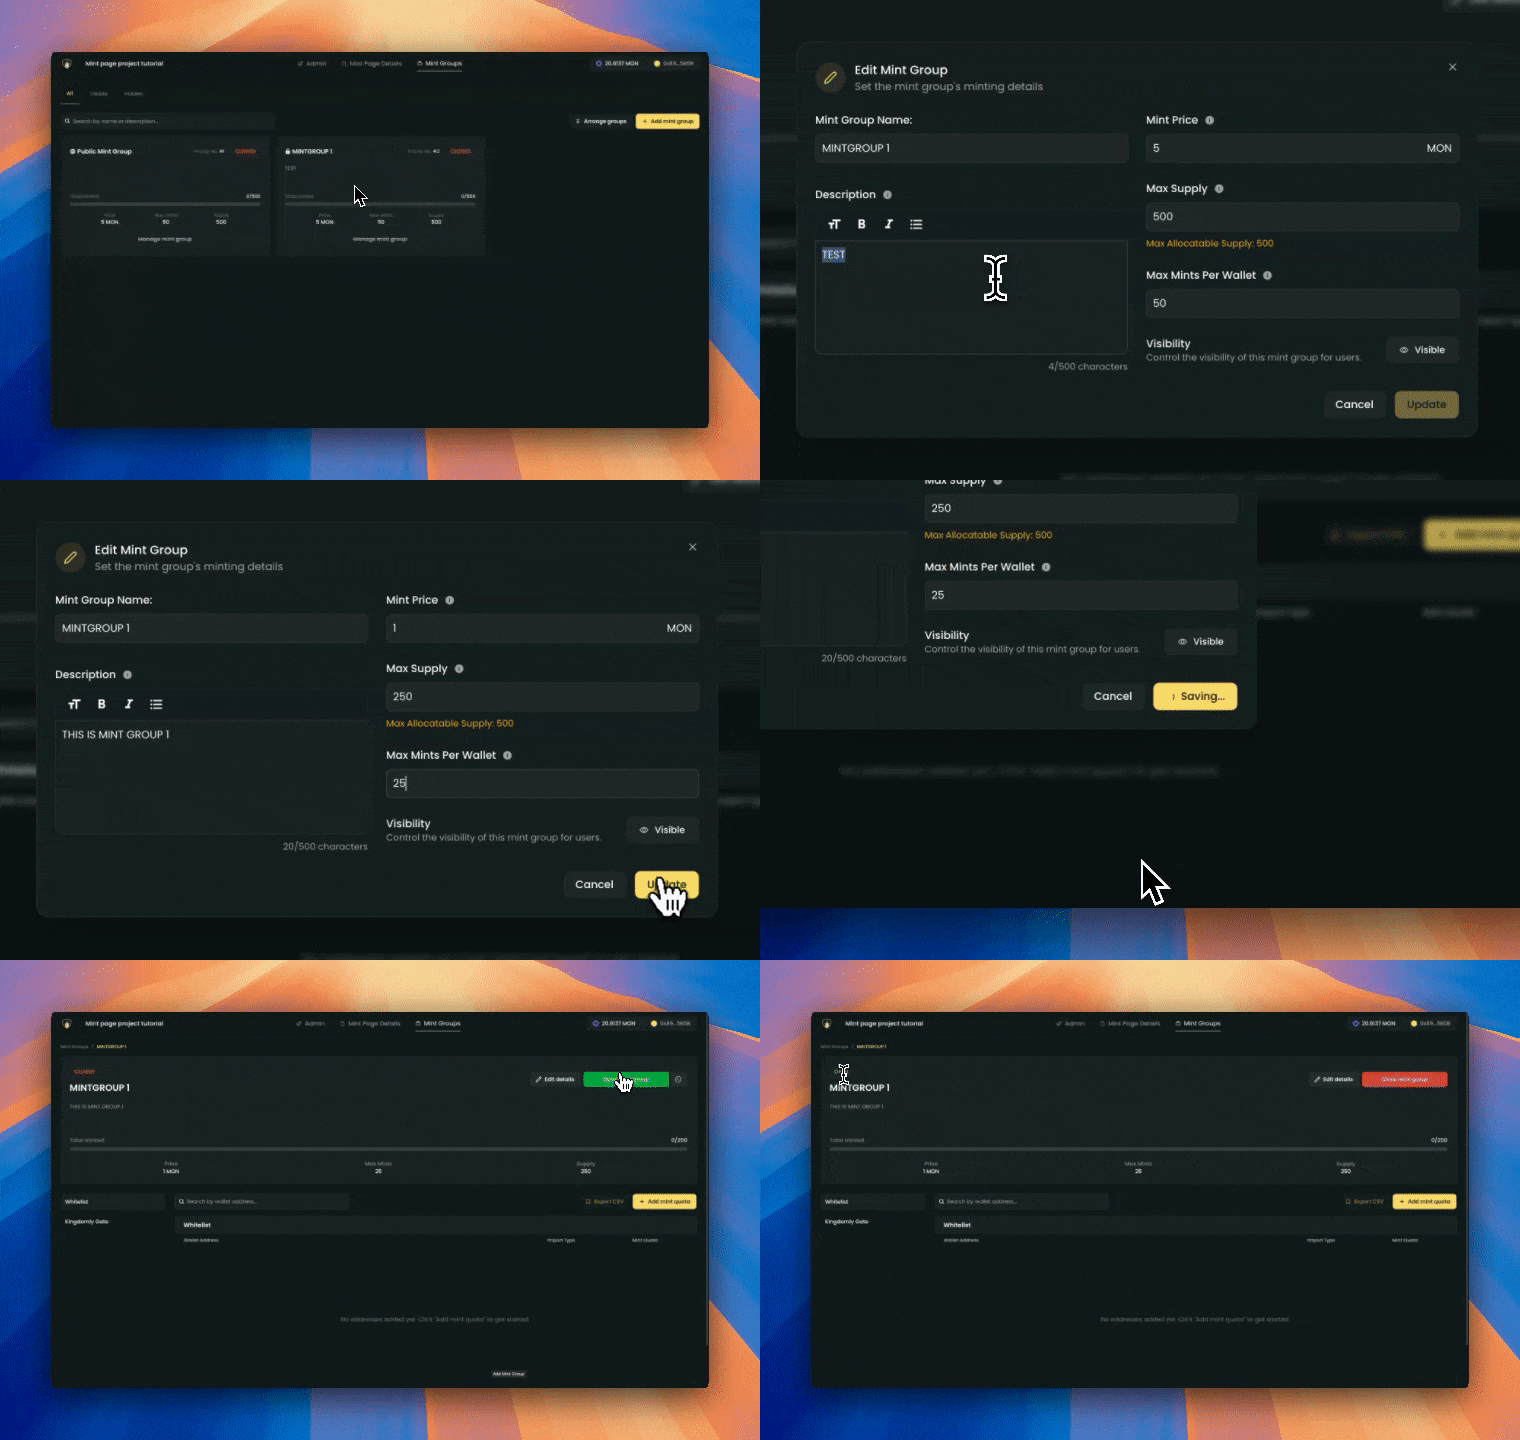 **What you need to know when managing mint groups:**
* You can set the **mint group live time in advance**. The time set is based on your **LOCAL TIMEZONE**.
* Changing **mint price**, **supply**, and **max mints per wallet** (will be deprecated in the future) will reflect **one transaction on the blockchain**. Please make sure to have enough funds to cover the transaction fees.
* **Setting mint group live** is different from **start mint live**. Setting mint group live only opens the specific mint group for minting. You will still need to start mint live to start minting (think of it as a **2 way switch**)
### Managing whitelists
Allow users to mint from a specific mint group by adding them in the whitelists.
There are 2 ways to add whitelists:
1. Add whitelist by collection snapshot. E.g. "Whitelist all holders of \[collection]"
2. Add whitelist by csv.
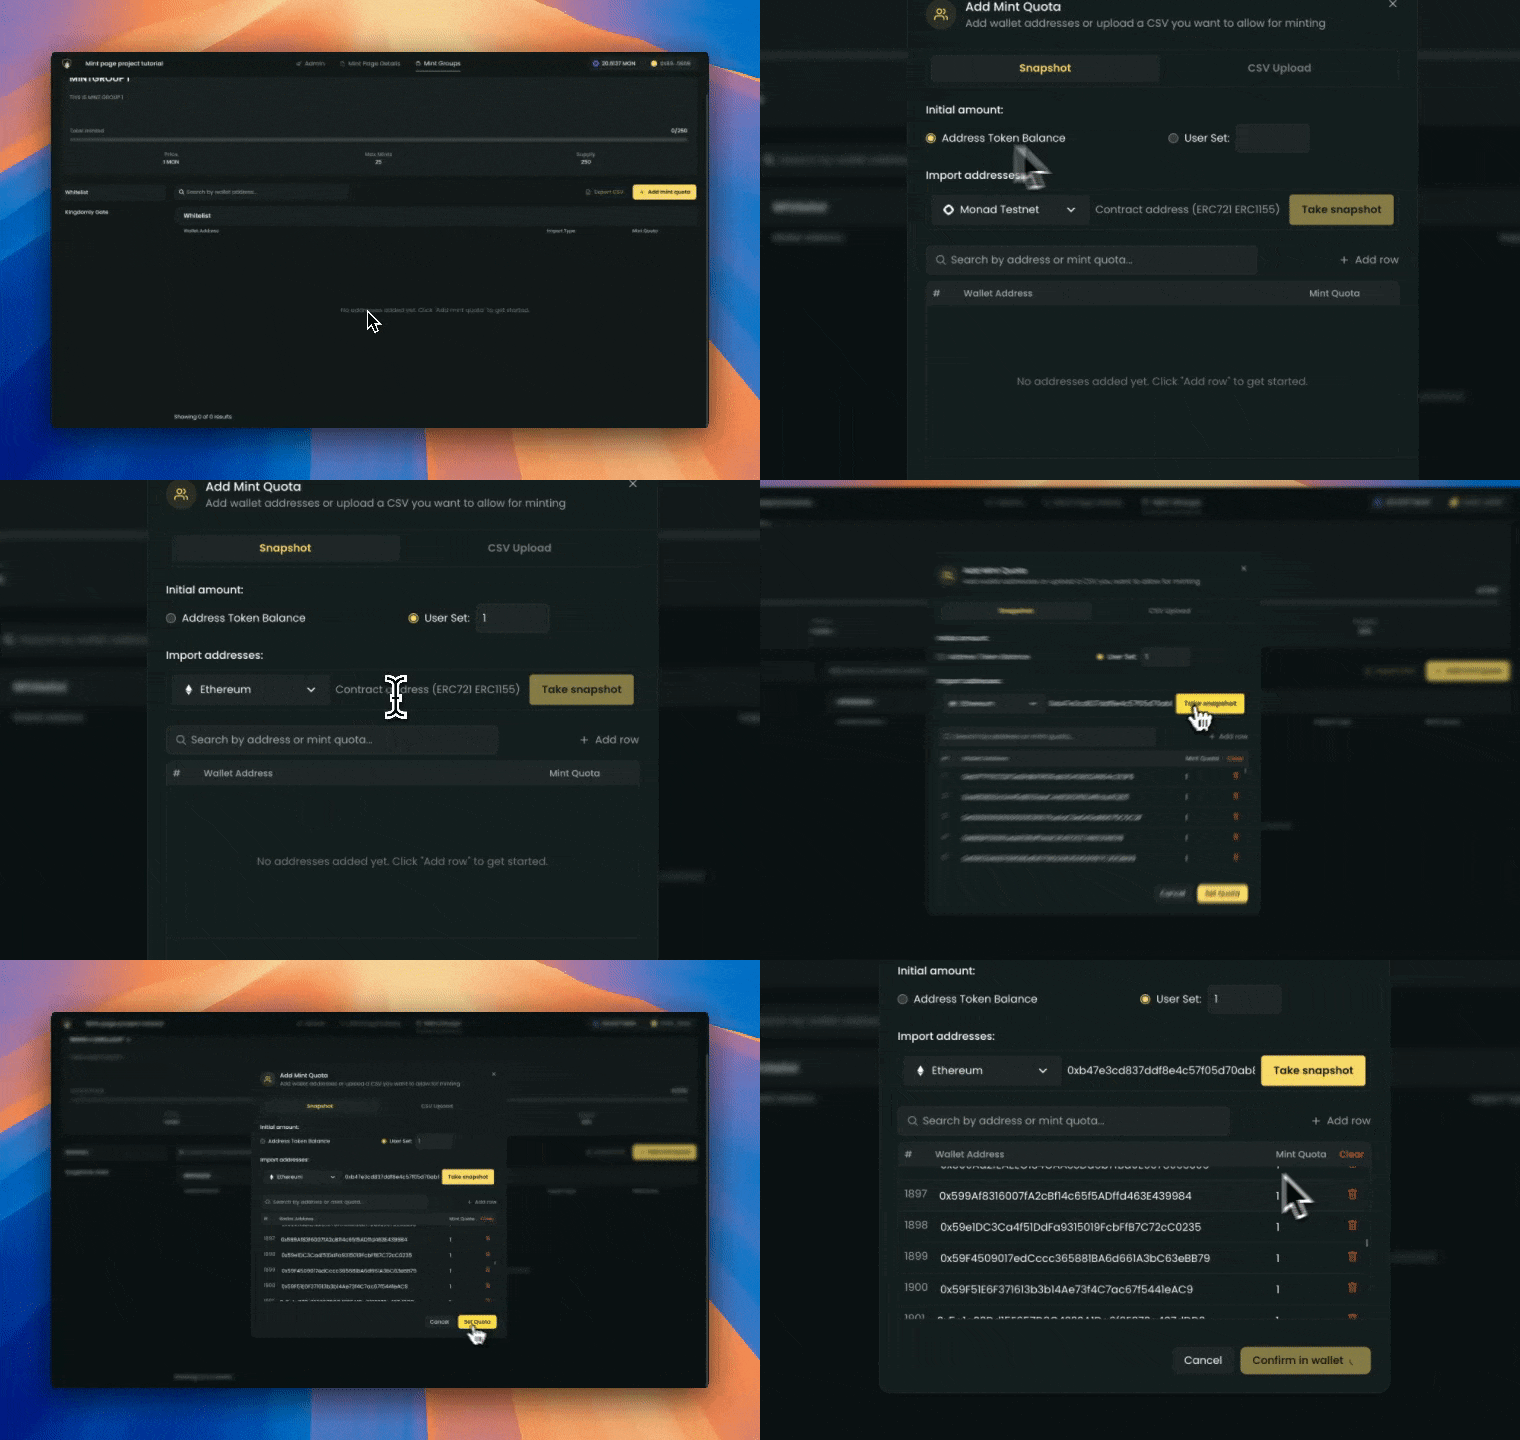
**How to add whitelist by collection snapshot:**
Click on **Add mint quota**
Set the **initial amount option**
Initial amount is the number of mint quota we will allocate for each address when the snapshot is taken.
E.g: If its set to **Address Token Balance**, the mint quota for each address will depend on the number of tokens they hold. And if its **User set** then you can set the initial amount for each address.
Click on **Add whitelist**
To make sure that the transaction is successful, transactions will be batched depending on the number of addresses you are adding. (**1000 addresses per transaction**)
Set the whitelist details and hit **save**.
**What you need to know when managing mint groups:**
* You can set the **mint group live time in advance**. The time set is based on your **LOCAL TIMEZONE**.
* Changing **mint price**, **supply**, and **max mints per wallet** (will be deprecated in the future) will reflect **one transaction on the blockchain**. Please make sure to have enough funds to cover the transaction fees.
* **Setting mint group live** is different from **start mint live**. Setting mint group live only opens the specific mint group for minting. You will still need to start mint live to start minting (think of it as a **2 way switch**)
### Managing whitelists
Allow users to mint from a specific mint group by adding them in the whitelists.
There are 2 ways to add whitelists:
1. Add whitelist by collection snapshot. E.g. "Whitelist all holders of \[collection]"
2. Add whitelist by csv.
**How to add whitelist by collection snapshot:**
Click on **Add mint quota**
Set the **initial amount option**
Initial amount is the number of mint quota we will allocate for each address when the snapshot is taken.
E.g: If its set to **Address Token Balance**, the mint quota for each address will depend on the number of tokens they hold. And if its **User set** then you can set the initial amount for each address.
Click on **Add whitelist**
To make sure that the transaction is successful, transactions will be batched depending on the number of addresses you are adding. (**1000 addresses per transaction**)
Set the whitelist details and hit **save**.
 **How to add whitelist by csv:**
Click on **Add mint quota**
Select CSV Upload
Upload your CSV file
**Your CSV file should follow this format:**
(address, amount)
| | |
| ------------------------------------------ | - |
| 0x1Ab5A783FD275ABB49b59e6409C1ba0BDbd45f04 | 5 |
| 0x95E82486fD030F3615725e8a62004788E4e1C592 | 3 |
| 0xE7c2a733983886D5eCD446886A5C13120286150a | 1 |
Make sure your CSV file has exactly two columns: **Address** (wallet addresses) and **Amount** (mint quota for each address).
Please make sure that all addresses here are valid EVM addresses. Failure to comply will result the batch to fail.
Click on **Add whitelist**
To make sure that the transaction is successful, transactions will be batched depending on the number of addresses you are adding. (**1000 addresses per transaction**)
### What you need to know when managing mint whitelists:
* You can add **whitelists** by **collection snapshot** or **CSV upload**.
* **Mint quota** is the number of NFTs that each address is allowed to mint.
* **Whitelists** are independent from each **mint group**, allowing you to customize access for different phases.
* Always verify that the addresses you are adding are **valid EVM addresses**. **Invalid addresses** will cause the entire batch to fail.
* The **CSV format** for adding whitelists must follow this structure: **(address, amount)** with exactly **two columns**.
* **Whitelist transactions** are processed in batches of **1000 addresses per transaction** to ensure successful execution.
* You can **modify** or **remove** whitelist entries after they have been added if needed.
* Setting whitelists for existing addresses will **overwrite** the existing **mint quota**.
* **Whitelist settings** take effect immediately once the transaction is confirmed on the **blockchain**.
* You can export a csv of the whitelists uploaded by clicking on the **Export** button.
**How to add whitelist by csv:**
Click on **Add mint quota**
Select CSV Upload
Upload your CSV file
**Your CSV file should follow this format:**
(address, amount)
| | |
| ------------------------------------------ | - |
| 0x1Ab5A783FD275ABB49b59e6409C1ba0BDbd45f04 | 5 |
| 0x95E82486fD030F3615725e8a62004788E4e1C592 | 3 |
| 0xE7c2a733983886D5eCD446886A5C13120286150a | 1 |
Make sure your CSV file has exactly two columns: **Address** (wallet addresses) and **Amount** (mint quota for each address).
Please make sure that all addresses here are valid EVM addresses. Failure to comply will result the batch to fail.
Click on **Add whitelist**
To make sure that the transaction is successful, transactions will be batched depending on the number of addresses you are adding. (**1000 addresses per transaction**)
### What you need to know when managing mint whitelists:
* You can add **whitelists** by **collection snapshot** or **CSV upload**.
* **Mint quota** is the number of NFTs that each address is allowed to mint.
* **Whitelists** are independent from each **mint group**, allowing you to customize access for different phases.
* Always verify that the addresses you are adding are **valid EVM addresses**. **Invalid addresses** will cause the entire batch to fail.
* The **CSV format** for adding whitelists must follow this structure: **(address, amount)** with exactly **two columns**.
* **Whitelist transactions** are processed in batches of **1000 addresses per transaction** to ensure successful execution.
* You can **modify** or **remove** whitelist entries after they have been added if needed.
* Setting whitelists for existing addresses will **overwrite** the existing **mint quota**.
* **Whitelist settings** take effect immediately once the transaction is confirmed on the **blockchain**.
* You can export a csv of the whitelists uploaded by clicking on the **Export** button.